Do we know what teachers want and does it really matter?
Among school IT managers we often talk about providing secure and stable systems. Good IT service can be objectively qualified through ITIL and other approaches. But in an educational setting, understanding the IT needs and desires of users, who are predominantly teachers, is essential. Relationships between IT support staff and teachers can become siloed and confrontational without a strong understanding of what teachers expect from IT. I porposed a model of what teachers want from IT, based on my tacit understanding, and refined this with teachers at various levels of responsibility. This post is the result.
What teachers want doesn’t constitute all that IT professionals need to do in educational institutions. Teachers are not usually aware of planning, testing or maintenance. They do not worry about technical policies, vendor engagement or documentation. Yet all these things are needed and indirectly affect teachers. The reason IT professionals need to understand what teachers want is so that we can work together in a way that makes sense.
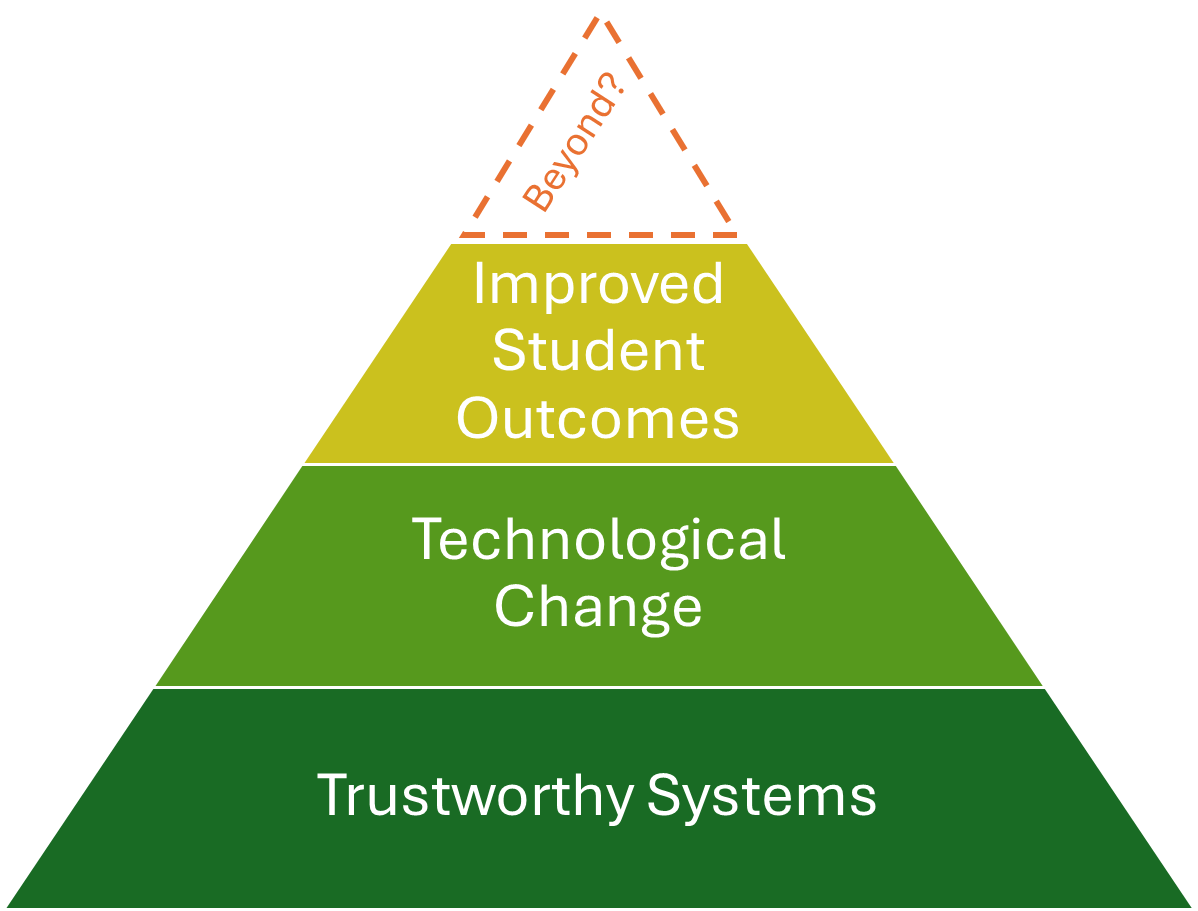
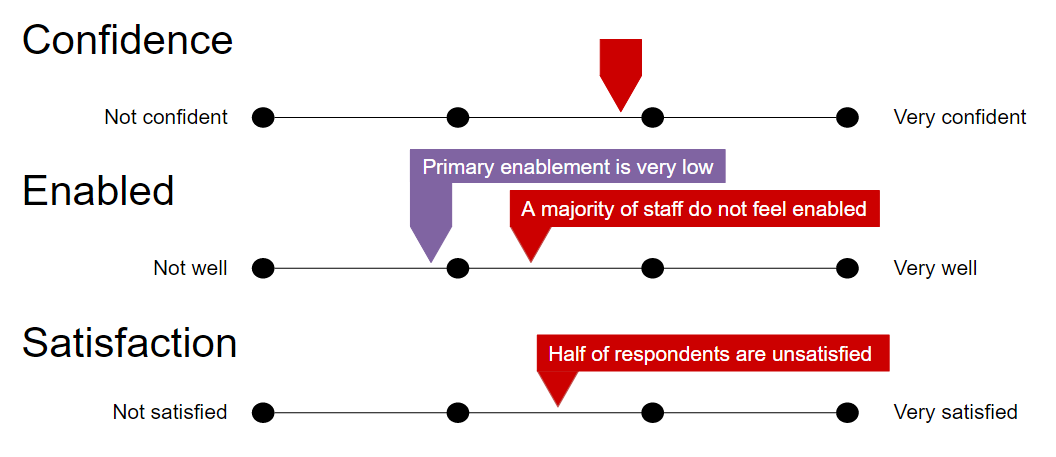
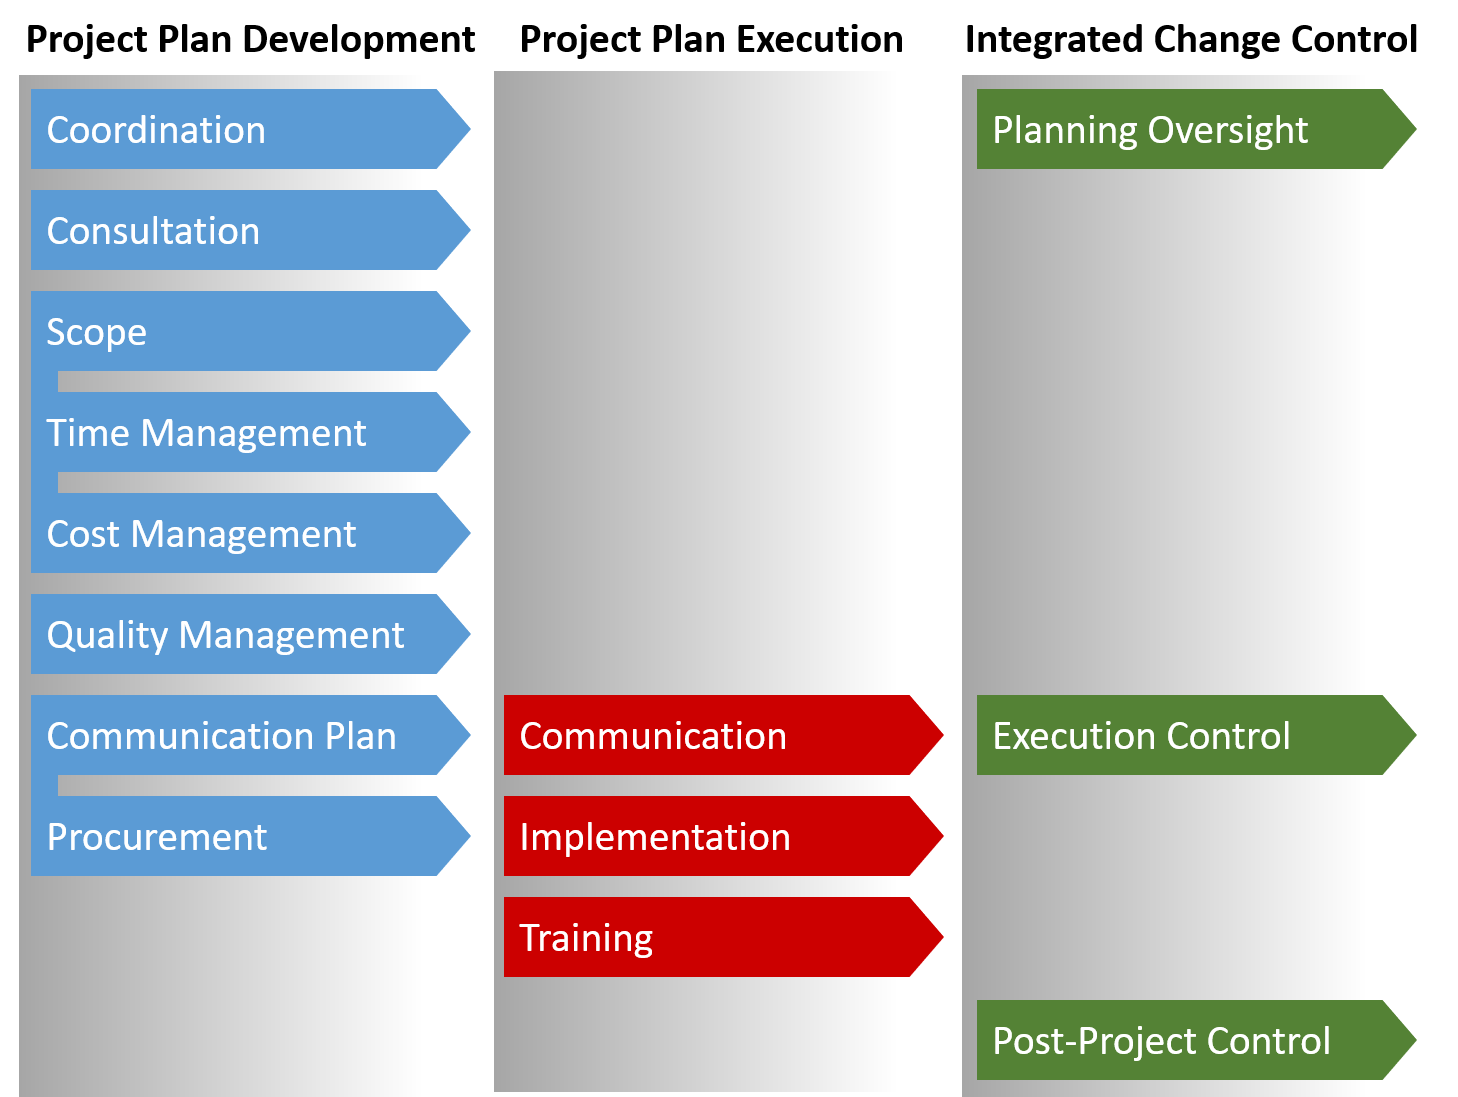
The relationship between teaching staff and an IT Team matures in stages. For example, IT staff may have an ingenious plan to improve student outcomes, but if teachers don’t trust IT systems, like AV in classrooms, they will not cooperate in such projects. Conversely, as IT teams deliver more trustworthy systems and successfully deliver change, teachers will be more likely to seek collaboration with IT staff on projects targeting student success. The following diagram depicts what teachers want in a graduated hierarchical sense. I don’t think teachers necessarily have this model in their mind, but I know that they won’t engage IT staff at higher levels if they are not satisfied with the lower levels first.
Trustworthy Systems
“Trust is earned in drops and lost in buckets.” (Attributed to multiple people)
When IT systems don’t work and this disrupts a teacher’s lesson plans, teachers lose trust in those systems. They will avoid using them or, when they can’t avoid them, they will become frustrated. It doesn’t matter to teachers whether the cause of an IT issue is infrastructure, the failing of the IT Team, an external provider or even the teaching staff themselves. Their focus is that they can’t do their job. If there is a series of issues over a period, not only will teachers distrust IT systems, they will also distrust IT staff to fix issues. They will also be less inclined to report issues, which compounds the problem.
Teaching staff want to walk into a classroom assuming their computer, the network, software and AV facilities will all work so they can deliver teaching. They are not interested in security, backups, system efficiency the latest update; the focus of teachers is student learning.
To improve trust, IT teams can do the following.
Work on general system stability more than system expansion, and encourage third-party providers to do the same.
Proactively monitor systems using dashboards and automation to detect problems before they are reported.
Encourage a culture of reporting among staff by verbally asking them to let you know when they spot issues. Make it easy to make reports. Repeat this regularly at meetings. Thank reporters for taking time to report (especially less confident staff, unsure if the issue is their fault).
Create a collaboration culture in the IT Team. I use the phrase “working alongside teachers” and encouraging IT staff to think of themselves indirectly as educators. I regularly discourage defensiveness about system issues.
Get out of the IT Office and into staffrooms, even when there are no problems. This gives staff opportunities to ask for assistance with unreported problems and increases visibility of the IT Team. I attend staff meetings to present IT matters, but also to put a face to the IT Team.
Work with school leaders to set realistic teacher expectations: IT systems are not going to work 100% of the time. Teachers need to be able to pivot their lesson plans when systems don’t work. Of course, any banked trust very quickly degrades with repeated or continuous outages.
Technological Change
Without trust in systems, teachers (particularly execs) will often try to drive technology change on their own. They may be motivated by a single third-party provider, rather than broad consultation. They may not consider scope, time, quality or communication, which leads to systems that are difficult to implement and integrate. The resulting systems are often ones that other teachers don’t feel they own and may resent using.
When the IT Team lead change without trustworthy systems, they will not have positive relationships they can draw on. Key stakeholders will not volunteer their time and system champions will not emerge.
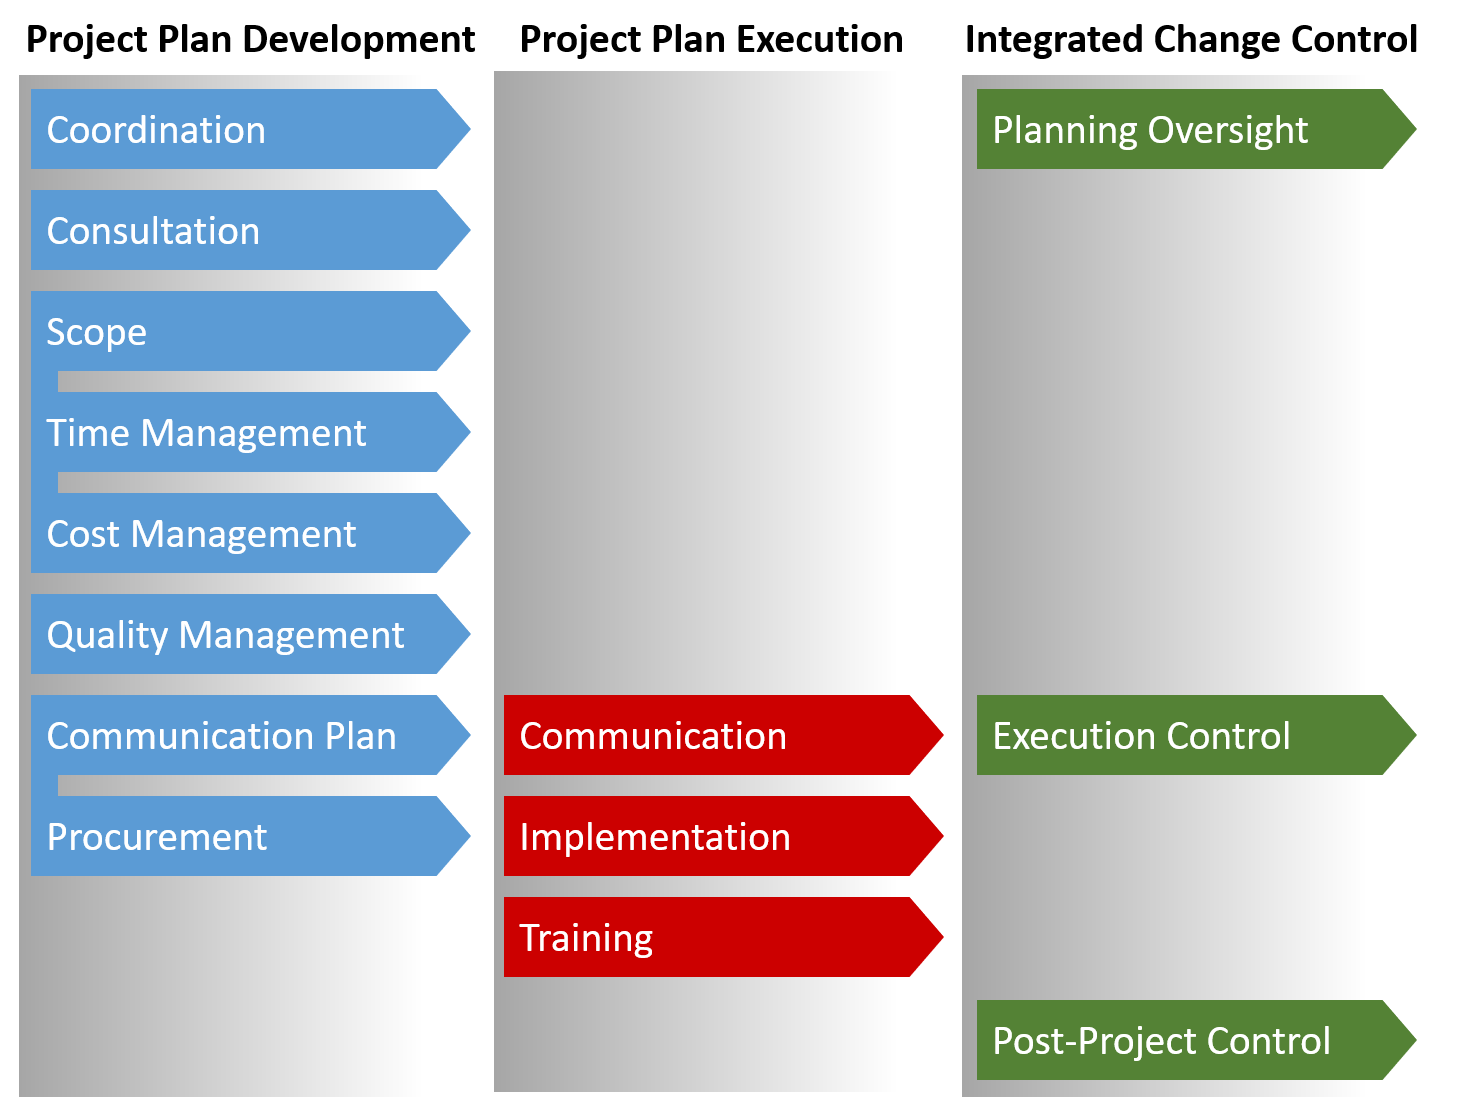
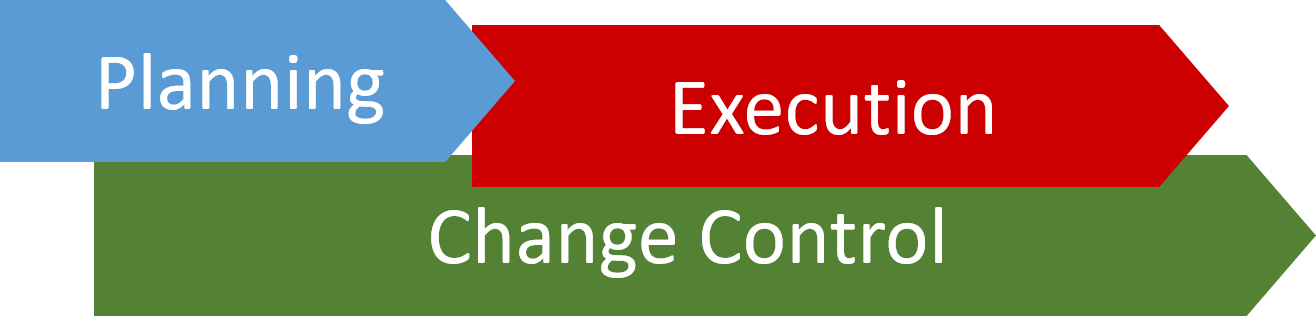
Once there is trust in systems, teachers are more likely to see the IT Team as partners in change. I’ve written about project management in schools previously, so I won’t repeat that here. To summarise, good EdTech project management requires planning, change control and execution. This approach can be scaled down for smaller projects, but for significant user-facing systems, like an LMS or SIS. Following such an approach greatly increases the chance of success.
From a teacher’s perspective, an unsuccessful technological change is one that causes them to change their teaching practices. If teachers need to recreate resources and lessons, resentment towards the system will build. If a new system doesn’t support a particular function efficiently, it will be seen as unsuccessful, even with gains elsewhere.
Ultimately, the target is to bring about suitable systems that teachers feel they own. Realistic expectations are important before they use the system. Successful IT change occurs when the following are in place.
A scalable, easy-to-follow change process with tangible instruments, such as planning templates, gives teachers confidence to be involved.
Consultation to with key stakeholders to develop appropriate requirements, which leads to a sense of user ownership.
Encourage system owners to become system champions, keen to promote systems that benefit teaching staff.
Communication that sets expectations of benefits for staff, so when change comes they will pay attention.
Improved Student Outcomes
With trusted systems in place and a number of successful change projects completed, the relationship between teachers and the IT Team can develop into one that allows collaboration on teacher’s primary goal: improved student outcomes.
Outcomes include student academic grades, but are not limited to those. Student mood and other pastoral measures are also outcomes teachers work with students to improve. Attendance is the best predictor of success for most students and is something that can be improved.
Often the impact from IT comes in the form of improvements to workflows, processes and interfaces for accessing information. These can be used by teachers to affect student outcomes by seeing students within their cohort and individually. Differentiated teaching for personalised learning happens when it is well informed by data. Sometimes, teachers are just trying to get to know students more objectively around the start of the teaching period or when writing reports.
The relationship between the IT Team and teachers may start with the provision of data for analysis, then pre-defined reports and eventually analytics. The distinction of analytics over lesser presentations of data is that they are predictive, proactive and available on demand. I’ve written about analytics in schools previously.
To achieve successful collaboration on improved student outcomes, concentrate on the following.
Seek questions that teachers need answered, and an understanding of what data is available to answer them.
Develop integrations and data warehouses that bring data together, so it can be presented efficiently, but also to achieve active alerting when threshold values are detected.
Understand how data can be used to benefit student outcomes; providing masses of reports will only overwhelm users. Linking proactive alerts to well presentation information means teachers can be drawn in and use systems, applying the information to practical improvements for students.
Beyond?
To be honest, I’m not sure if teachers have expectations beyond the levels described above. I have ideas for evolving the nature of teaching through student models, knowledge profiling and automated individualised learning schedules. But that requires a relatively radical departure from the current classroom situation, so I’m not sure teachers want that.
I hesitate to mention the notion of AI as an agent that will satisfy teachers’ desires beyond what I’ve described. I am seeing examples of Generative AI being used to take raw lesson plans and creating more personalised versions based on student interests, but time will tell if that is useful for more than adding engaging variety.
I may have to revisit this post again if I reach that top and can see beyond.
Is it better to buy an interactive screen with or without smarts?
Background
I’ve been dealing with interactive screens in classrooms for several years now. When I started in schools, I inherited responsibility for a legacy of screens from various manufacturers. Some were still within support, but most were living on like a crazy naked man: unsupported and likely to attack. Some staff had invested in the associated software, allowing them to present lessons as the manufacturer intended, but when the software license expired, they would be left with a disappointing investment of time. Consequently, most staff relied on teaching from a connected laptop.
My first task when I started at my new school was to assess various systems, including the classroom AV situation. At St Mary MacKillop College, Canberra, there is a 50/50 mix of projectors and interactive screens. I started working on plans to transition the remaining projectors to screens, but I needed a classroom AV standard to drive this. After talking to teachers about their use, I needed to assess the market.
What I found was a growing number of manufacturers keen to get their devices into schools, including traditional screen-makers, like Promethean, Smart, CommBox, a range of known electronics manufacturers moving into the market, like LG, Samsung and Phillips, and quite a few Chinese brands I wasn’t familiar with. I also attended EduTech (a significant Australian commercial education technology conference) to see the offerings from these brands in real life.
I discovered each manufacturer attempting to differentiate themselves, not on their hardware, but through their software offerings. Each sales pitch highlighted the various Android-based tools you could while using their device. The walled gardens of the past seemed to be growing.
Teachers had told me they were not using the built-in interactive screen tools they had access to now and weren’t interested in using more than their laptops. For some teachers, I could imagine some of these tools could have use-cases some of the time, but I couldn’t help considering the support, training and maintenance needed to provide these tools, as well as the disappointment in teachers if it were to be taken away later. Some manufacturers have considered breaking down the walls slightly by allowing staff to log into Google Drive or OneDrive and to deliver their content from those cloud sources, but this also left me a bit concerned as it would need more connections, more accounts, and would create a possible data breach vector that would be hard to control if staff walked away while logged in. Teachers are entering class with a tool that has the smarts they need, so why try to replicate that on a device with another operating system?
Can it be simpler? Yes, it Can.
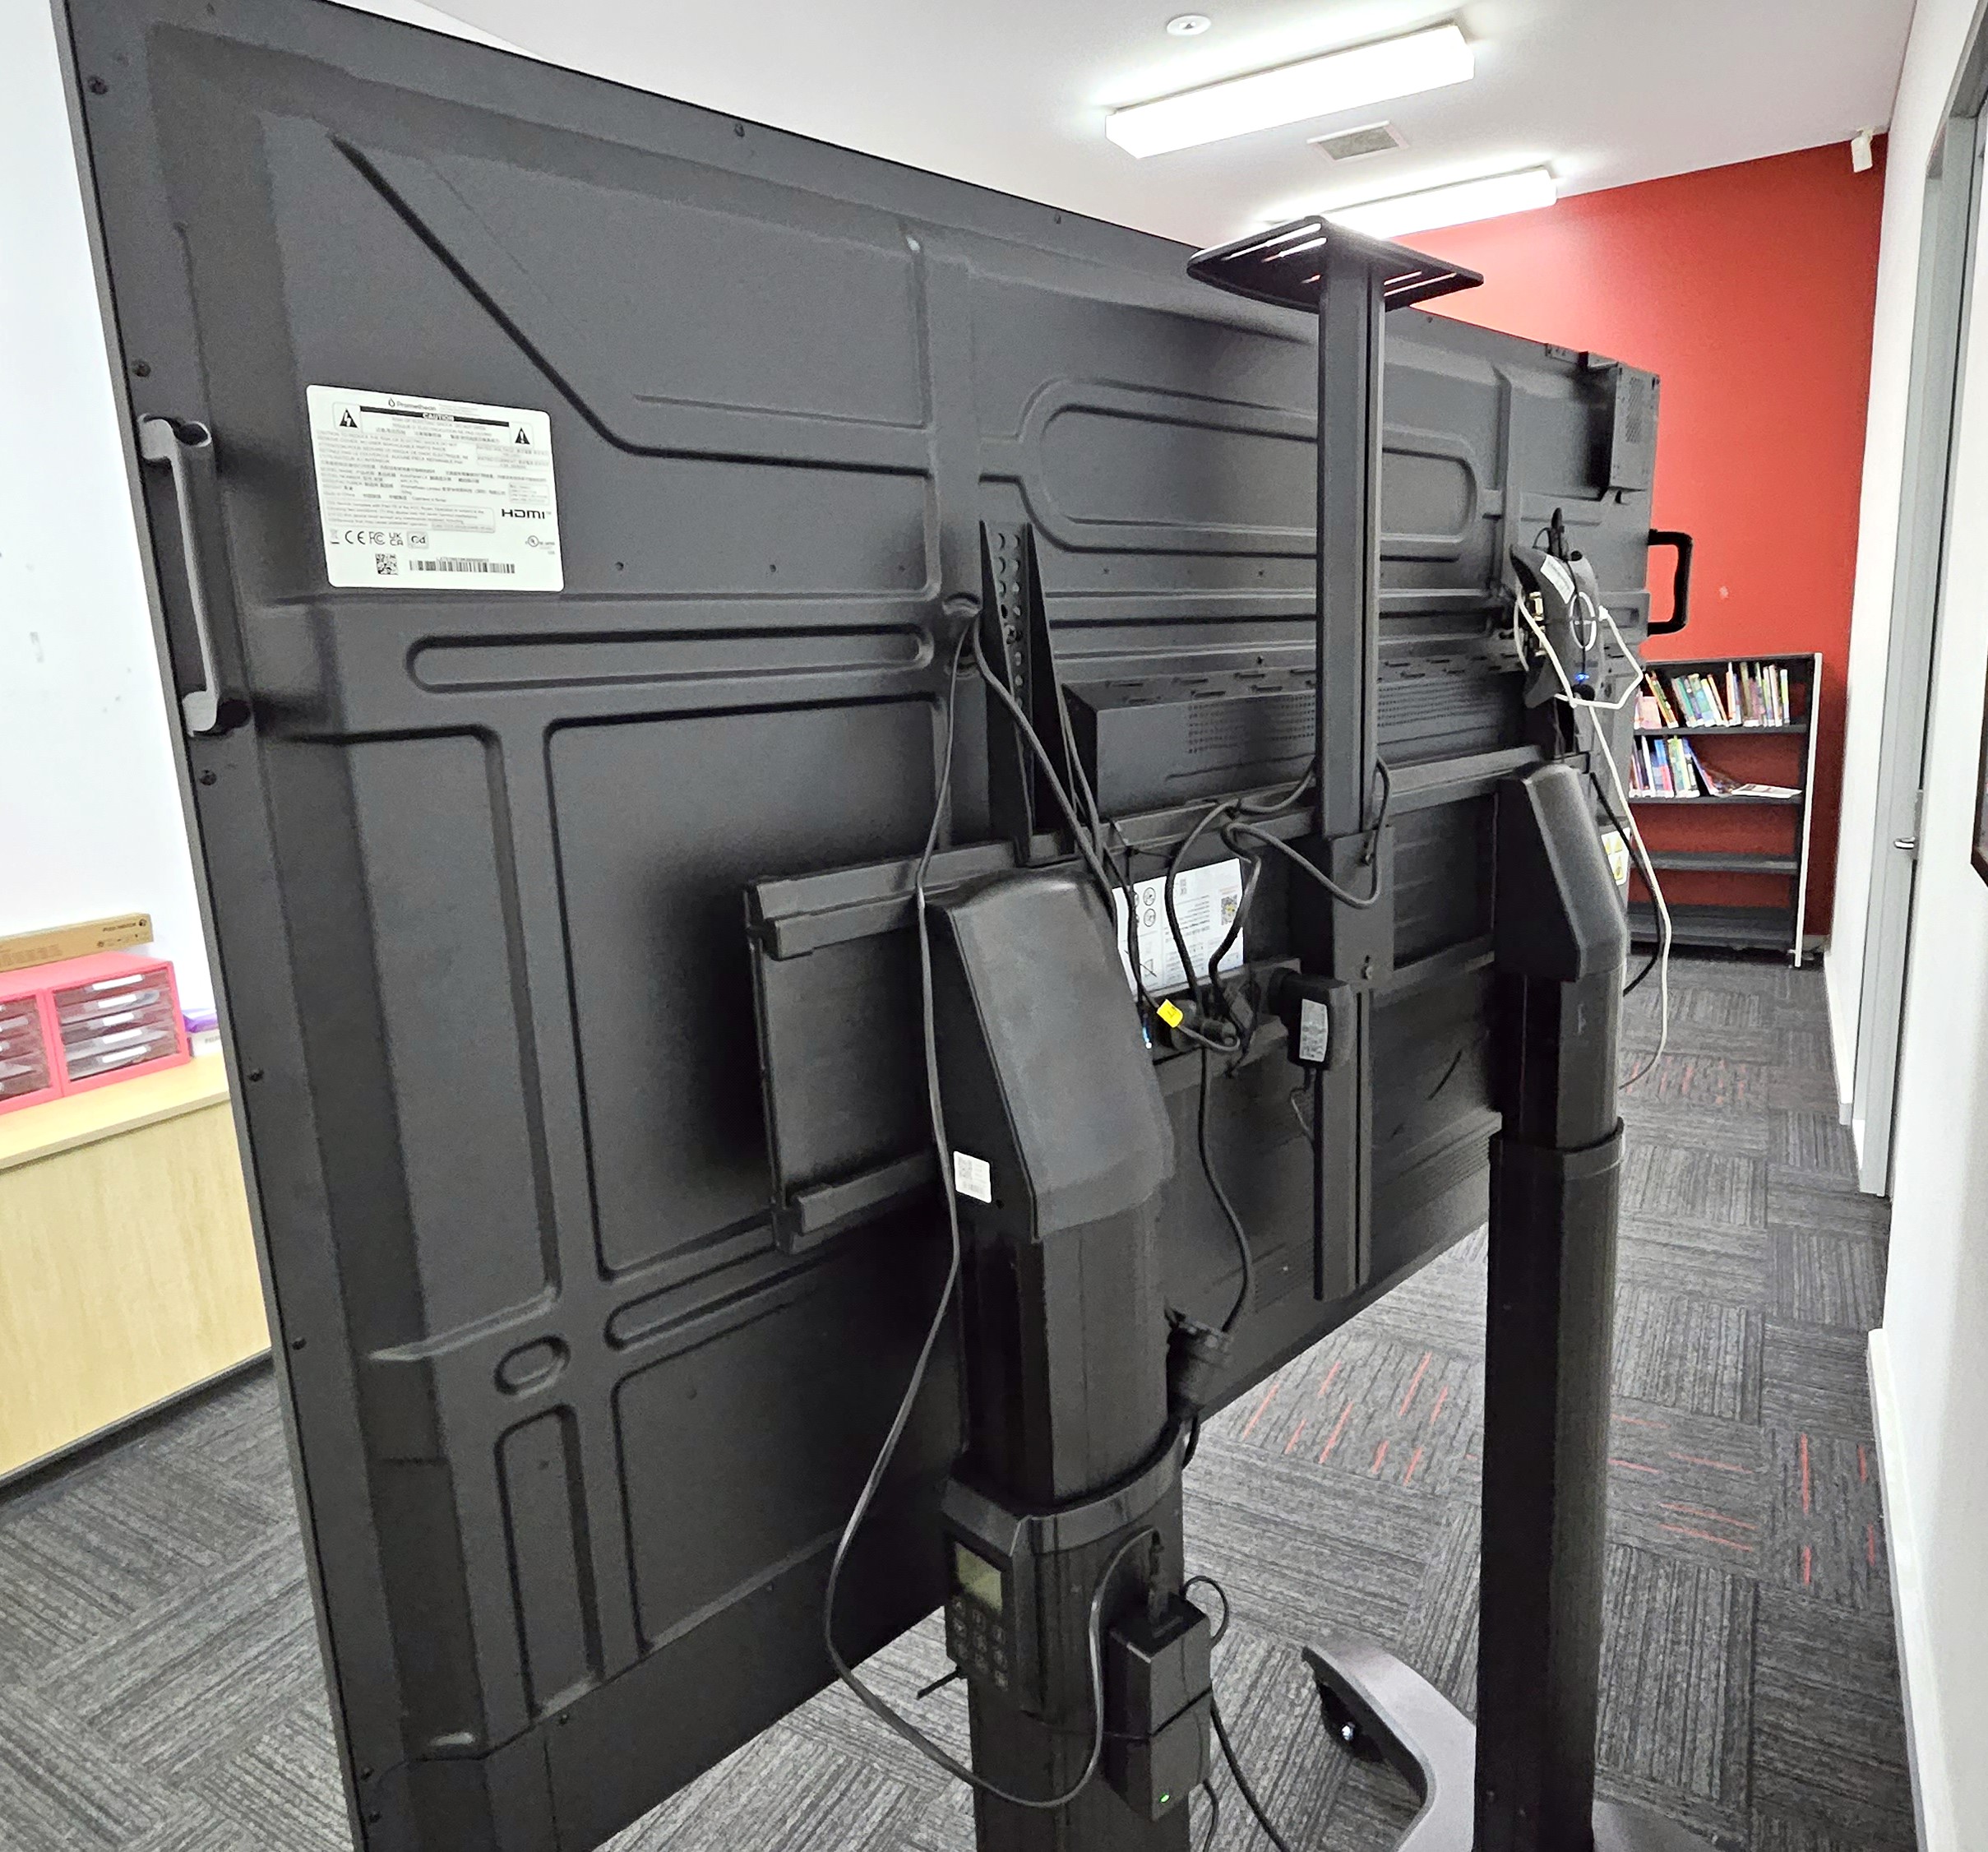
I started looking for devices without smarts. This is something I had achieved at a previous school, so I knew there were possibilities. Sending touches back to a connected laptop is still important as teachers like to write on a board like a whiteboard. I turned to Dell, who I had sourced not-smart touchscreens from before, but their AU$4,800 price for a 75″ screen was higher than most of the smart interactive screens available. I started speaking to the makers of the smart interactive screens to see if their devices could be modified or reconfigured to disable the smarts, but their solution still required access through the Android OS to connect a laptop, and that OS would run out of support well before the screen’s expected end of life. Fortunately, I stumbled upon a new model from Promethean that allowed you to purchase the screen and smarts separately, and the cost of the screen without smarts was very attractive at around AU$2,200.
I was a bit worried that this might be a lower-grade device with laggy touch and tinny speakers, but our testing showed the response to touch and pen input to be responsive and the sound sufficient to fill a classroom. One nice bonus is the USB-C port that allows a single-cable connection for video, sound and return touch, while charging the device. Another benefit is that the device turns on quickly, so you don’t have to wait for an OS to load.
We set about making this the basis of our new standard AV classroom setup.
Setting Things Up – Stands
One other costly aspect of classroom AV can be the installation. In my previous school, all screens were wall-mounted with a cupboard containing devices and a controller to allow you to switch sources. This Rolls-Royce solution suited the school, but a simpler solution is available. Movable stands are widely used, but it’s worth comparing to mounting. Putting an interactive screen on a mobile trolley means it can be set up by IT staff, without any need for electrical or network contractors.
Trolley Pros
Trolley Cons
Easy, cheap setup
Only connection needed: power
Replacing a busted screen is easy: wheel a spare one in
Teachers can place them where they need them (no more fighting for whiteboard wall space)
Trolleys take up more space
Trolleys can be moved where you don’t want them (like out the door)
Is Wireless Projection Worthwhile?
Wireless adapters give teachers the freedom they want to move around the classroom while presenting. It’s not perfect, but it can achieve what teachers want most of the time.
Using a wireless adapter has some advantages and disadvantages.
Wireless Display Adapter Pros
Wireless Display Adapter Cons
Teachers can move around the classroom while projecting
Cables don’t go missing
Ports don’t wear out
Adapters can be remotely managed
High-res videos show compression artifacts
Introduces lag on touch and pen input
Although relatively simple, some training is required (press Win+K)
Users need their own charger
Adds another layer of maintenance
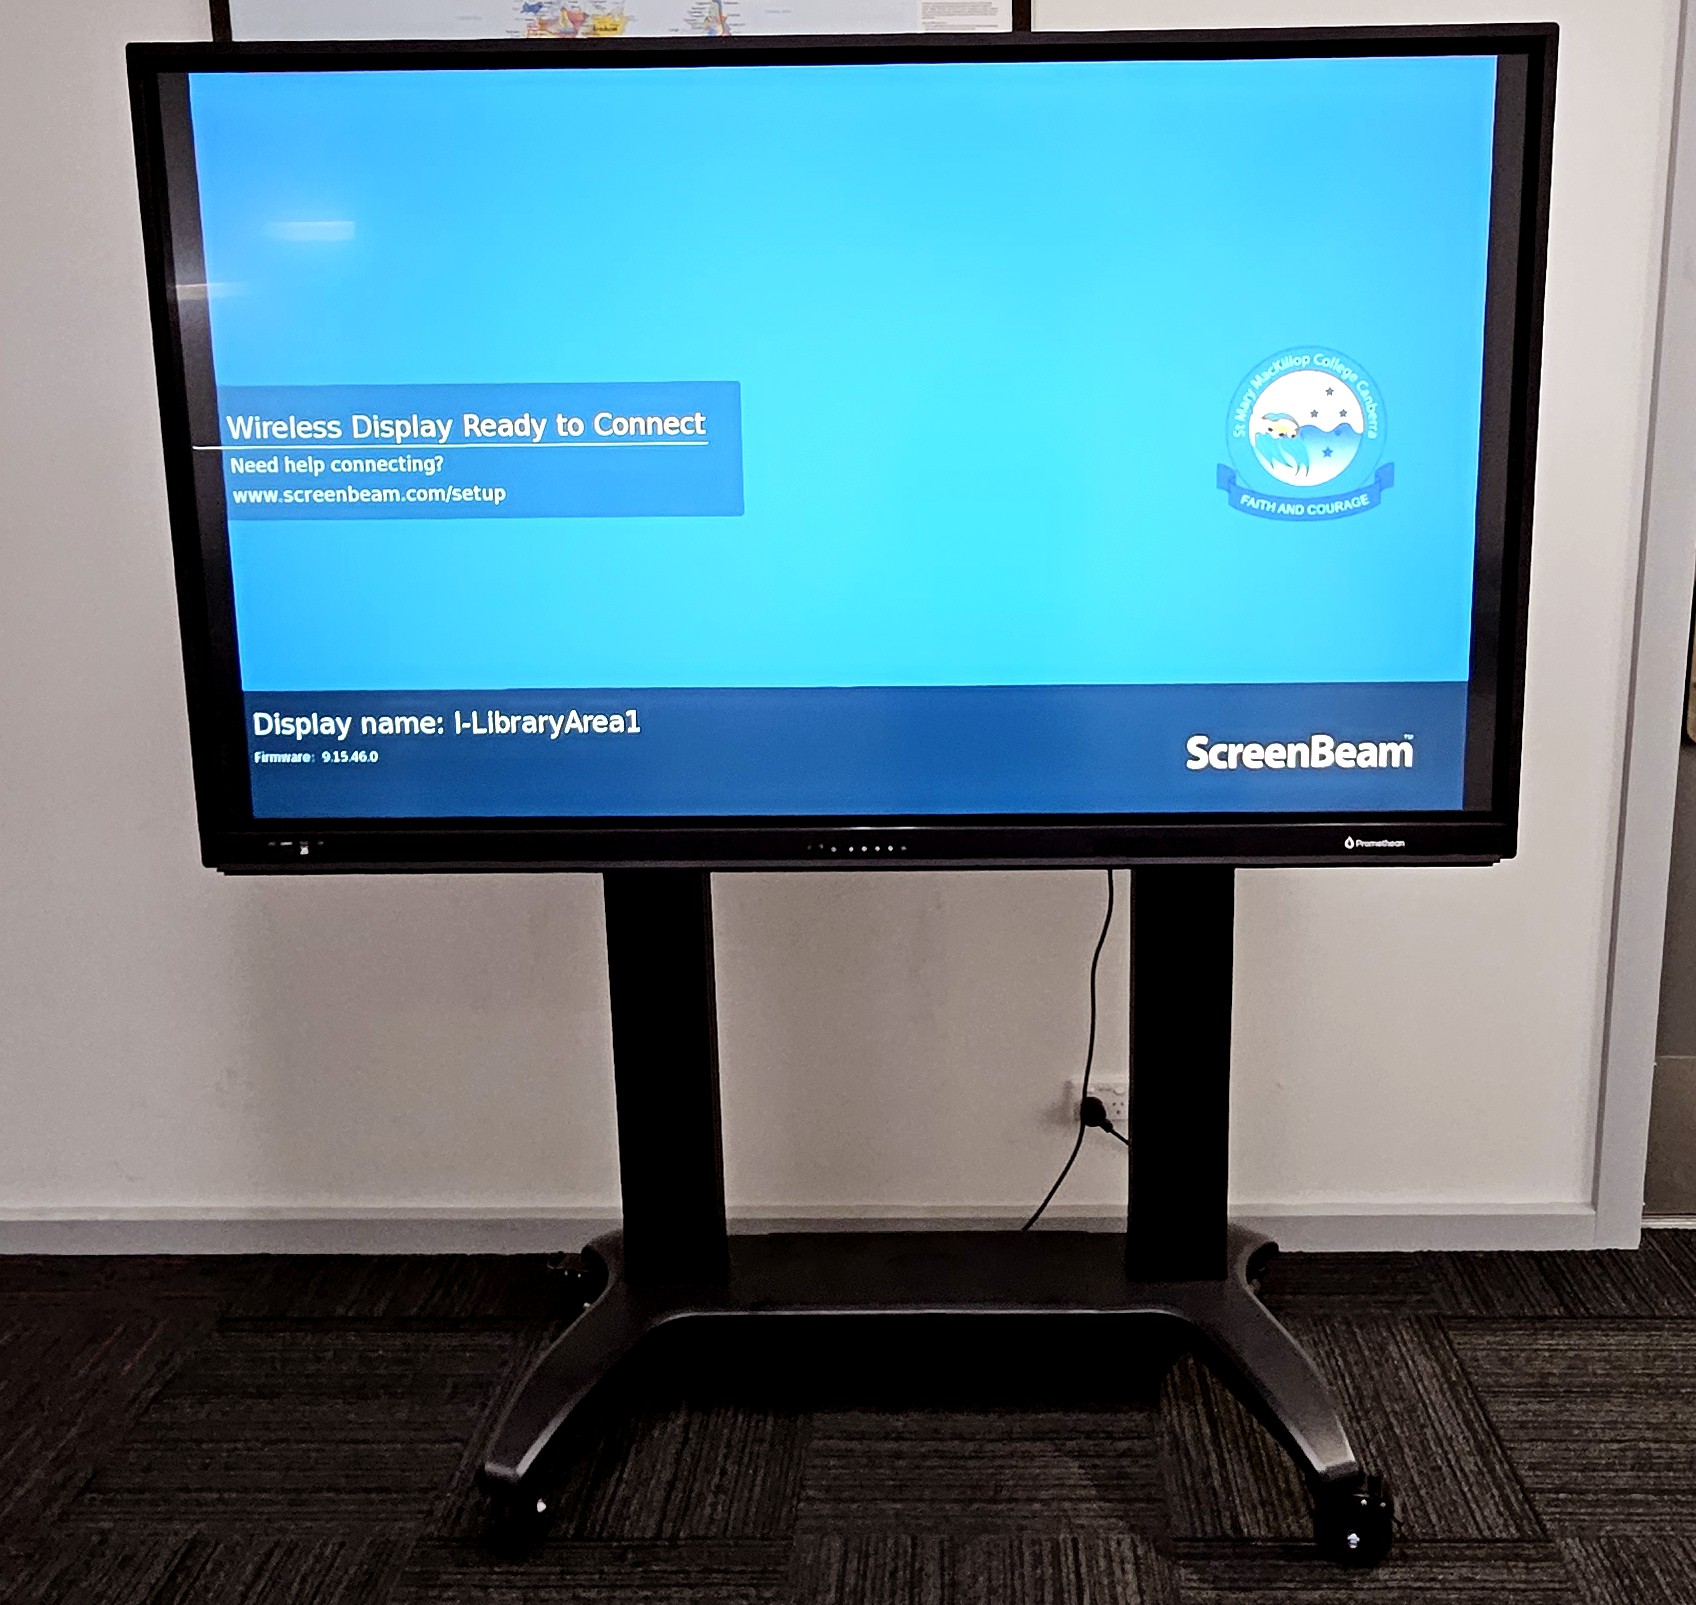
We’re using ScreenBeams and there are other wireless adapters available. I recommend wireless adapters that use the native screen mirroring potential of users’ laptops.
I have found requiring software installation to use a wireless display adapter is a step too far for most users.
The native wireless solution uses a direct radio connection rather than clogging up the network to communicate. Guests not on the WiFi can still use them.
Some effort is required to set up the global monitoring software that allows you to see the status of SceenBeams and change their configuration. Some network changes and testing went into getting that working at our school; Kudos to Corey and Roman for that work.
A Simpler Classroom AV Spec
Our classroom AV setup now consists of the following components, with rough prices, incl. GST (as at 20231110).
Promethean LX
$2,200
Moving Trolley (eg Gilkon), height adjustable (could be cheaper otherwise
Generative AI has educators worried. I am assuming you have heard enough to know what AI-based tools like ChatGPT can offer and, like me, are thinking about the impact on learning. After a disappointing webinar from Microsoft, where we were effectively told to get used to the idea, I’ve been considering what was unsatisfactory about that suggestion and why educators are concerned about generative AI, which brought to mind Bloom’s Taxonomy.
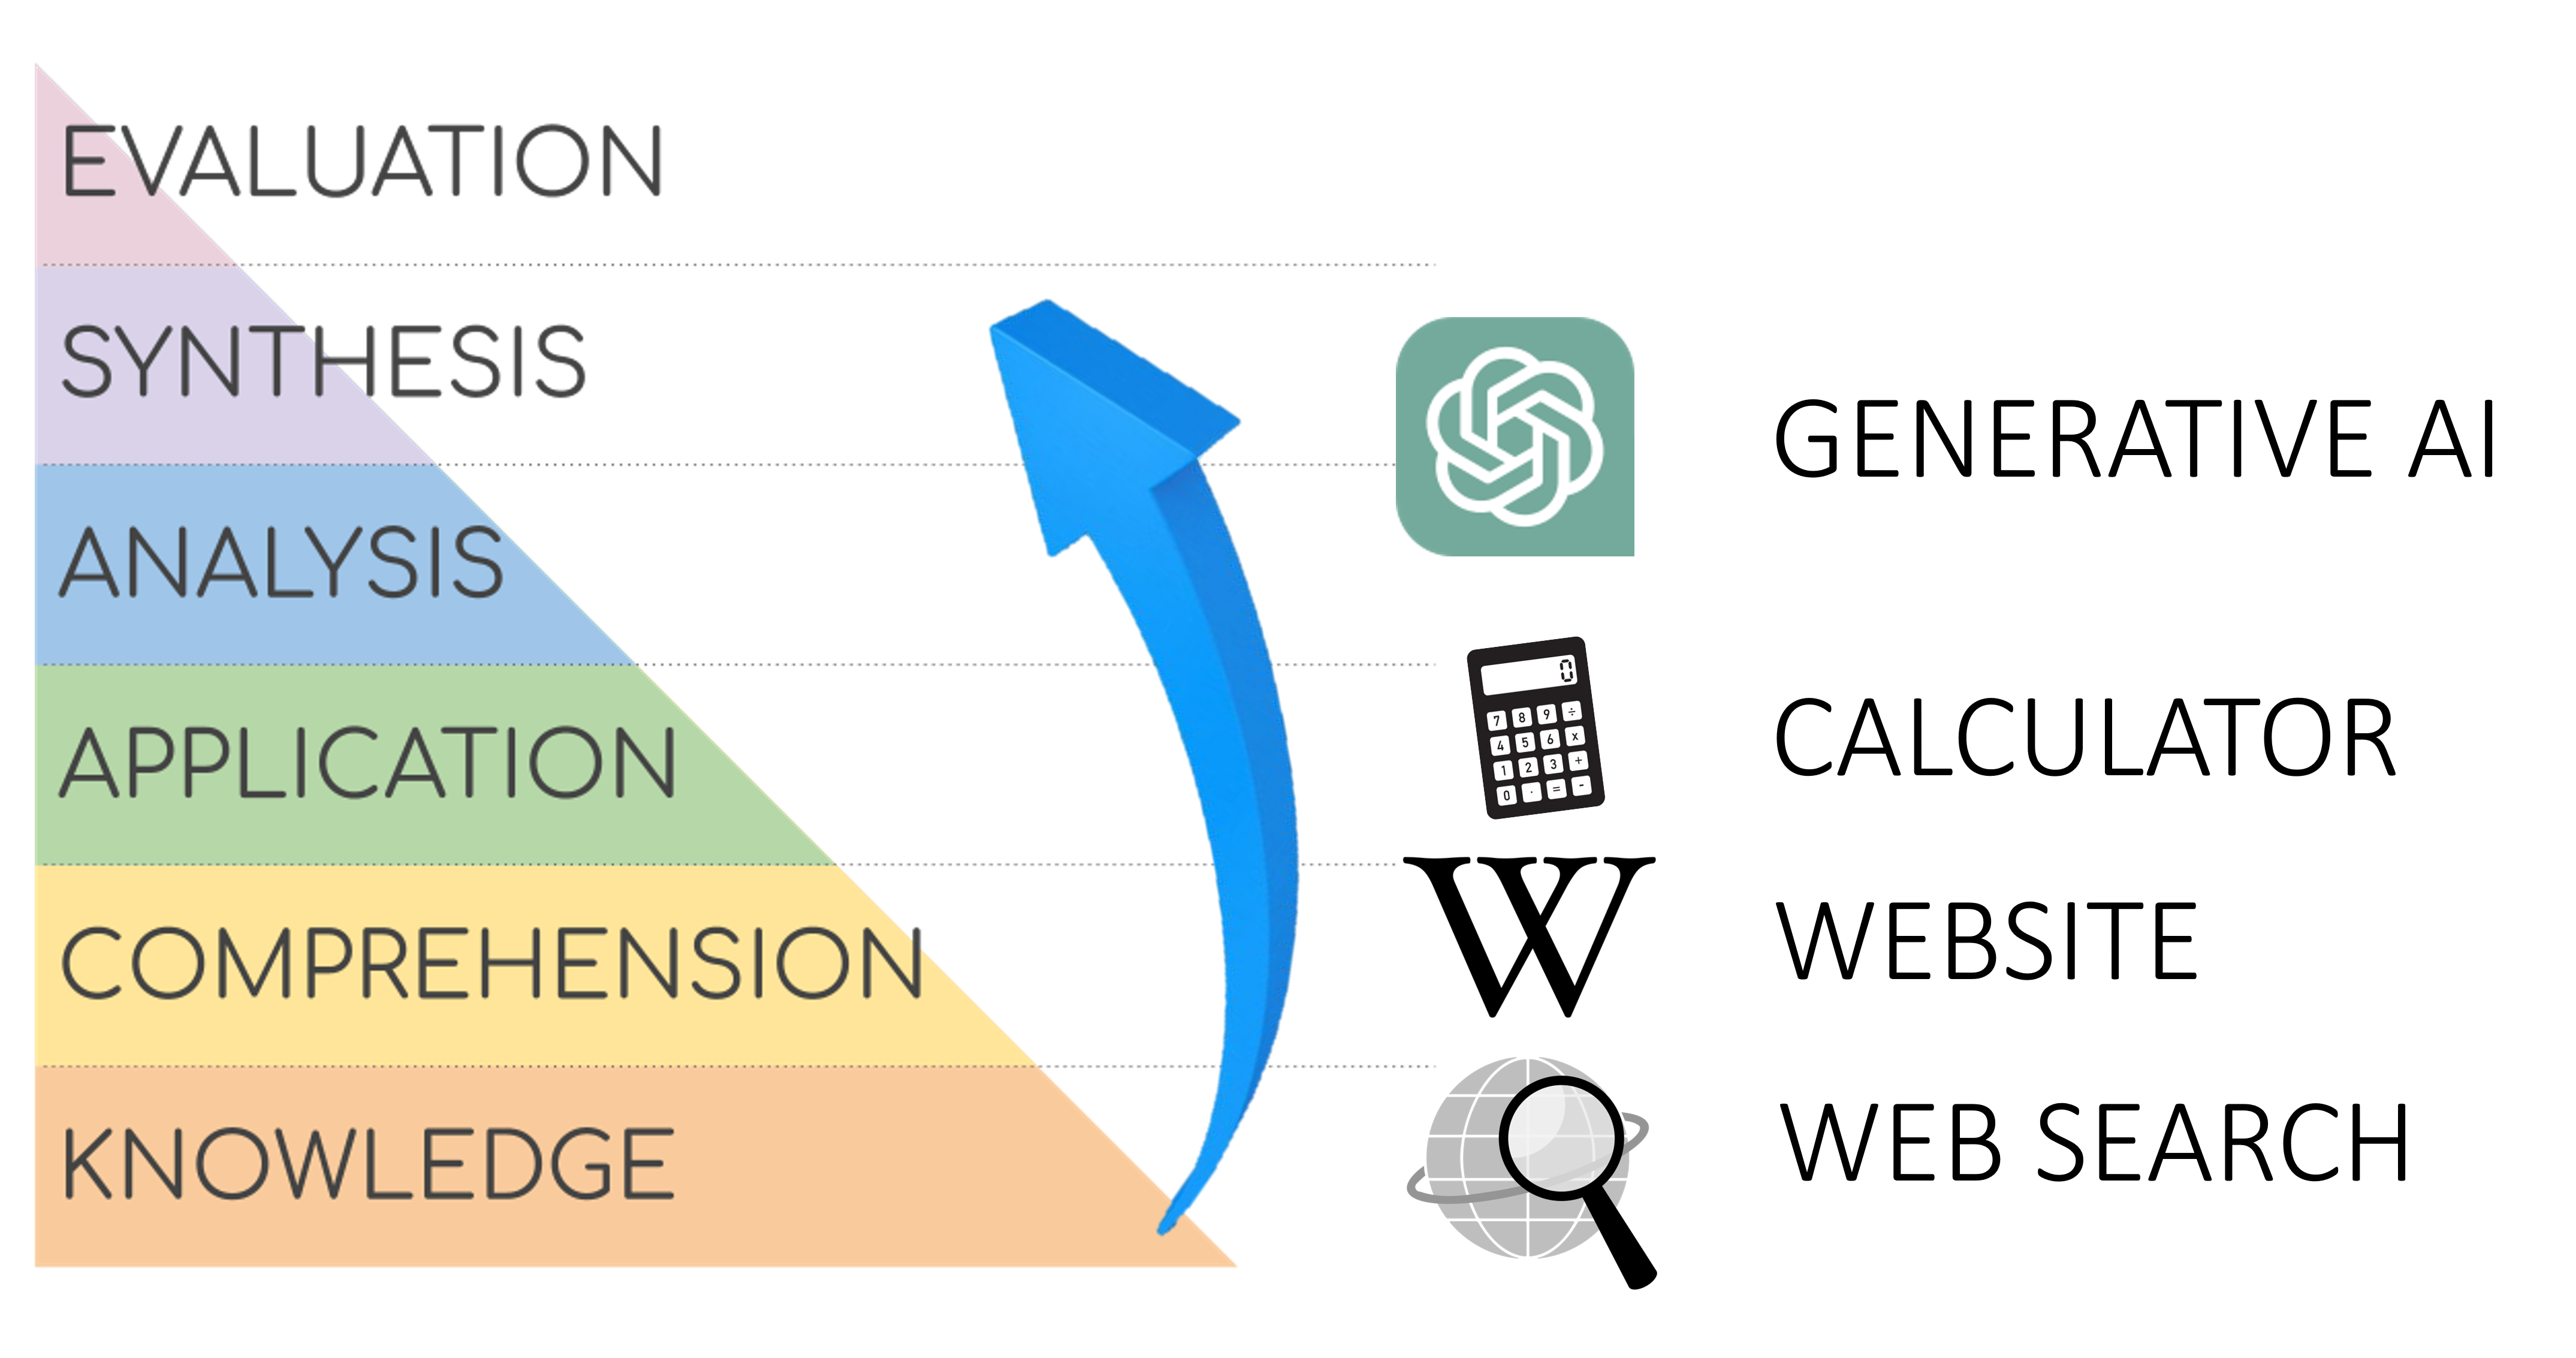
The following diagram represents Bloom’s taxonomy (1956 version) with a few extras. I showed Bloom’s Taxonomy to a gathering of school IT officers and none recognised it. But I’m certain teachers would as they are trained using this theoretical framework. There are multiple versions, but they all represent levels of understanding that can be measured through assessment.
ChatGPT, and tools like it, have been compared to past technologies that challenged educators at their inception. Calculators were, at first, resisted in schools as they could answer mathematical questions that students needed to answer. The Internet, with its search engines and sites like Wikipedia, has also challenged the way students are assessed.
Generative AI has concerned educators to the same degree as these earlier technologies, if not more. Considering Bloom’s Taxonomy gives insight into what may be going on in the back of teachers’ minds.
A quick web search can substitute a student’s recall of knowledge.
Sites like Wikipedia can provide information showing a level of comprehension.
A calculator allows a student to take solve mathematical equation without demonstrating the application of their understanding.
Generative AI, in comparison, can:
take a sophisticated prompt,
gather information that demonstrates knowledge and comprehension,
contrast views in a way that shows application and analysis, and
synthesise these ideas into a cohesive written piece.
As suggested in the diagram above, artificial intelligence can now be used to substitute higher levels of understanding that were previously reserved for the human student. Together with the relatively sudden release of generative AI, I believe this is what has teachers worried.
At this stage, the quality of output from generative AI is not perfect, containing factual errors and bias, but it is improving. It is already at a stage where it could be equated to responses expected from post-graduate students, such as medical and legal students. The output is also relatively unique, so existing plagiarism detection is less effective against it.
Going back to my original question, educators are concerned as ChatGPT threatens their methods of assessing student understanding in a new way, which threatens academic integrity and institutional reputation, but also means they have work to revise their assessment approach.
What can be done?
It seems that generative AI is not going to disappear any time soon, in fact it will probably have deeper impacts on education than we can currently imagine. From what I can see, the possible responses for educators to adapt their assessment to this new paradigm.
Block
Blocking generative AI tools, such as ChatGPT and QuillBot could discourage students from attempting to use these tools. This would be a similar response to when earlier technological tools have been introduced and it has been the response from ACT Education (where I work). However, in the case of ChatGPT, the number of places where it can be accessed, beyond its main website (such as Bing and various chat platforms), is proliferating, so blocking may not be effective.
Control
If generative AI tools are not blocked, controls can be put in place to prevent cheating and, perhaps more importantly, ensure students are able to learn and demonstrate their understanding appropriately.
Education As with other tools, students need to be equipped to understand the associated ethical standards expected. Plagiarism and other forms of academic misconduct are frowned upon and do not lead to successful learning outcomes for students. There already needs to be information literacy training around content from online sources, to allow students to grow into citizens who can identify trustworthy content, and generative AI output is an extension of this.
Task Controls In mathematical tasks, we ask students to show their working; in essay tasks, we ask students to note their sources. Similarly, with tasks that could make use of generative AI, students can be asked to give more than the answer to demonstrate how they came to their understanding. Assessment design can be improved to deter (or at least complement) use of generative AI by adding specificity to the task or by asking students to deliver artefacts in multiple modalities (other than written text). Ultimately, the best way to avoid cheating is to make tasks seem achievable by providing clear instruction and appropriately weighting tasks.
Technological Controls Plagiarism detection seems to have been diminished now that generative AI can synthesise a novel text presentation, with appropriate citations. So what can be done technologically to control the use of generative AI?
It’s possible to ask students to present their work using a shared Word document, Google Doc or OneNote file, which shows a history of how the document was constructed, allowing teachers to scrutinise where content may have been copied and pasted. This is not foolproof, but a useful check for teachers.
Quizzes have been shown to allow demonstration of understanding that is as good or better than a written essay. A quiz can elicit responses to various question types, which may be useful to redirect students away from generative AI. Quizzes can also be partially or fully automatically marked, which is always an incentive for time-poor teachers. Adding time constraints and a lock-down browser to a quiz should give confidence for most assessment.
Physical Controls When authenticity of assessment really counts, it still means asking students to undertake tasks in person, away from computers. That could mean a paper exam or an in-person question and answer session. The utopia of online exams, temptingly closes after Covid19 remote learning, will be challenged by generative AI when institutional reputation is at stake.
Embrace
Educators have the opportunity to employ generative AI as a tool for learning and assessment. Like plagiarism detection (which began as a tool for educators to spot cheating, but became a tool shared with students to learn appropriate citation) generative AI in the hands of students can have learning benefits. The possibilities are already being enumerated and I anticipate we’ll see many pedagogical applications of generative AI over the coming years. Here are some.
Providing summaries of written works to gain a better understanding
Generating exercises to self-assess understanding
Supporting text revision where non-native language skills are lacking
Providing a starting point for in-depth research
Evaluation is a level of Bloom’s Taxonomy that I don’t think AI has yet conquered and that leaves room for higher-order thinking to be assessed. A colleague pointed out an article from the Sydney Morning Herald describing tasks being prescribed to medical students, who were instructed to prompt ChatGPT for information and then critique it.
Conclusions
The benefits of generative AI could lead to better student outcomes, if educators allow learning to make use of them. At present, there is significant positive innovation to match the reactions of those wishing to block generative AI.
I don’t expect efforts to block generative AI to last long, especially while they are less than fully effective. Ultimately a point of balance between control and embrace needs to be established, where assessment of understanding can happen and the learning benefits of AI-based tools can be achieved.
Limitations
I need to say that these views are my own and not an official policy or stance of ACT Education.
I haven’t completed a comprehensive survey of opinions from “the coalface”, however I’ve been communicating with people who have been gathering reactions to generative AI and writing briefs and presentations for Education decision-makers, which led me to this understanding.
Previously I described a number of myths about analytics I saw circulating when I started working in the school sector after years in the tertiary education sector and the education-related IT industry. Some schools are cobbling together reports on a semi-regular basis and, while useful for a small group of people for a short period of time, these are not analytics. Other schools have access to marks from an LMS, but not a complete picture sufficient to make predictions. Analytics should be:
available on demand,
predictive and
proactive.
This means that data should be collected regularly, processed in the background and ready for use, including calculations that lead to simple results as well as complex trends. When a result or trend meets a threshold condition suggesting intervention is warranted, relevant staff members should be notified to act.
Data available to schools
In tertiary education, mandates for online assessment are strong and use of online systems for remote and blended learning are almost universal. This leads to rich data on assessment and other participation that allows tertiary institutions to conduct interventions, with the goal of retaining students (and their fees).
The conditions of data in schools differ to tertiary, with less in some areas and more in others.
(less)
Schools have less granular online assessment and participation data, with even less in early years.
(more)
Student effort is often recorded and can be tracked over time.
(more)
School students participate in external assessments. In Australia, students participate in NAPLAN testing in years 3, 5, 7, and 9.
(more)
Schools are required to collect attendance information, which can be a useful proxy for participation and when combined with timetable information can reveal rich, useful patterns.
(more)
Schools collect pastoral information, which reflects behavior that can impact student outcomes.
(more)
Some schools check student attitudes or mood on a regular basis.
The value of analytics in schools also differs with the goal of improving student outcomes in grades and other holistic measures, rather than just retention.
Data warehouse
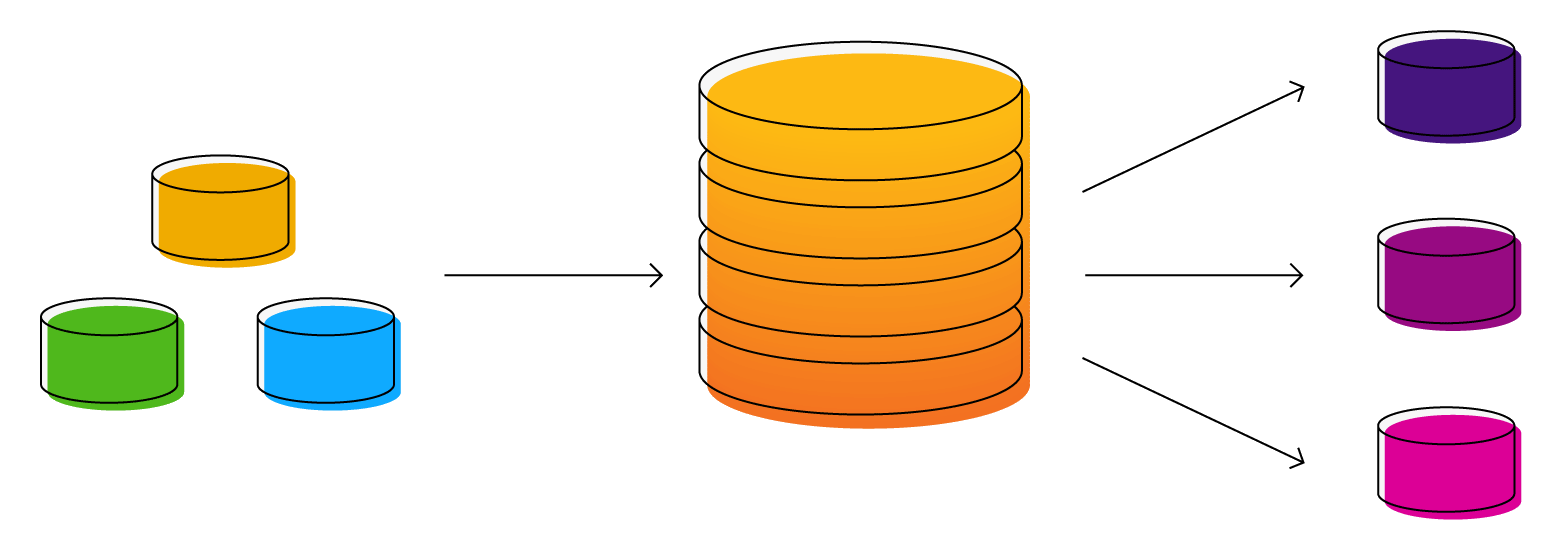
Collecting the data described above is a start, but having the data doesn’t mean it is useful. A data warehouse:
collects together data from disparate systems (LMS, SIS, forms,…),
conducts calculations on a regular basis,
sends alerts when threshold conditions are met and
provides views that can be queried quickly when people are drawn in to act.
The creation and maintenance of a data warehouse implies the need for data specialist staff. At CGS we are fortunate to have a database administrator, who is primarily responsible for our analytics, as well as a two web devs, a forms dev and a data systems manager, who work together integrating various systems, including the main analytics system referred to as the “Dashboard”.
Analytics possible in schools
Canberra Grammar School had been wanting analytics for a number of years before I joined in 2016, but were unsure how to achieve them. In a project with pastoral and academic leaders, we have been able to develop the Dashboard, which has been in use since 2018 and continues to grow in potential and use.
The development of the Dashboard followed the PMBOK-based project management process that I have written about previously. The need for analytics will differ depending by school and will be driven by the questions that the school needs to answer. This project involved consultation with various pastoral and academic leaders. We captured and expressed questions as use cases, such as “As a teacher/HoSH/Tutor I want an alert for student birthdays”. The list of use cases was quite long and we are still achieving some as more data becomes available.
The platform to handle the analytics could be achieved in a number of systems. At CGS we use SQL Server for the data warehouse (as well as a data store for most of our other systems), SQL Server scheduled tasks for alerts and background processing and a collection of SSRS Reports to form the Dashboard interface. We investigated PowerBI as an alternative platform but found this cost prohibitive when putting the results in the hands of all staff.
Since its inception, the Dashboard has undergone a number of revisions in response to user feedback. The initial focus was on delivering information focussed on individual students. We have added views to allow discovery of students needing intervention within cohorts.
Proactive alerts
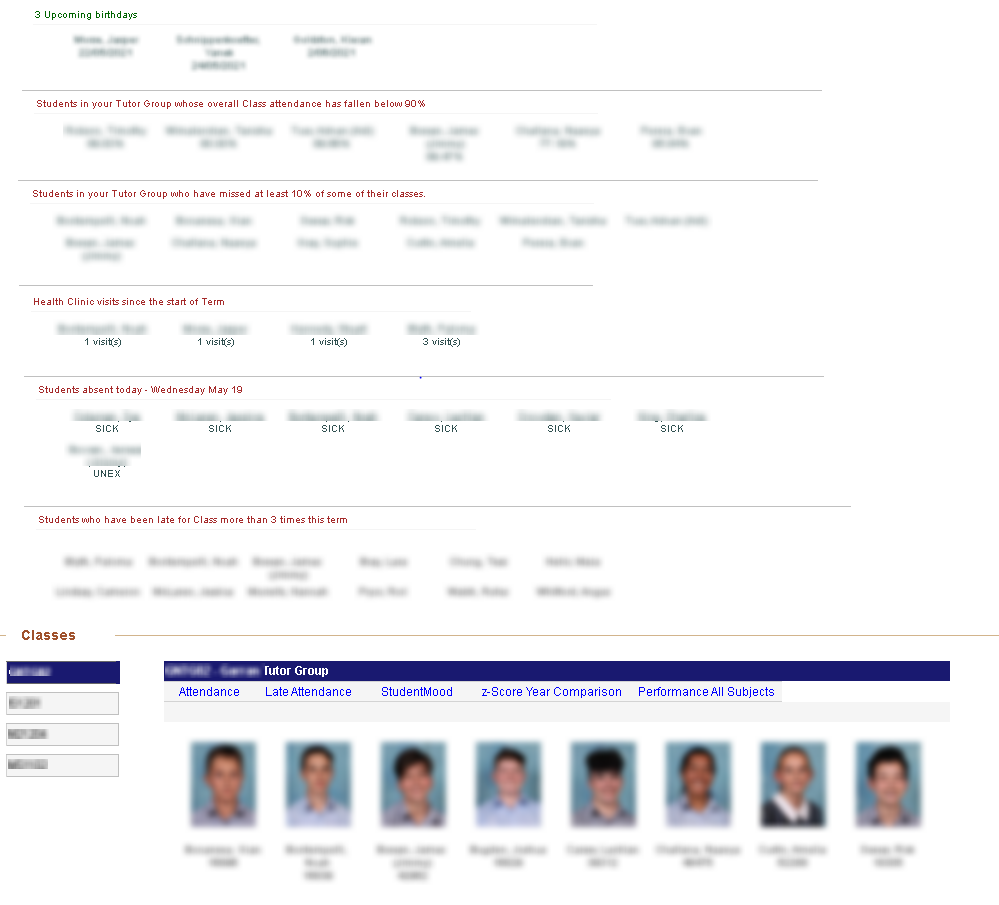
Alerts sent directly to users prompt their action, but must be sent sparingly to avoid creating noise that people will habituate to. Here are some examples of alerts sent by email.
At risk students who have not been marked off in a class
Students with approved leave needing follow-up
Unexplained absences over a period of days
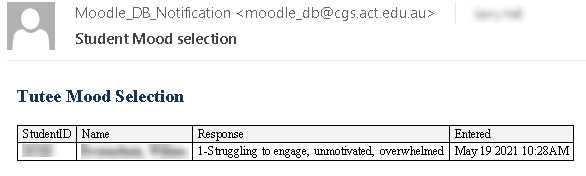
Students who report their mood as low
Pastoral events (positive and negative), including detentions
Reminders to mark assignments
Reminders to staff to who have not taken class rolls before a certain time in scheduled periods
Highlighted information
Some lower-priority alerts are shown to staff on entering the Dashboard. These alerts relate to students whose pastoral care they are responsible for.
Students with low attendance or lateness
Students who make numerous visits to health clinic within a period days
Students with co-curricular activities today
Student birthdays
On-demand information
Information displayed on Dashboard
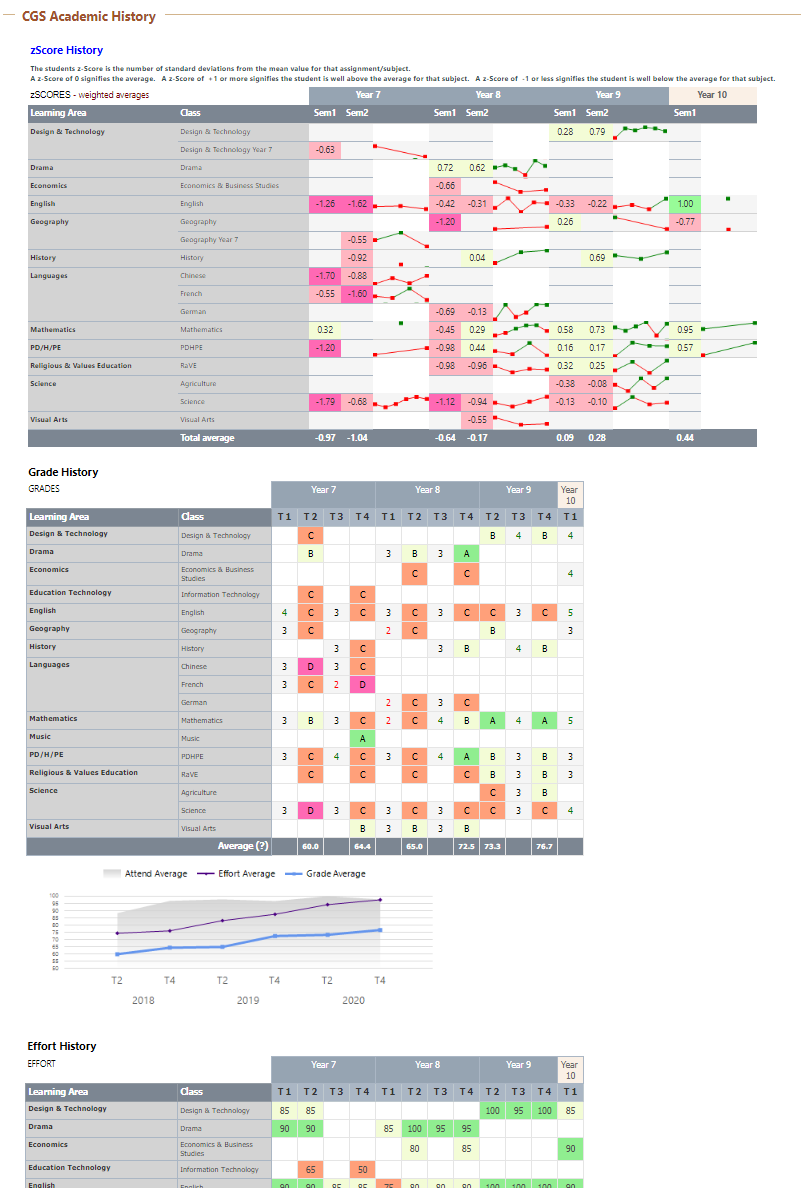
Academic results and effort marks and trends over the student’s enrolment
Timetable information and attendance for academic and co-curricular activities
External assessments results
Co-curricular participation including weekly activities and carnivals
Student mood history, pastoral incidents and learning needs
Cross-reference information for students at risk by matching flags for learning support, medical conditions, etc
Looking at an individual student, a staff member can find information quickly and see highlighted information about the student.
Staff can drill down to specifics.
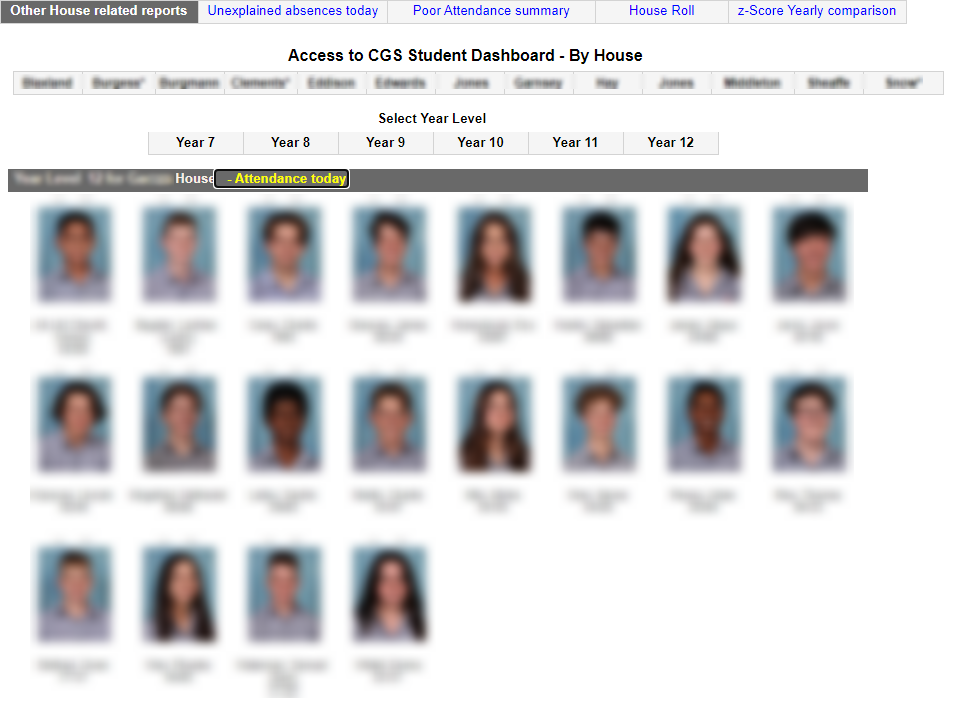
Comparative information and trends
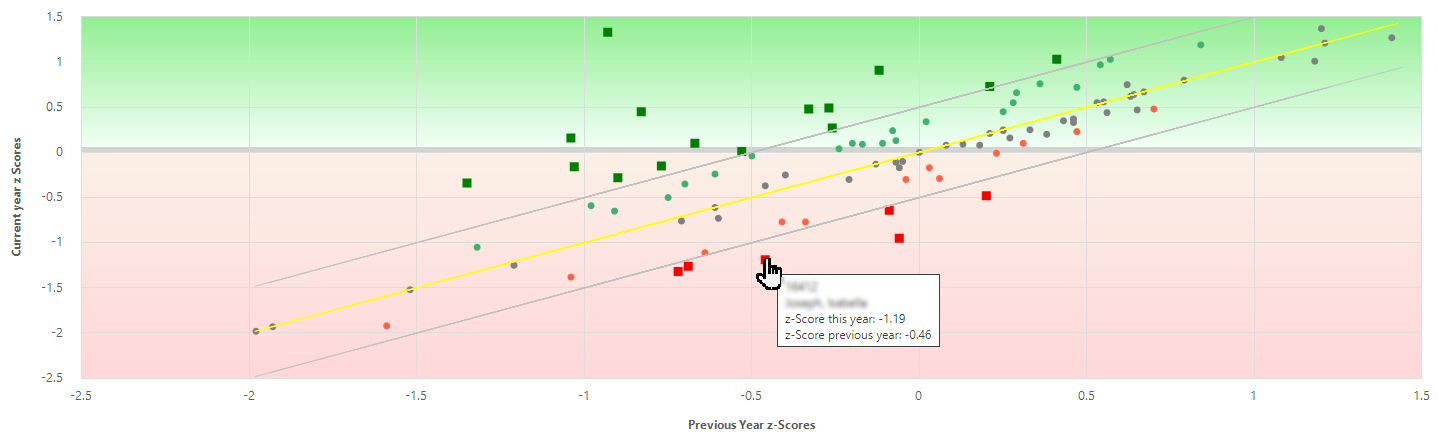
While individual students are presented in the context of their cohort using z-scores, there is also the capacity to look at cohorts of students to identify student performance changes within the cohort.
Usefulness
The success of any system is measured by its usefulness. Analytics at CGS have proven to be useful for more than strategic decision making and seem to be having an impact on student care and to really improve student outcomes. The Dashboard is reported to be used in the following situations.
Teacher’s understanding who students are at the start of term
Differentiating students based on:
ways they learn,
skill sets and
past experiences.
Determining students who will work well together. (One staff member said, “We could spend a whole term getting to know a kid. Now we know them when we walk into the class on day one.”)
For administrators to find staff responsible for students
Teachers appreciate the immediacy of having analytics available on-demand. One staff member said “It’s all about efficiency. When you’re reacting, having accurate data presented in an instant means you can assess a situation and make judgements rapidly.”
The use of analytics in the School has emphasised the need for accuracy and consistency in data collection. It is obvious when there are holes in the data, which impacts on the clarity of a picture about a student. This has led to drives for better collection of information and management of staff who fail in their recording duties.
Since the system was introduced, there has been a steady rise in its utilisation, year-on-year. While many staff may have searched in systems that feed data into the Dashboard, it is now clear the Dashboard has become the first interface they go to, particularly for new staff. According to the Director of Student Care, this indicates “staff are using student data in a more holistic way”. Projections for the current year show a number of views over 100,000.
Directions forward
We are still developing more predictive analytics. We are working on micro-patterns of attendance, such as a student missing classes in a particular subject. With a drive to bring most assessment to our Learning Management System in all parts of the School, this will give more granular data and hopefully the ability to reach the holy grail of analytics, which is predicting student success within a current course.
With greater access to data, staff can feel they might be missing out on information, particularly as the system evolves. Specific training and encouraging practitioner sharing has become needed to train data-driven teachers and pastoral leaders. This need is increasing.
We are currently working on parent and student views of analytics as a form of continuous assessment information. This informational display will be presented through the School’s LMS.
Phishing attacks are a risk to our School and schools like it. They are difficult to mitigate using automated means, so user training is needed.
There are two main types of phishing attacks:
an email that leads a user to a page where they provide credentials or other information or
an email that attempts to establish a trusted conversation with a user in order to ask them for information or to purchase items that can be transferred to cash (spearphishing).
While financial loss needs to be avoided, the extraction of user credentials has the potential to be most damaging as this can lead to loss of secure information and ultimately data breaches.
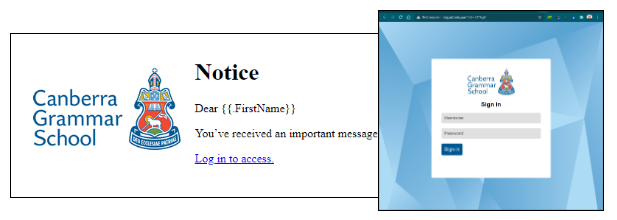
At Canberra Grammar School, we’d been wanting to run phishing training for a number of years. We had seen quotes for external vendors to support such training, but to save $12,000 to $15,000 we were motivated to try this ourselves. In this post I will outline how we went about running phishing training at CGS and the outcomes we experienced.
Messaging Around Phishing Training
In order to train users about phishing, you have to think like a phishing attacker. However, it’s important not to take that too far and think of the training as tricking users. Ideally users should become aware of phishing, know how to identify phishing emails and know how to respond when they receive such emails. This all has to be done while maintaining the good relationship between users and IT staff.
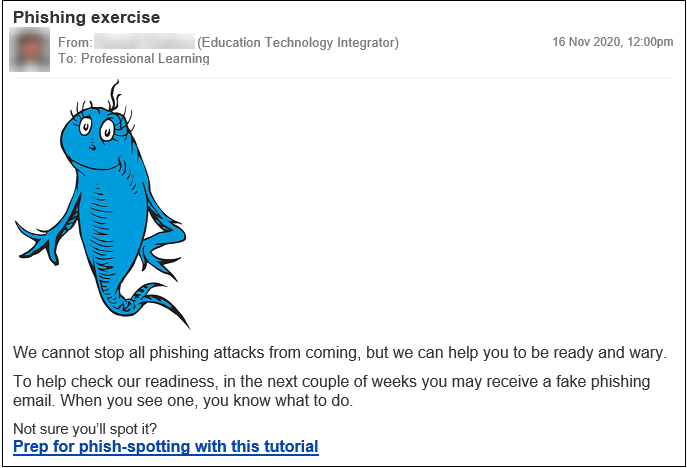
Before embarking on this training we created a number of educational and informative communications.
A guide within our Knowledge Base describing phishing emails and how to act
An email to various School leaders informing them about the program of training and letting them know it was OK to discuss it
A series of educational messages sent to staff through our daily announcements
An announcement about the phishing exercise
A quiz in our LMS that offered optional training to those wanting it before our fake phishing exercise and mandatory training for those who responded badly to the exercise
Within our School, staff are encouraged to forward phishing emails to our Service Desk who assist with identifying emails as phishing attacks and blocking senders as well as identifying other recipients and warning them.
Setting Up a Phishing Server
We started creating our own solution using a basic web server and email server, but we then came across a system called GoPhish, which is an open source system for running phishing training.
To run GoPhish, you need a server that is web-accessible. We made sure the server was accessible outside the School as we imagined some staff would receive and respond to fake phishing emails from home and this needed to work as well as it did within the School. This could be a VM hosted locally or one from an external hosting provider.
We also took the step of purchasing a domain name close to our School’s own domain name (registrar link). We had seen such a domain used in a very sophisticated phishing attack on School community members and we wanted to use a similar domain for some of our fake phishing emails and landing pages, targeted to staff with riskier roles.
GoPhish is simple to install and get running. Download the zip file, unzip it and run the executable. We used a self-hosted Windows VM and when GoPhish first ran, a firewall warning popped up, asking to allow the software through.
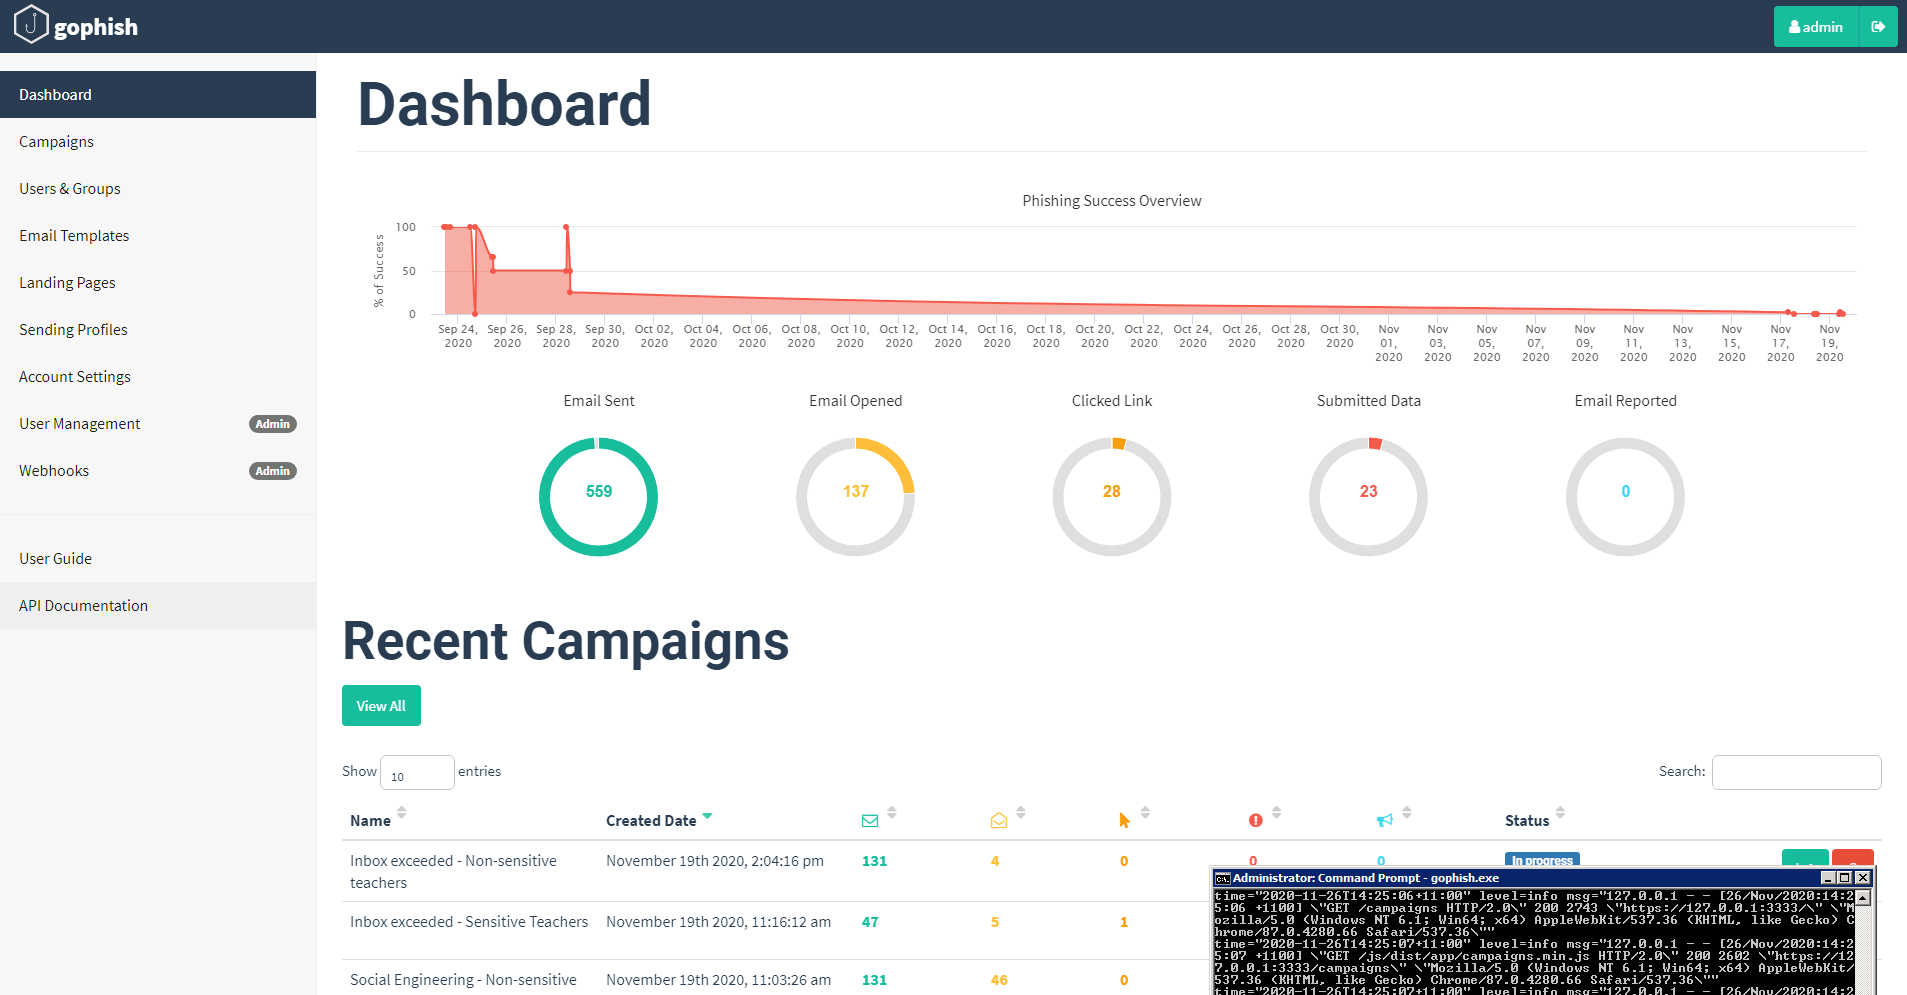
Command prompt output from GoPhish on an initial launch
When the server first runs, it generates a password that is displayed on the command prompt window. I grabbed a copy of that. The IP and port of the server’s web interface is also given, which I copied into your browser’s URL bar. My browser warned me the site is insecure; clicking Advanced and Proceed and I could see the admin interface. I used the default username “admin” and the generated password to log in, then set a new password when prompted.
The GoPhish system with facilities to build campaigns
The VM and the server needed to keep running while configuring the system, sending phishing emails and afterwards to track and redirect users.
Campaigns
On the left-hand menu there are items for setting up components of a campaign. The nice part about setting these up separately is that this allows you to mix-and-match different combinations of components when you put together a campaign.
I don’t think it would be wise to share our templates here, but if you are from a school, feel free to call or email me and I will share mine with you.
Sending Profiles
Each campaign needs a sender.
For credential campaigns that lead a user to a page, replying is not important, so we used a sender that looked real according to where the email was supposed to be coming from (eg no-reply@ato.gov.au).
For spearphishing campaigns, the sender profile should represent a person of authority in your organisation, leading replies to a fake email account outside your organisation that looks like it could be that person’s personal email address. We set up a Gmail account for this. For added realism, we used the real email address of the impersonated sender in the From field, but add a Custom Header field with the name Reply-To directing replies to the fake email account. (We only used this level of sophistication on our most at-risk staff. Normally such an attack shouldn’t be possible as the School blocks domain emails coming from non-domain accounts, but they may experience this in personal emails.)
Email Templates
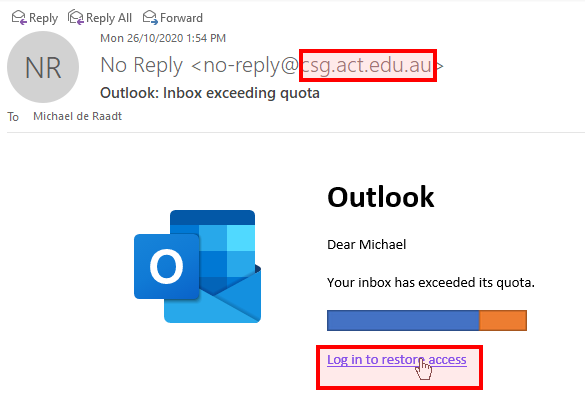
We set up a number of email templates representing credible communications from authorities who might contact a person out of the blue. The key message is a request for urgent action. We added content in the template editor’s HTML tab (you can also click the Source button to toggle WYSIWYG mode). For images, we embedded these as base64 encoded content so they are sent within the email, rather than links or attachments (see tools below). The email template can embed recipient names if you want it to be more sophisticated; these names are uploaded with email addresses. We ticked the box to add a tracking image to each email, which allowed us to know if a user has viewed a message (assuming they downloaded the linked tracking image, which is not entirely reliable).
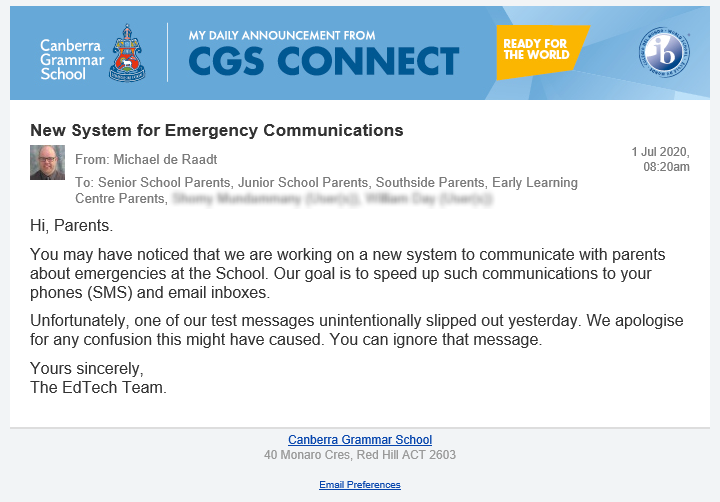
We created templates that suggested contact from the Tax Office, from the School asking for urgent login and another suggesting the user’s inbox was full, needing action.
An example phishing email with problematic elements highlighted
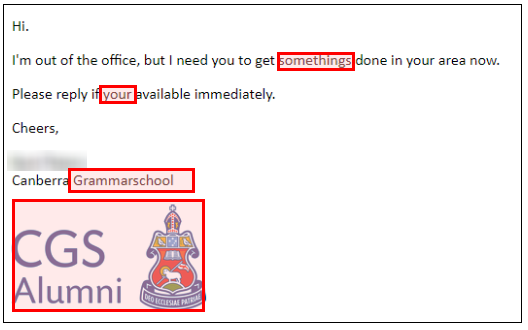
For spearphishing, you are sending emails to tempt recipients into replying. We used a sender profile for a person who could be identified as an authority from the School’s website. Our email template suggested urgency with some unstated action needed. The email included a signature, including an embedded base64 image, but it was deliberately different to the School’s defined email signature format. We spoke to the person we were impersonating to get their support and cooperation and people did contact that person directly.
A spearphishing email, pretending to be a School Director, but including spelling errors as well as signature and image inconsistencies
Landing Pages
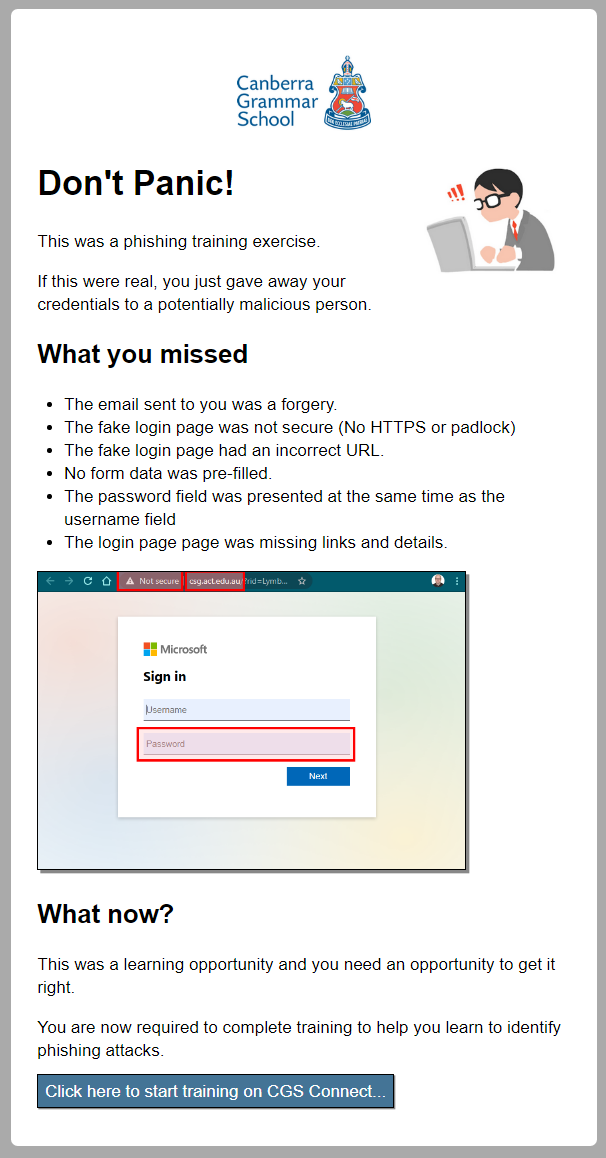
For capturing credentials, users will be led from a link in an email to a landing page. Landing pages should include inputs for users to put in their credentials. To create a fake landing page we went to the real page, copied its HTML, brought linked CSS into the document and converted linked images into embedded base64 images so the page is entirely self contained. GoPhish can help you create such landing pages if you provide it the URL of a real landing page, but we didn’t try this. Some skill with HTML will help you make it work. Don’t worry about where the form is set to send it’s information (the <form> action attribute), the phishing system overrides this to bring the traffic back into itself before redirecting users. We ticked the box to capture submitted data, but don’t tick the “Capture Passwords” checkbox.
A fake landing page, requesting credentials, with problematic elements highlighted
Redirection
In a phishing attack that leads a user to a page to provide their credentials, there is an option to redirect the user to a page afterwards. Rather than this being within the phishing site, which should be suspect to users, we redirected users to a page hosted on the server of our School LMS, so the domain would be familiar and acceptable security was in place. The page could be accessed without authentication so as not to disrupt the effect of the exercise. The page could be passed URL parameters so that information about the specific attack could be recalled to illustrate what the user missed in the attack. At the bottom of the page, users were directed to the phishing training quiz.
Page users were redirected to after providing their credentials.
Uploading Users
Groups need to be created in a spreadsheet. We used full-time staff only and divided them up into sensitive and non-sensitive groups according to financial capabilities and levels of access to sensitive information. For each group we created a CSV file with the following columns, including a header row. All fields except Email can be blank, but you can draw on these other fields in templates, if you wish.
First Name,Last Name,Email,Position
During our initial setup, we had groups that included EdTech department staff for testing.
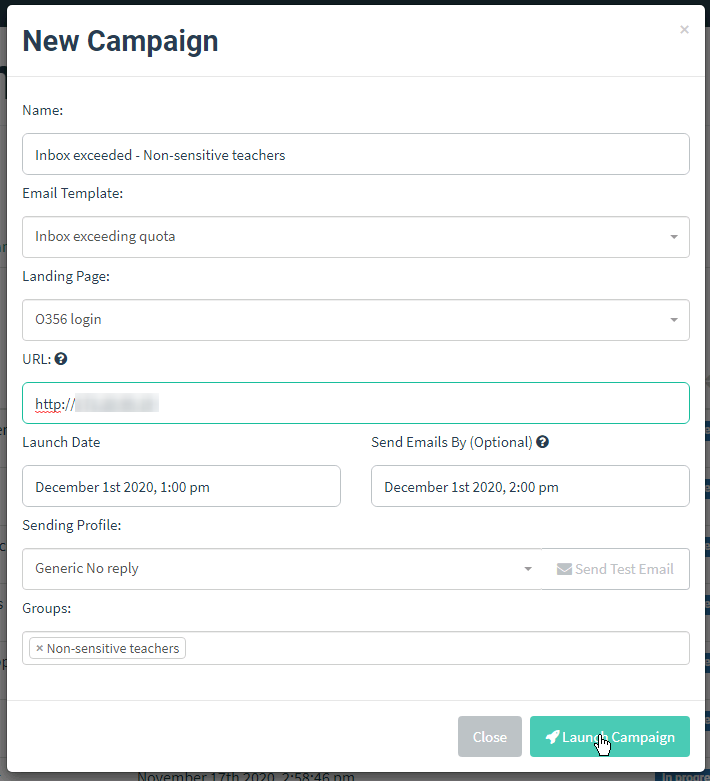
Launching a Campaign
We started by warning our Service Desk we were are about to start a campaign and how to respond to users reporting phishing emails. We provided text to make responding to these emails easy and consistent.
For our spearphishing campaign, we warned the person we were impersonating that we were about to start. We discussed how to respond to queries that came to them.
We created a new campaign from the Campaigns page.
We picked an appropriate combination of:
email template + sender profile,
landing page (irrelevant if spearphishing) and
user group.
For the URL, we mixed up the address similar to the School’s actual domain (trickier) with the IP address of the phishing server (less tricky).
We set an end time about an hour later using the “Send Emails By (Optional)” setting and the system spaced out sending the emails.
Bringing together the elements of a campaign
Once launched, we kept an eye on various campaigns through the Dashboard page. Campaigns were conducted with groups over a period of three days using different email+landing page combinations.
Replies to the spearphishing emails went to a fake email account. To each reply we informed the person replying that they had been sent a fake phishing email, what they should have done and that they should then undertake training. Again, a pre-determined text response was used.
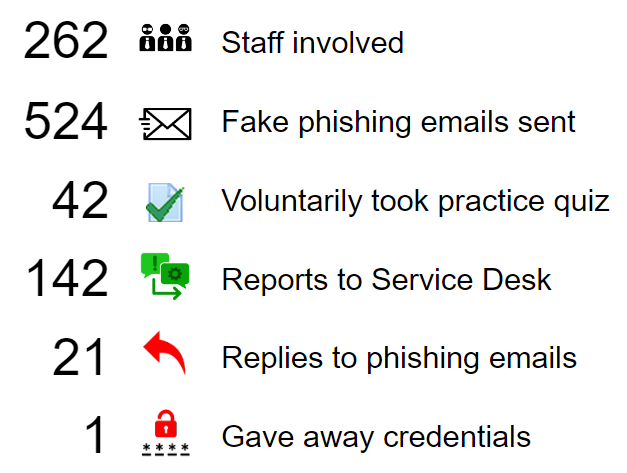
On the whole, the experience of running phishing training was generally positive. Most staff expressed a keenness to be tested when the exercise was discussed publicly. Only a couple of staff said they felt uncomfortable after failing the exercise. Responses from staff allowed us to improve our advice during training and for a future repetition.
It’s hard to know exactly how many emails were received by users as some would have been filtered by users’ email clients. It’s also hard to know how many people looked at the emails as the tracking images would have been hidden by most users email clients, unless they chose to reveal them. We did get some numbers, which rounded out as follows.
While not all staff responded in an ideal fashion, awareness was raised and people who failed the exercise were directed to remedial training. Ultimately a positive education exercise was achieved.
The testing also shows our email system responds appropriately to most phishing emails and can be trained when users identify emails as Junk. This was also good training for Service Desk staff.
The phishing system can be reused in future if this exercise needs to be repeated.
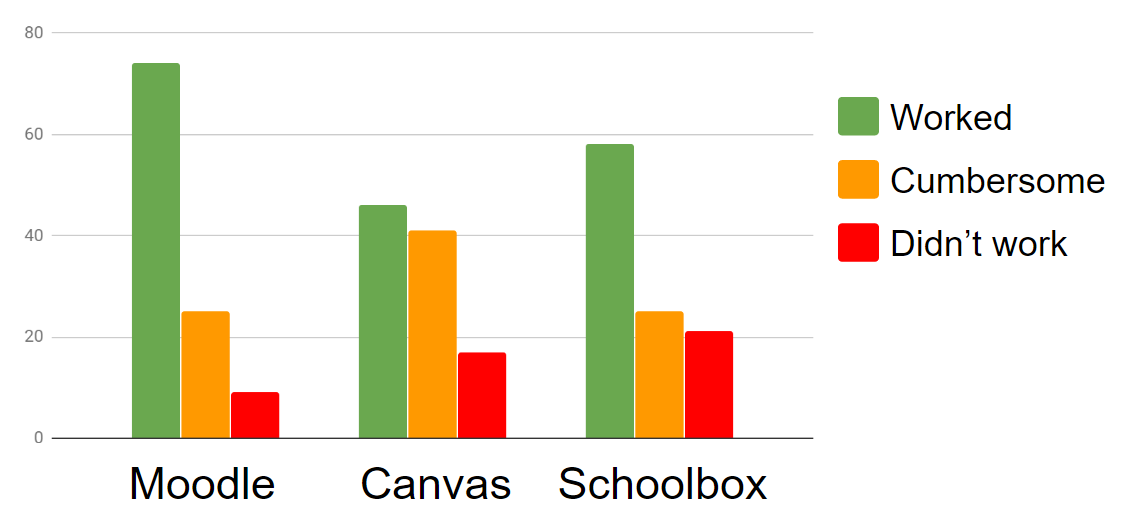
If we had used an off-the-shelf LMS, our potential to customise the system would have been limited. Part of the reason our School chose Moodle was to allow us to make it our own. This potential is a double-edged sword: it takes time and effort to customise a system, especially when School leaders get in the habit, but the results allow us to achieve a system we would not have been able to achieve otherwise.
One trap to avoid is modifying core Moodle code as doing so will affect your future upgrade prospects. So far we have managed to avoid this and have been able to make all our modifications by creating plugins.
An Announcements System
Moodle allows you to use the Forum module as a mechanism for sending messages to users at course and site levels, however when planning for an LMS change, stakeholders were asking for particular features the Forum module doesn’t deliver, so we started developing our own Announcements system and it’s been the largest single developed solution we have created.
Our announcement system allows us to:
target single users, groups, courses, campuses, year levels and more;
combine audiences in union (eg all Year 7 and 8 students) or intersection (Football players in Year 10);
send messages to parents (mentors) relative to students;
moderate messages sent to large audiences;
impersonate senders (eg the PA to the Head sending on behalf of);
brand single message and digest emails;
see an infinitely scrolling list of past announcements;
see context specific announcements (eg course-related) in that context;
Students (and their parents) need ready access to their timetables for the day. We provide that with links to courses for each period. The display changes over the course of the day as time passes. It’s possible for users to skip forward by days, according to timetable information provided by our SIS.
In the Primary school, timetables are simpler. We show a link that takes students straight to their year-level course. We also show unusual activities such as specialist classes (art, PE, music, etc) and individual tutoring sessions.
We add these blocks in a region we’ve added at the top of the Home page.
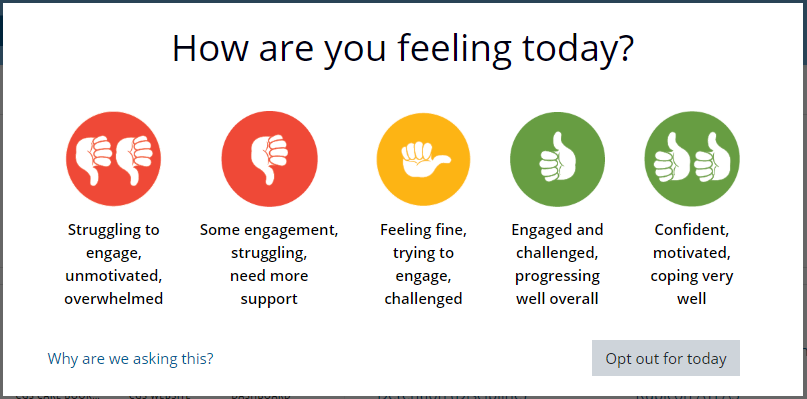
Particularly during remote learning, we were needing a way of gauging staff and student mood, to assist pastoral care staff and counsellors. Our solution was to create an overlay on the front page that asked users how they were feeling.
Responses are channelled into a table that allowed us to generate alerts and reports.
The core Mentees block shows only a student names to a parent, with links to the students’ profiles. We have created an enhanced version of this with photos and direct links to the student’s courses (which we allow parents to access). This provides parents with quick access to all their children’s involvement in an obvious fashion.
The block is placed in an added region at the top of the Home page.
When a parent has many children, the block can be collapsed down. There’s also an option to hide the content of the block for teachers who are parents and don’t want students in their classes to see details.
For our School, the LMS also acts as a portal to other systems. We therefore created a quick links block that allows buttons and text links to be added for specific audiences that can be targeted by combinations of site role, campus and year level, giving a personalised experience.
The Boost theme is more responsive than previous themes and we’ve embraced it. One downside to the simplified navigation is that only current courses are listed. To allow access to past courses we created a plugin that adds them in an expanding menu below the normal list of courses.
The RecordRTC features of Moodle provide convenient audio and video recording, but the open formats it uses are not respected by Apple devices. We looked at the Poodll plugins, but the downside was that our recordings would need to sit on servers overseas. We created a tool that runs in the background and transcodes the audio and video files to formats that are compatible with Apple devices and provides these compatible links embedded as additional source files within the original links for compatability.
Most of our user data comes from our SIS. Automating this means the LMS is easily managed. As well as syncing user details and course enrolments, we’ve created a number of admin tools so we can also sync:
When setting up your Moodle site, you may want to consider how long courses will live and how you will “roll” them over, which means making them ready for a new cohort.
Edit: We created a plugin to assist with setting enrolments to manual for archived courses. I’ve updated that part of our process below.
It is possible to leave courses in place and simply reuse them, but I wouldn’t recommend this as courses can accumulate a lot of mess over years, both in content and settings. Moodle’s backup, restore and import processes are set up to easily copy courses, adjusting to new timelines. Our approach is to create a new copy of courses for each teaching period. This also affects how we name and organise our courses.
Keeping a version of each past course, as it was taught, means teachers and students can remain enrolled in that course for years, referring back to it over time. Recreating courses means the teacher only has to focus on the current instance and not worry about maintaining historical activities and resources. It also doesn’t greatly increase storage as Moodle’s file management transparently keeps a single copy of files that might be used in multiple courses.
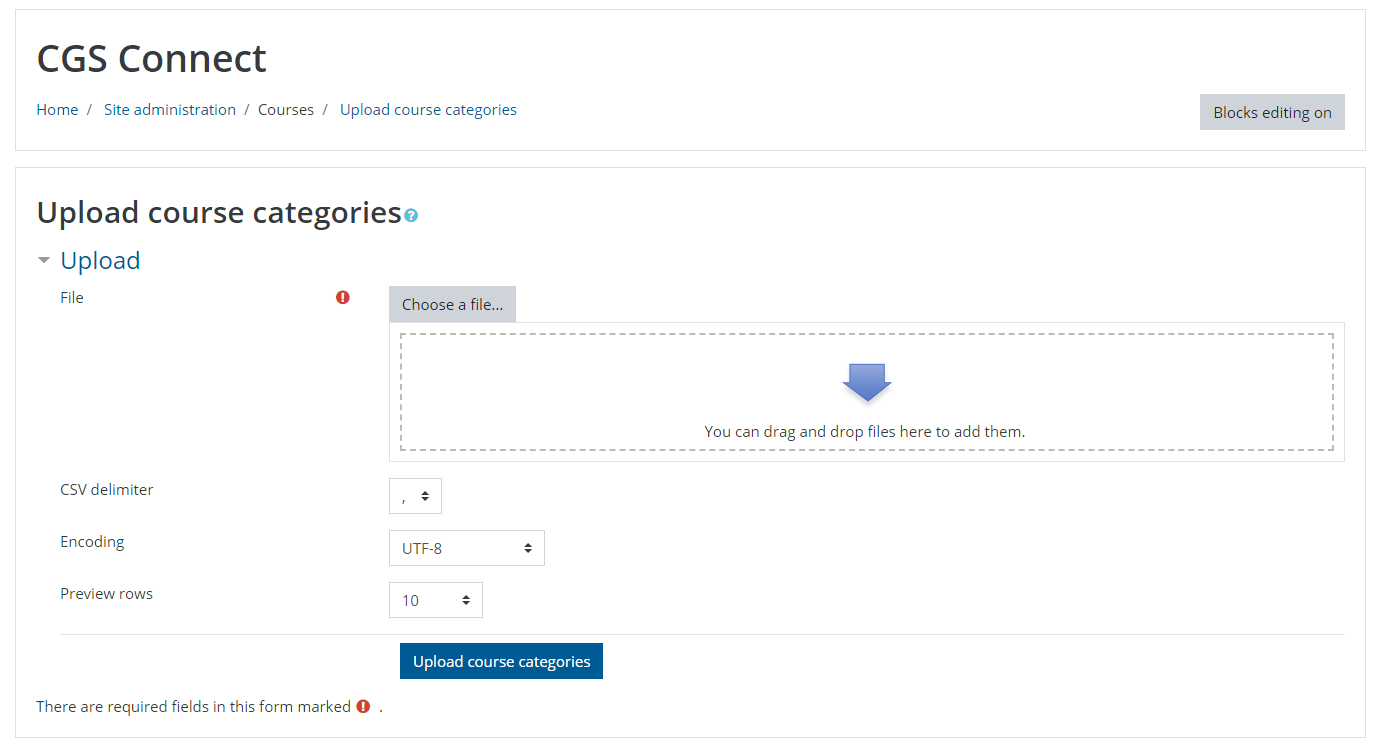
We roll-over our academic and sports courses every six, 12 or 24 months, depending on the length of the courses. Our roll-over process relies on feeding a number of spreadsheets into Moodle admin tools. One optional added tool is the Upload Course Categories tool.
Our roll-over process therefore has three stages: preparation of spreadsheets (CSV files), using these to execute course changes and make copies (as well as a few manual changes) then a clean up of the results while the system continues to be used.
Preparation
Once you have set up the following spreadsheets once, reusing them with new details is very easy. We use a collaborative Google Sheet and then export sheets as CSV files when we need them.
Prepare a CSV file containing a list of categories that will contain courses that will be rolled over. Include the following fields: idnumber, name, description
The new categories will reflect the structure of the current categories, but will be rooted at a category for the past year (eg 2019).
The idnumber and description fields can be empty, but must be present as columns
The name field includes the path with forward slashes (/) between levels, eg “2019/Senior School/Senior Academic/IBDP”
Prepare a CSV file containing a list of new courses with the following fields: shortname, fullname, idnumber, category_idnumber, format, showgrades, templatecourse
The shortname and fullname should follow the format described using the naming convention (see ours).
The idnumber will match the course in the SIS.
The category_idnumber is the target category ID (we use short words for these codes).
The format is the course format. We use tiles for academic courses.
The showgrades controls whether grades are shown; the value will be 1 for academic courses and 0 for other courses
The template course will be the idnumber of the previous instance of the course you will be rolling over (copying).
Execution
As this affects users’ experience, it needs to be done out-of-hours and relatively quickly, so be prepared. You may want to try this a test system first to ensure you get it right. The critical bits are done in maintenance mode.
Create the roll-over categories using by uploading the first CSV created earlier (the list of categories) to Site admin > Courses > Upload course categories (or create the categories manually if this plugin is not installed).
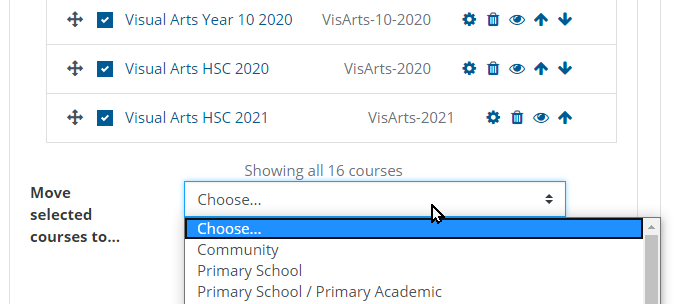
Manually move each course that is being rolled over into its corresponding roll-over category (under the year category). You can do whole categories of courses at a time.
Put the site into Maintenance mode in Site admin > Server > Maintenance mode.
Wait for a minute to ensure any cron jobs are completed.
Create new courses, copying old courses, by uploading the third CSV you created earlier (the list if new courses) to Site admin > Courses > Upload courses (this copying may take a while). If you have a large number of courses, you may want to do this in batches.
Set end dates for rolled-over courses by uploading the second CSV you created earlier (formerly the current courses) to Site admin > Courses > Upload courses.
Check that courses are in place and set up.
Freeze the year level category (assumes freezing is enabled at Site admin > Development > Experimental settings)
Take the site out of Maintenance mode.
Clean up
The following can be done while the system is in use, but shouldn’t be delayed.
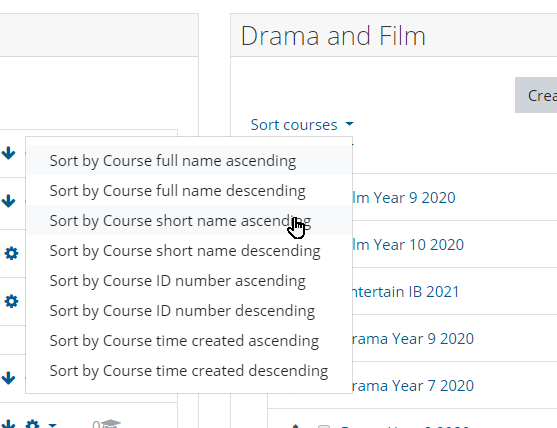
Sort the courses in each category by short name ascending. Check this makes sense and possibly re-order courses into a more logical order (eg, Pre-S, Pre-K, K, 1…) if necessary.
Copy any course images to the new courses. These don’t come across in the course copy.
This post describes the technical details of the setup of Moodle as an LMS, announcements system and portal in a School. For details of the greater change management project, please see my previous post: An LMS Transition Project.
After Moodle was decided on as the preferred system, there were a number of implementation decisions that needed to be made. Over time we have adjusted and improved upon our installation and I hope to share advice with other schools, particularly as a lot of Moodle advice is given in the context of tertiary education.
We have two systems running: one for testing and one as our production server. The configuration for the test server is mostly the same as the production server, except for redundancy and backups. In this document I will focus on the production instance.
Database
Moodle works best with PosgreSQL and if you have no DBMS preference, I suggest you go with that. At our School we had been running MS SQL Server for a number of systems, so it made sense to stick with that. Speed is about as good as PostgreSQL, but there are some additional settings needed to accommodate Unicode characters (guide). Staying with a single DBMS has also made cross-system reporting, backups and the focusing of expertise simpler.
The database for Moodle is hosted on two VMs with automatic fail-over. Each has 8 CPU cores @ 2.3GHz, 160GB storage (all flash) and 16GB RAM, which seems to be more than enough for our application. The storage is split across a few partitions to allow resizing for different DB tables (eg logs) as needed.
Server
For the webserver, we are running IIS under Windows. Again this is not the best option for Moodle (most use Linux with Apache), but it is simpler for our system administration and backups. Running a relatively large instance of Moodle on Windows has been more challenging than I thought it would be, but it can work.
The VM for our web server has 16 CPU cores @2.3GHz, 550GB storage (all flash) and 16GB RAM. The Moodle data directory sits on a separate 500GB partition to allow resizing when needed.
We’re running a recent, but not bleeding-edge PHP version. We did have to pick a version that would work successfully with the PHP drivers for our DB, Redis cache and for Solr. Within php.ini, increase the max_execution_time (3600) and max_input_vars (20000). Turn on the various drivers Moodle suggests (except I suggest not enabling opchache on your development or test servers, as that makes code tweaks possible without them being cached). To allow Curl to work with SSL, you need to download certificate from the CURL website into a location defined by curl.cainfo in php.ini.
Windows has an arbitrary limit of 4000 on TCP sockets. With a web connection, DB connection and cache connections, each user can be utilising three or four sockets and we were hitting that socket limit and creating contention. A few Registry changes are needed to overcome that limit.
We also increased the allowed filesize for IIS, mostly to be able to handle large backups (guide). In IIS > Request Filtering > Edit Feature Settings > Set Maximum allowed content length to 2147483648 for 2GB. We also made a change to Windows to work better with UTF8 characters in filenames (guide).
Git
Even though you won’t develop code on your production instance, the easiest way to fetch the latest versions of Moodle, and plugins developed by yourself and others, is to use Git. See this guide for details if you are not familiar with Git. I recommend starting all installs with Git as starting with a downloaded zip version makes overlaying Git harder.
Caching
For caching, Redis is the new preferred solution for Moodle (guide) (session handling settings) (helpful discussion). Under Windows, you have to settle for a code port hosted by Microsoft from a few years ago, but it works (download). For our purposes, we set up two Redis stores so we could separate session caching from application caching for monitoring purposes. You can create two Redis instances with the following command line commands…
…and then enable them as services using the Windows Services admin app. They will start automatically when the machine restarts and are really just blackboxes that Moodle throws cache information into.
You then need to download and install the PHP driver (matching your web server and thread-safe status) and adding an entry to your php.ini file.
To monitor the cache instances, we are using a script (download) and made a change to array at the start of the file for two caches.
If Redis is working, it should show up in Site admin > Caching > Configuration. Add an instance of Redis named Redis1 with IP 127.0.0.1:6379 and another instance named Redis2 with IP 127.0.0.1:6378. Click Edit mappings at bottom of page and add Redis1 as Application cache and add Redis 2 as Session cache.
For the session caching to work, you also need to add the following lines to your config.php file. Be sure that these are late in the file, but before the require_once() call for setup.php.
On more than a trivial site, most of Moodle’s work is handled in the background. This is also where Moodle can fail most often. This means you have to set up a mechanism to execute scripts and log the output from those scripts. In the Unix world, this is called cron and in Windows it is Scheduled tasks. For our instance, we have a scheduled task that runs every minute, triggering a batch file that runs the Moodle PHP script admin\cli\cron.php. We create a timestamp and use this to create a new file that we can pipe the output from the cron script into. We also have another scheduled task that cleans up cron output files after five days. We use anther log file that we output the returned status and run time into for each cron run, which is a helpful overview in seeing when cron tasks run long; we truncate the file to 30,000 lines to keep a few days of history.
Moodle takes care of what tasks it will complete during a cron run. It understands overlapping tasks and scheduling itself, so you don’t have to. It maintains locks for overall cron running, ad hoc tasks and individual tasks. What can irregularly happen is that a task can fail and the locks are not cleared. By default, locks are cleared after 24 hours, but this does not always work and a lot can happen in 24 hours. We have made a few changes to get more reliable results. First, some changes to the config.php file to use the DB instead of files for various kinds of locking…
Be sure these lines occur before the require_once() for setup.php.
We have allowed scheduled tasks to run in parallel in Windows. This means that you can have up to three scheduled task runners and three ad hoc task runners running at the same time, controlled by the limits in Moodle in Site admin > Server > Task processing. If there are long-running, multi-minute tasks (like search indexing, forum notifications, etc), other shorter tasks are not affected as much. Also, if one of the task runners locks up completely, others will still be able to run.
We’ve also put DB alerts in place to monitor the locks. When tasks have not run for an hour or when a lock has not been cleared for an hour, it sends out an alert. This doesn’t occur often, but is good to know and check on when it does.
Integrations
SSO (Single Sign-on)
Our default login is through SSO using the SAML2 Single Sign on plugin. When users hit the site they are redirected to sign in through SSO, if they haven’t already. Our SSO sessions are handled by an external provider and works across most of our web-based systems. The only manual authentication to Moodle is for the main admin account which is accessed by an SSO bypass URL.
Google Drive
To access Google services, you need to register for an OAuth2 client ID (guide). We do not use the authentication side of this as we use SSO, but we do used this for Google Drive repository access.
One Drive
Like the Google API, you need to register an OAuth2 client for Microsoft to be able to access One Drive (guide). There is a more extensive plugin set to access more MS API services, like OneNote, but we were not able to get that working.
Google Analytics
One way to get stats about users passing through your site, including their locations and device details, is with Google Analytics. You have to set up an account on the Google Analytics site and get a tracking ID. I recommend the Local Analytics plugin, which makes setting up the link to Google Analytics easy and provides more meaningful information when you are analysing traffic later.
Solr (Search)
Moodle has some basic search functionality baked in, which is easy to use, but does not index PDFs and other files for search terms. We set up the Solr search engine, which runs in the background and is accessed by Moodle’s cron to index new and modified content hourly. The process of setting this up can be achieved by following Moodle Solr Guide and this relevant Moodle Forum discussion.
The Solr port for Windows uses Java (unfortunately), so you have to install JRE. You can then install Solr 5.5.5 from Solr Downloads page (see also this Solr Guide).
You need to download the PHP extension DLL from this Forum page or PECL page, depending on your version of PHP.
There are some tricks to get Solr to work with Moodle. Under the Solr install folder server\solr\moodle\conf\managed-schema you have to comment out the following lines (using XML comments, like HTML comments).
We also had to increase the number of items that could be searched, otherwise admins and users with broad access to lots of content will face errors when searching. In the file server\solr\moodle\conf\solrconfig.xml we changed the maxBooleanClauses value to 524,288 (32,000 wasn’t enough).
<maxBooleanClauses>524288</maxBooleanClauses>
The Solr engine doesn’t run as a service, so in Windows we added a scheduled task to start the program (bin\solr.cmd with arguments start -m 2g) at startup and keep it running (checking hourly). It seems to run happily without our intervention.
A search result based on PDF content
Unoconv (PDF rendering)
One of Moodle’s nicest features is the ability to render documents so teachers can annotate on them during marking. We tried GhostScript, which has worked in the past, but this resulted in errors for us. One alternative is Google’s Document converter, but this is slow when large files have to be sent for rendering and returned. Another alternative is Uniconv, which is part of LibreOffice (guide). You need to download and install LibreOffice. Download the Unoconv source code zip from Github, extract the unoconv script, rename it to unoconv.py and store it in C:\unoconv\. Create a unoconv.bat file in C:\unoconv\. Add paths to Libre Office’s python.exe and the unoconv.bat files in Moodle’s config.php file (see config.dist for examples). In Site admin > Plugins > Document converters > Manage document converters, unhide the Unoconv document converter and promote it to top.
A rendered PDF assignment, ready for annotation
Moodle Setup
Advanced Features, etc
The following table shows where we have deviated from defaults and why.
Feature
On/Off
Why
enableblogs
unchecked
Not needed in School at this stage
enableplagiarism
checked
Used with TurnItIn
enablebadges
unchecked
Possibly useful later, but a big step initially
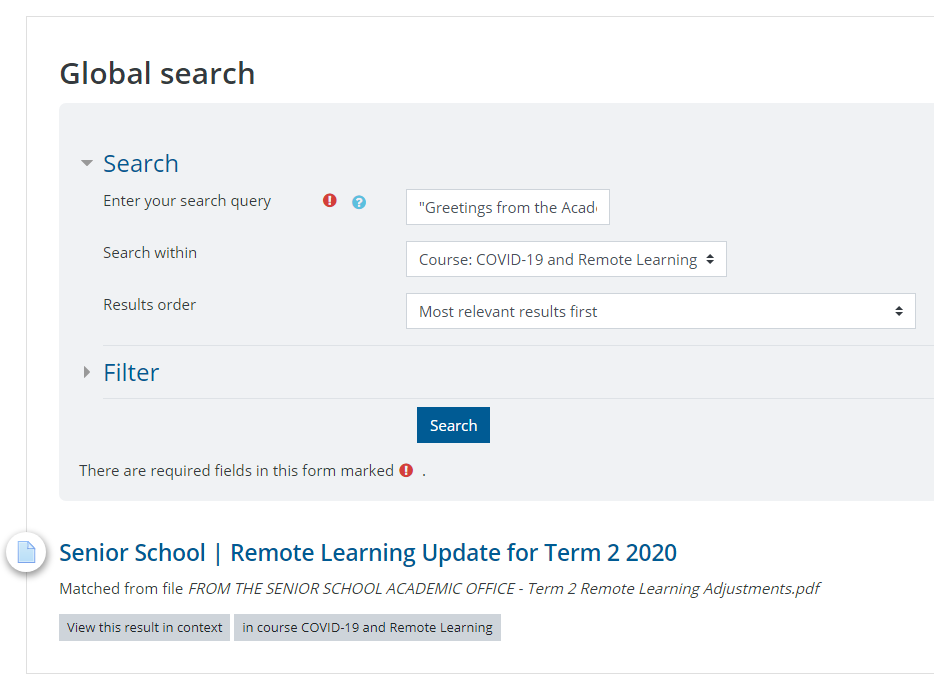
enableglobalsearch
checked
A requirement identified by stakeholders
core_competency
unchecked
Possibly useful later, but a big step initially
contextlocking
checked
Allows historical courses to be kept in read-only mode (frozen)
Security and Privacy
A number of measures can be taken to secure the Moodle setup as advised by the Security overview report (Site admin > Reports), which includes links to guides for each security check.
A security measure you will want to undertake is to fix the paths to system files that can be viewed in Site admin > Server > System paths; this can be done by adding these settings in your config.php file. Fixing these prevents someone who gains admin access on the front end modifying these to gain access to back-end processes.
To secure the site, we’ve reduced the capabilities of the Authenticated User role, which is the base role for most other roles. A good way to secure your permissions is to edit the Authenticated user permissions (Site admin > Users > Permissions > Define roles), looking for the icons under the Risks column, changing anything with an XSS () or Configuration () risk icon to Prevent or Prohibit.
Prevent means it can be overridden by a more specific role, like a Teacher, while Prohibit essentially means only administrators can use that; be liberal with Prevent, but consider using Prohibit carefully as it can break the experience for users unintentionally.
Being outside Europe, we’re not subject to strict rules for privacy. We’ve therefore turned off the tool that allows users to automatically delete their personal information (automaticdeletionrequests) and the display of the data retention summary (showdataretentionsummary).
User Roles
In order to get Moodle to work the way you need it to in your School, you will need to make changes to all roles and set up some new ones.
General Changes
We made a number of changes to the Authenticated user role to control the user experience. This is partly because we have a student information system (SIS) that is the source-of-truth for identity information and because enrolments are defined by timetables.
Capability
Permission
Why
Prevent users from viewing courses without participation
moodle/course:view → prevent
Users in the School should only see courses they are enrolled in through the timetable
Prevent users from browsing courses unless explicitly given that capability
category:viewcourselist → prevent
Only staff can browse. Parents and students should only see what they’re enrolled in
Prevent users from seeing the participants list unless explicitly given that capability
As a means of simplifying navigation, we limit course enrolments to users involved in courses. Users do not see other courses in their Boost navigation bar. However, there is a desire to allow teachers to be able to browse within their own parts of the School and some staff, such as learning support staff, need to be able to browse to a student’s course in order to support them. We created a “Browser” role that is equivalent to a non-editing teacher but is limited to category levels. We automatically sync teachers as browsers to their parts of the School. This provides access without affecting course enrolments.
Parents
Moodle was first started to support education at tertiary level and, although it is used in other sectors, that origin shows through in how parents are handled in the system. Normally parents can only see their student’s profiles and are not allowed into courses. We don’t want to allow guests freely around the system and we don’t want to enrol parents in courses as that pollutes the participants list and confuses marking lists. We have created Parent role in the normal way, but we allow this to be assigned at a category level. We then sync parents to categories containing courses their children are enrolled in. We control their access to specific courses within these categories by using a customised version of the Mentees block on the site Home and student profile pages, showing the courses their students are enrolled in and allowing direct access. This is not a perfect solution, but it will work until Moodle understands Parents better.
Parents are themselves enrolled in a number of “Brochure” courses depending on what part of the School their children are enrolled. These courses allow posting of general academic and co-curricular information and also act as a means of sending targeted announcements.
User Photos
Getting user photos into the system is relative simple. We have a script that exports staff and student photos from our SIS into a folder, each with filenames using their user ID. Zip all the photos and drop the zip file into the form at Site admin > Users > Upload user pictures. We repeat this annually after photo day.
Plugins
Moodle has thousands of contributed plugins that you can add to your site; this is one if its strengths. Be cautious about adding plugins, however, as developers are volunteers and if they stop developing your favourite plugin, you may be burdened with the responsibility of maintaining that plugin through future Moodle upgrades. Look for plugins created by developers that are active and responding to user questions. I co-wrote a book with Gavin Henrick about choosing Plugins and, although the list of plugins is aging, the first few chapters about evaluating plugins is still relevant.
The following is the list of plugins we use (with configuration changes we made). This does not include plugins we have developed ourselves.
We have turned off the following standard activities.
Chat
IMS Content Package
External Tool
SCORM Package
Survey
Wiki (using OU Wiki instead)
The following blocks are disabled.
Blog Menu
Blog Tags
Community Finder
Courses
Flickr
Global search (in theme at top of page)
Latest Announcements (we use our own)
Latest Badges
Login
Navigation
Private files
Recent Blog Entries
For Plagiarism detection, we use TurnItIn. There are alternatives, but that was a pre-existing system used by the School, so it was easy to transition that over. TurnItIn controls distribution of their plugin in a deliberately confusing way. You can try this guide and seek further support from TurnItIn if you want to go that way.
In terms of Text editors, we have disabled the TinyMCE editor and rely on the more accessibility-friendly Atto editor. For the RecordRTC plugin, we’ve increased the time limit to 300sec (10min). For the Table plugin, we’ve allowed border styling.
Our Front Page
The default landing page for Moodle is the Dashboard page. This makes sense when students are the main audience without parents, but in a School, the landing page is used by a wider audience. In our School, the landing page also acts as a portal to other systems and for communications, so we needed it to be consistent. For this reason, we set the Default home page setting to be the Site home and we’ve actually hidden the Dashboard using a CSS tweak in our theme. It is also just simpler to have one landing page.
Talking about themes, we use a child theme of the default Boost theme (guide). This means we benefit from improvements to Boost while allowing us to make customisations as needed. As well as customising colours, we are able to add additional elements, such as block regions, and hide elements that are difficult to disable through admin settings (like messaging controls). The result is a very clean interface.
Course creation and organisation
Our organisation of categories and courses was set up to reflect the organisation of the School itself, giving a natural way of browsing to courses (most users only see courses they are directly enrolled in).
Our School caters for students from early learning to year 12. The School is divided into two main parts: Primary and Senior (High School). Within each, there are Academic and Co-curricular courses. The Senior School uses Houses to organise students for pastoral care. There is also an overarching Community category and a category for Staff. The categories are therefore organised as follows, each with courses inside.
Community
Primary School
Primary Academic
Primary Co-curricular
Senior School
Senior Academic
(Department eg Mathematics, Science, etc)
…
Senior Co-Curricular
Activities
Arts
Outdoor Ed
Sports
Trips
Senior Houses
Staff
We also have year categories (2019, 2020, …) that allow us to archive courses when they end. The structure of courses within these year categories matches the categories listed above, mostly for administrative convenience as user’s can’t browse to these courses and can only get to them if they are enrolled.
We create new courses each teaching period. For some courses this is six months, for most it is a year, and for some year 11 and 12 courses it is two years. In order to uniquely identify each course, a naming convention is used.
Fullname template
<Subject>
<Year/Award>
[<Level>]
<End Year>
[<Semester>]
Full example
Fullname examples
English
Year 9
2019
English Year 9 2019
English
IB
HL
2020
English IB HL 2020
English
HSC
Extension 1
2021
English HSC Extension 1 2021
Geography
Year 10
2020
Sem 1
Geography Year 10 2020 Sem 1
Shortname template
<Subject abbrev.>
<Year number/Award>
[<Level abbrev.>]
<End Year>
[<Semester number>]
Shortname examples
Maths
8
2019
Maths 8 2019
Ancient Hist
HSC
Ext1
2020
Ancient Hist Ext1 2020
Geography
10
2020
1
Geography 10 2020 1
Data Syncing
To be more than a trivial independent system, Moodle needs to be integrated with systems that can provide user information. We rely on table views as the interface for communicating this information. We populate these views using scripts on our SIS information. Moodle provides some syncing tools out-of-the-box and some we have created ourselves.
We sync student, teacher and parent enrolments in actual courses. For students and teachers, this is based on the timetable. For all users, enrolment in brochure courses is done depending on the part of the School relevant students are enrolled or staff are employed.
We turned off automatic course creation to ensure control over new courses, just in case.
Group Syncing (custom)
Because of our course organisation, students enrolled in courses may be in different classes with different teachers. To allow teachers to distinguish their own class for assessment and communication, groups are automatically set up for each class. To avoid interfering with manually created groups, automatically created ones are associated with a specific grouping.
Mentors (custom)
The parent-child relationship uses the generic mentor association in Moodle. We have created a plugin that populates these relationships automatically.
Category and System roles (custom)
To assign parent and browser roles to categories and system levels, we have set up a sync that populates these. This allows parents to see their childrens’ courses, teachers to browse courses within their department, learning support staff to browse into student’s courses and School leaders to be given Manager roles depending on their job position.
We are also working on grade syncing between Moodle’s gradebook and our SIS to streamline the flow of grade information.
Lessons Learned
Keep things together on your network
When we started setting up our VMs, we had them in different parts of our network. Our webserver VM was in the DMZ, but the database server was inside our network. Traffic between the VMs had to traverse our firewall, which created sync issues and a lot of errors. Bringing them together on the network solved these problems.
Don’t move your server
As we migrated systems from our old LMS (Blackboard) to Moodle, the old system was still in use. It was our intention to set up our new system and then simply move it so to the same URL as the old system, so any users would simply arrive at the new system. The new system was called next.cgs.act.edu.au, but when we needed to shift this to connect.cgs.act.edu.au. This caused some big problems, both within the system and with our DNS registration, leading to an unwanted outage, just when we wanted people to start using the new system. A better approach would have been to set up the system on a new URL and redirect traffic from the old.
Migration takes a lot of time
Moodle does have some tools that let you import content from other systems. We thought that since so many people had shifted from Bb to Moodle, the process would surely be simple. Our initial experiments with common cartridge showed that what Bb delivered was a large pile of mess. Cleaning this up took more time than manually importing content and this manual touch led to better courses in the end. Translating Bb’s many-layered courses into Moodle’s flat course structure was also tricky.
Our School had determined that the transition between systems should be done quickly, without bothering teachers and with all historical content migrated for future use. With the help of a few good recruited workers who were familiar with Moodle, we managed to deliver a migrated set of courses, however it was late, which negatively affected the change experience for many users.
Be sure to carefully measure how much content you need to migrate, give yourself plenty of time to migrate content and be transparent about migration progress with users.
Since I arrived at Canberra Grammar School, an LMS transition seemed to be on the cards. Engagement with Blackboard, the incumbent system, was low and anecdotal reports suggested disatisfaction.
A project with process
I had worked on a number of large projects based around an EdTech Project Management Process, based on PMBOK, and in 2018 the go-ahead was given for an LMS project. It was estimated that a proper transition would take around two years, which was an unprecedented length for an IT project in the School, but we were going to do it right.
Determining the need for change
The first step was determining the need for change. Before we could commit to an expensive change, we wanted to objectively know it was necessary. At CGS, the LMS is used for three main purposes: as a learning environment, as a means of making announcements and as a portal to access other systems. A survey was created to gauge whether users felt confident, enabled and satisfied with the incumbent system across these purposes. We also asked users to identified how they were enabled and blocked in their use. The survey was voluntary but yielded a 61% response rate, which allowed confidence in the results. In relation to use as a learning environment, the findings showed users were confident, but most did not feel enabled and half were not satisfied. Similar results were found for other purposes of the system.
The initial attitudinal survey suggested that a change was warranted and identified a number of deficiencies to overcome in a replacement, such as the interface and ease of use.
Planning
Driving Questions
With a project determined as necessary, planning began. Driving questions had to be answered to identify the, mostly pedagogical needs, which included an improved online teaching environment, refined flows of assessment and reporting information, the potential to collect data for analytics, a focused communication system and a portal to link to other systems.
Coordination
Some history of the previous system was compiled for context and a rough schedule was started.
Consultation
The people who were going to be involved in the project were identified including:
A Project Leader and Data Owner (an executive responsible for strategic change and respected teacher),
A Consultative Committee (the standing EdTech Committee),
A Change Manger (myself) and
A broad range of Stakeholder Groups.
A RACI Matrix was drawn up to ensure the project members (and implicitly others involved), new what level of responsibility they had in the project.
Because the project was going to affect many users, the stakeholder groups consisted of a broad range of staff (Primary and High School teachers, pastoral leaders, executives, communications and support staff), students and parents, forming nine groups in all.
Scope
In the case if this project, it was important to identify the parts of the greater system that was being reviewed. The branding we use for the system “CGS Connect”, the consistent theming across systems and the transparent linking between systems meant that the boundary between the system were not obvious to all users, including executive staff. Some areas outside the system were thought by some to be in need of change, so limiting the scope to LMS, announcements and portal allowed the project to focus on a single system change.
With the scope set, it was possible to define the deliverables and objectives of the change and to describe exclusions from the change.
Time Management
The earlier rough schedule was further developed with dependencies added. Stages like Migration and the creation of new courses were added. A period of longevity of 3 to 5 years was suggested before a subsequent review.
Cost Management
Before starting to look at alternatives, it was worth defining a budget for the project. The main differentiation was going to be whether we paid for an externally hosted system or hosted our own, with customisations and development.
Staff time costs were going to be significant for training. If we were going to make customisations then time of development staff time would be needed.
Migration would be a large up-front cost and some budget was set aside for consultation.
Depending on the system chosen, ongoing costs could vary, but an estimated budget was set to allow system costs to be compared against it. If the system was self hosted, those ongoing costs would be incurred locally as opposed to paying them to an organisation hosting the system externally.
Quality Management
Before starting a change, we set a number of quality measures were considered. The reason for doing this before starting was to allow for benchmark measurements to be made of the incumbent system. Some of the measures related to system use that could be counted or timed and some related to users’s attitudes, which would come through user testing and surveys.
A list of risks was drawn up, each with an estimate of probability and means of mitigation.
Development overrun
Migration overrun
Resistance to adoption
Focus on other projects
Considering these risks early was useful as each of them became relevant at stages of the project. It was good to have them stated in the plan and known to executives, so the project could be backed and prioritised when needed.
Communications Plan
Being a significant change, there was a long list of messages that needed to be communicated. Each message was defined with rough content, who would be responsible for sending and who would the recipients be and when the messages would be sent. The key goal of communications was to preempt the change in the minds of users and develop a sense of ownership for the new system.
Messages included notifications of coming change, invitations to be involved, demonstrations of functionality and project status reports. Recipients included various groups including staff, students and parents at various stages of the project. Messages were delivered by announcement email, at meetings and through written reports.
Procurement
With initial planning out of the way, the bulk of remaining planning time was spend comparing alternatives. The goal was to allow stakeholders to provide input from their perspective and feel they had contribute to the choosing of a new system and ultimately ownership of that system.
Sessions were held with each of the stakeholder groups. Based on an extensive list of possible LMS features, stakeholder groups collectively identified and prioritised requirements and each groups’ requirements were amalgamated. We used an electronic survey that allowed people to designate each of 89 possible requirements as “Unnecessary”, “Useful sometimes”, “Often useful” or “Essential”. Comments and general feedback were also collected for later consideration.
Each response was then given a weighted value with values averaged within groups and then across groups, giving each stakeholder group equal representation. The top 30 requirements became the criteria for comparing alternative systems.
Top 30 Requirements (by importance)
Obvious, consistent navigation
Search functionality
Single sign-on integration
Usable on small screens/touch screens
Ability to attach/link to files to announcements
Mobile notifications for announcements
Linking to Google Drive files
A tool for promoting School events
Ability to use system when Internet is unavailable
Up-to-date class/group enrolment information
Greater control over announcement formatting
Context specific landing page for different users
Sharing sound/photos/videos
A means of communicating with staff
A means of parent communication
Drag-and-drop resource sharing
Linking to/embedding web pages
Ability to elect announcement audience in granular way
Accessibility aids for visually impaired
Online archive of announcements
Dedicated mobile app for activities
Scheduling of future announcements
A means of communicating with groups of students
Understanding of timetables
Multi-language support
Surveys/forms to gather student feedback
Integration with School calendars
Ability to re-use content
Linking to Google Docs, Sheets, etc
Guest access for parents and other staff
There were numerous alternatives available. Armed with users’ criteria a number of systems were able to be eliminated through a lack of numerous necessary features. Other shortlisted systems were then scored numerically against the criteria, a process that required lengthy investigation and consultation with vendors.
For each criterion, a value was given as follows.
3 for a mature feature meeting the criterion
2 for partly meeting the criterion
1 for hard-to-apply or unproven against the criterion
0 for features absent or not advertised
Values were then weighted against the inverse value of the criterion (30 points for the highest priority down to 1 for the lowest) and then summed, leading to the following scores.
1891
2192
2198
2401
2930
3160
3161
System scores based on weighted criteria
The three highest-scoring systems, Canvas, Schoolbox and Moodle, were selected for trialing. The challenge was to create an objective trial that would allow users to select a system to implement.
Technical criteria were defined and including integration with our pre-existing systems and the ability to theme and organise spaces in the system. Each of the trailed systems was able to accommodate these criteria to varying degrees. Some needed to be judged against the technical criteria through trialing.
Trailing – A blind taste test
An instance of each of the three systems was established and populated with representative course content. Each system was themed with School branding and obvious system naming was avoided to attempt blind evaluations.
Test scripts were created that covered most of the criteria, some tests combining multiple criteria. Test steps were defined for each of the three systems in an electronic form that led the user through the test. Staff and parent representatives were invited to complete a relevant test across each system and to rate their experience with the systems as “Worked”, “Worked, but was cumbersome” or “Didn’t work” together with free-form comments. Over 100 tests were completed by users leading to a solid set of opinions with Moodle proving most functional, followed by Schoolbox and Canvas.
Students were involved in the trials by another method. A group of Primary students and another group of High School students, who each were actively involved in computer-related activities, were given the opportunity to experience each system and run through some tests. A selection of the volunteers was interviewed through a talk-aloud process across the systems while observing their actions as they used each system. Students seemed happy to explore the systems freely with aspects of colour and imagery shown to be attractive to students, influencing the formation of their opinions about the functionality of the systems, sometimes in a manner that contradicted the difficulties they experienced. This was noted for the later implementation.
Technical criteria were also applied to each system and Moodle was seen to be the best technical fit for the School. The School’s executive also appreciated the potential to customise the LMS in a way that would set the School apart, while understanding the cost and risks associated with hosting an open source system.
Based on scoring against users’ criteria, blind testing, technical criteria and the blessing of executives, Moodle was chosen as the system to implemetn.
Implementation
With a system chosen, implementation began, involving setup, configuration and customisation. A test and production instance were established so changes could be tested before being deployed. I will create another post or two describing how we have set up our Moodle instance in detail, so others can benefit from that experience.
In summary, choosing to implement and host an LMS meant that more work would need to happen locally, rather than relying on outside help. It was worth doing, but it was a challenge.
Roadshows and Piloting
With a transition at the turn of the year, as well as creating our customisation, we had six months to mentally prepare users for change. A Roadshow of demonstrations was established at weekly staff meetings to demonstrate functionality and develop enthusiasm. Volunteers from different parts of the School were given spaces for teaching, which also helped refine the organisation and configuration of the system.
Communications were send out through various means to inform the community about the system and the coming change.
Migration
In order to minimise disruption to teaching, content from the previous system needed to be migrated. Automated methods proved flawed and resulted in courses that did not resemble the source, so it was determined that manual migration work would be needed. Assistance was sought from outside organisations. One organisation pulled out at the last minute and additional assistance was found in private individuals. It was later found that the second outside organisation was delegating migration work to inexperienced users, creating work that later had to be repeated. The aim of completing the migration before the first training sessions was not met and migration activities continued over the end-of-year break.
Training
Fighting for time with teachers proved difficult. Before the end-of-year break a training session was conducted with the entire staff, which was counter-productive as users had many perspectives and some did not have migrated content to work with. With lessons learned, training after the break, before the return of students, was conducted with smaller, focused groups and proved reasonably successful. A series of subsequent voluntary CPL sessions was interrupted by the advent of COVID-19.
End Results
We’re now winding down the project, but planning to make continual improvements. When our School closed due to the COVID-19 pandemic and regular learning became Remote Learning, the recent training for teachers meant they were more prepared than they would have been if we hadn’t recently transitioned. As the system became the primary modality for teaching, engagement in the system increased dramatically.
We have achieved almost all the distinctive criteria in the new system, which will hopefully achieve more from the School than other systems would have.
When I started as a leader responsible for Educational Technology projects in a school, I lacked a framework to work within. Having come from the software development world, I understood how to develop systems, however, selecting and implementing systems is quite different.
I looked into a few frameworks for system change management and found PMBOK (the Project Management Body of Knowledge) was adaptable to EdTech projects in schools. PMBOK is a general project framework, but it is adaptable, so I set about writing a process guide and template based on it and also included a number of software and educational models to give specific relevance to schools.
In 2018 I ran a workshop at the AIS ICT Leadership conference to share my version of this process and it was well received. In summary, the process involves a number of work areas for planning, execution and change control as shown in the following diagram.
When working with a project team, a template can be used as the basis of a collaborative document to work through the planning work areas.
The most involved area is the Procurement area, which involves consultation to determine requirements, transforming these into prioritised criteria then setting a cut-off for essential criteria.
The documents below describe the process in detail including a comprehensive guide, a project plan template and the slides from my workshop (with examples of a software and hardware project in a school).
I’ve since heard back from other schools who have applied the process successfully.
I’m sharing it here now so that I can refer back to this process as I describe an LMS transition project we have undertaken over the last two years in subsequent posts.