TL;DR – School specific bits
- Setting up user roles, including parents
- The plugins we use
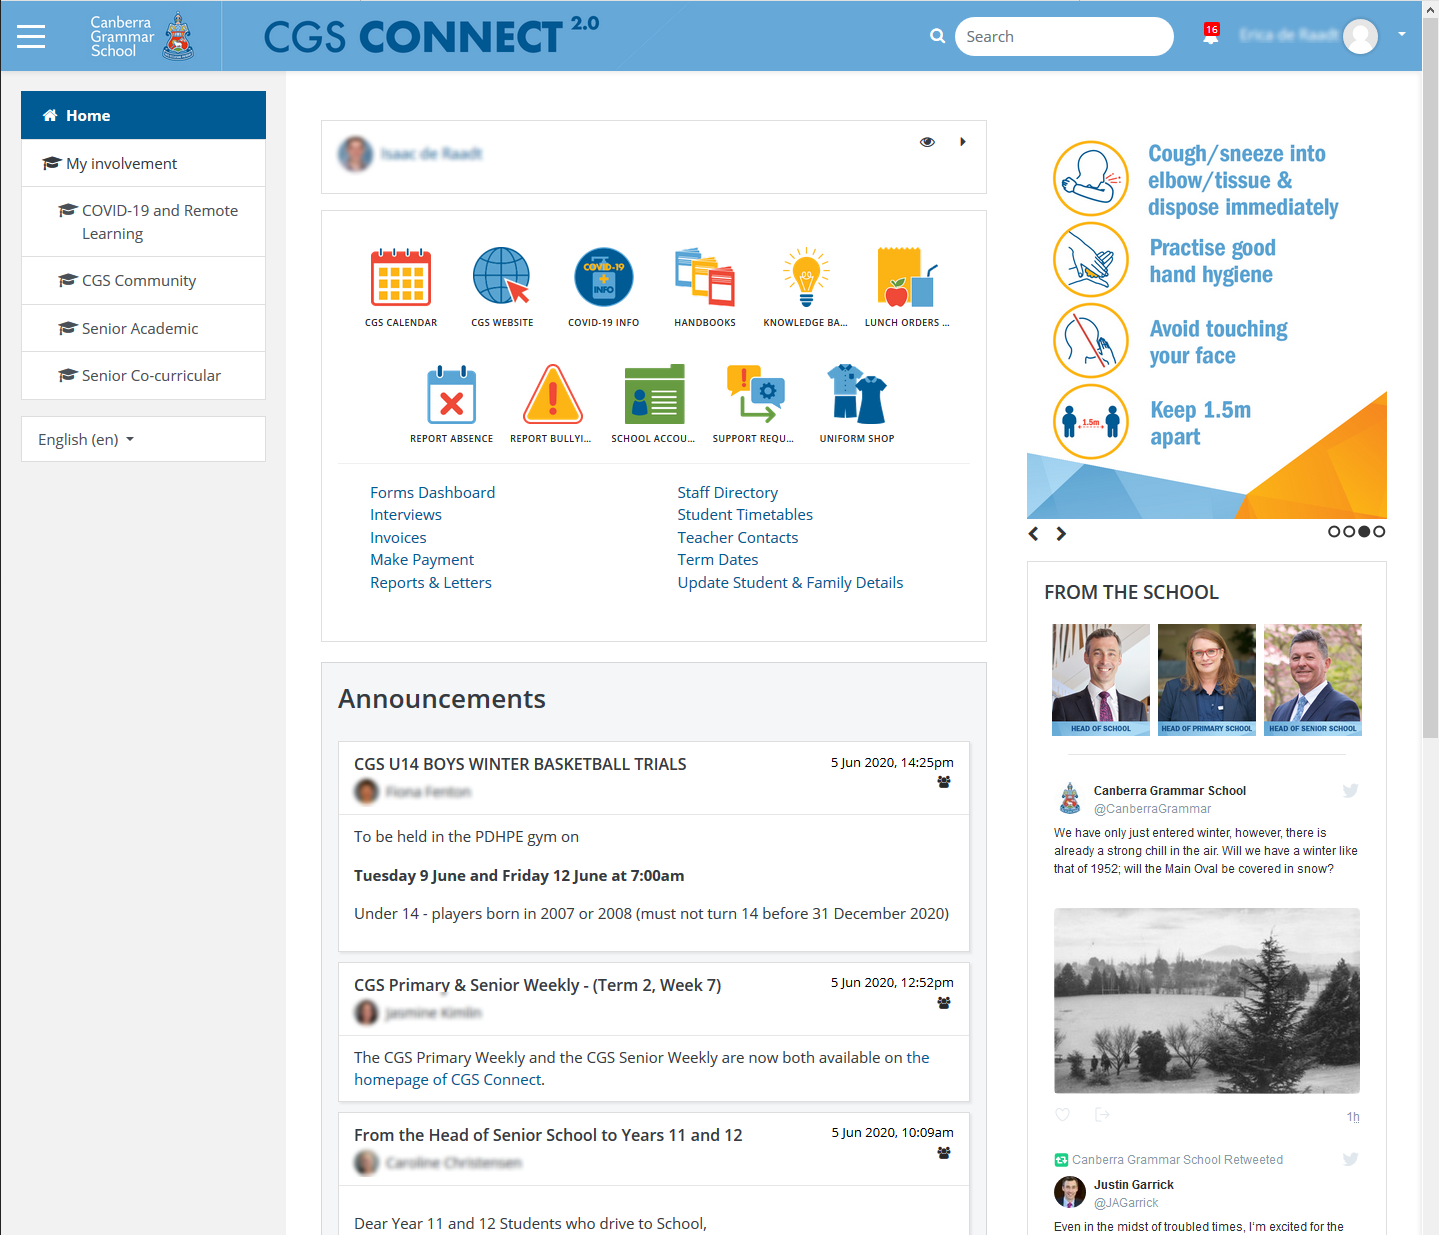
- Our front page is a portal
- How our site is organised
Overview
This post describes the technical details of the setup of Moodle as an LMS, announcements system and portal in a School. For details of the greater change management project, please see my previous post: An LMS Transition Project.

After Moodle was decided on as the preferred system, there were a number of implementation decisions that needed to be made. Over time we have adjusted and improved upon our installation and I hope to share advice with other schools, particularly as a lot of Moodle advice is given in the context of tertiary education.
We have two systems running: one for testing and one as our production server. The configuration for the test server is mostly the same as the production server, except for redundancy and backups. In this document I will focus on the production instance.
Database
Moodle works best with PosgreSQL and if you have no DBMS preference, I suggest you go with that. At our School we had been running MS SQL Server for a number of systems, so it made sense to stick with that. Speed is about as good as PostgreSQL, but there are some additional settings needed to accommodate Unicode characters (guide). Staying with a single DBMS has also made cross-system reporting, backups and the focusing of expertise simpler.
The database for Moodle is hosted on two VMs with automatic fail-over. Each has 8 CPU cores @ 2.3GHz, 160GB storage (all flash) and 16GB RAM, which seems to be more than enough for our application. The storage is split across a few partitions to allow resizing for different DB tables (eg logs) as needed.
Server
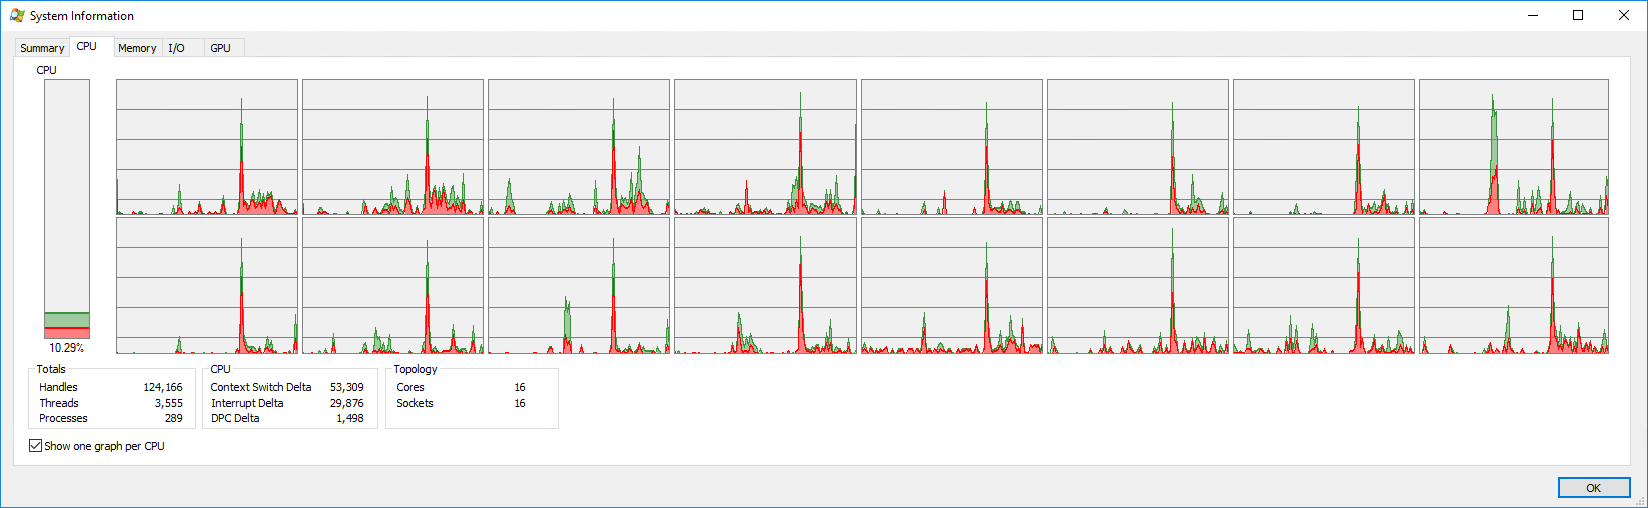
For the webserver, we are running IIS under Windows. Again this is not the best option for Moodle (most use Linux with Apache), but it is simpler for our system administration and backups. Running a relatively large instance of Moodle on Windows has been more challenging than I thought it would be, but it can work.
The VM for our web server has 16 CPU cores @2.3GHz, 550GB storage (all flash) and 16GB RAM. The Moodle data directory sits on a separate 500GB partition to allow resizing when needed.
We’re running a recent, but not bleeding-edge PHP version. We did have to pick a version that would work successfully with the PHP drivers for our DB, Redis cache and for Solr. Within php.ini, increase the max_execution_time (3600) and max_input_vars (20000). Turn on the various drivers Moodle suggests (except I suggest not enabling opchache on your development or test servers, as that makes code tweaks possible without them being cached). To allow Curl to work with SSL, you need to download certificate from the CURL website into a location defined by curl.cainfo in php.ini.
Windows has an arbitrary limit of 4000 on TCP sockets. With a web connection, DB connection and cache connections, each user can be utilising three or four sockets and we were hitting that socket limit and creating contention. A few Registry changes are needed to overcome that limit.
We also increased the allowed filesize for IIS, mostly to be able to handle large backups (guide). In IIS > Request Filtering > Edit Feature Settings > Set Maximum allowed content length to 2147483648 for 2GB. We also made a change to Windows to work better with UTF8 characters in filenames (guide).
Git
Even though you won’t develop code on your production instance, the easiest way to fetch the latest versions of Moodle, and plugins developed by yourself and others, is to use Git. See this guide for details if you are not familiar with Git. I recommend starting all installs with Git as starting with a downloaded zip version makes overlaying Git harder.
Caching
For caching, Redis is the new preferred solution for Moodle (guide) (session handling settings) (helpful discussion). Under Windows, you have to settle for a code port hosted by Microsoft from a few years ago, but it works (download). For our purposes, we set up two Redis stores so we could separate session caching from application caching for monitoring purposes. You can create two Redis instances with the following command line commands…
redis-server --service-install --service-name Redis --port 6379
redis-server --service-install --service-name Redis2 --port 6378
…and then enable them as services using the Windows Services admin app. They will start automatically when the machine restarts and are really just blackboxes that Moodle throws cache information into.
You then need to download and install the PHP driver (matching your web server and thread-safe status) and adding an entry to your php.ini file.
To monitor the cache instances, we are using a script (download) and made a change to array at the start of the file for two caches.
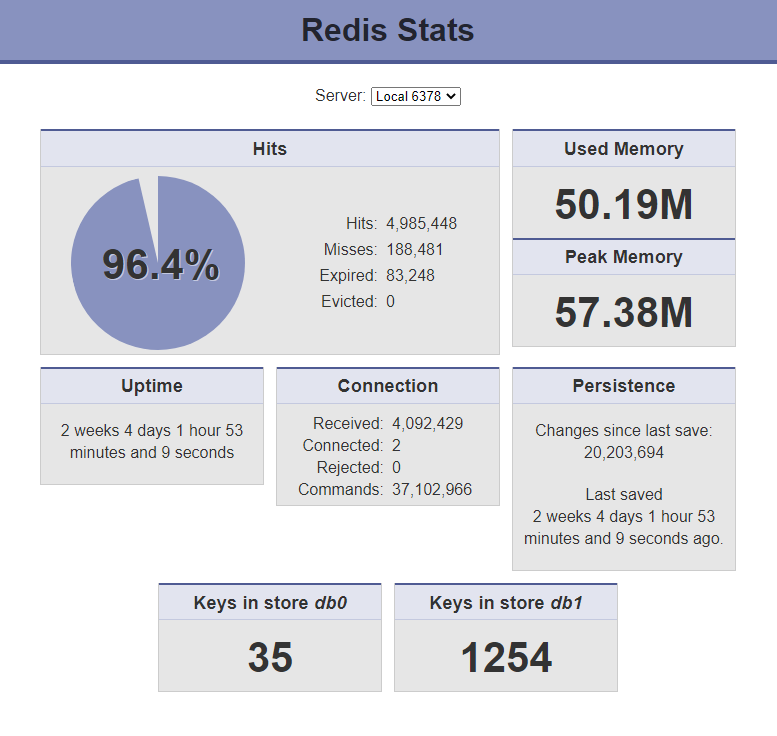
If Redis is working, it should show up in Site admin > Caching > Configuration. Add an instance of Redis named Redis1 with IP 127.0.0.1:6379 and another instance named Redis2 with IP 127.0.0.1:6378.
Click Edit mappings at bottom of page and add Redis1 as Application cache and add Redis 2 as Session cache.
For the session caching to work, you also need to add the following lines to your config.php file. Be sure that these are late in the file, but before the require_once() call for setup.php.
$CFG->session_handler_class = '\core\session\redis';
$CFG->session_redis_host = '127.0.0.1';
$CFG->session_redis_port = 6378;
$CFG->session_redis_database = 1;
$CFG->session_redis_auth = '';
$CFG->session_redis_prefix = '';
$CFG->session_redis_acquire_lock_timeout = 120;
$CFG->session_redis_lock_expire = 7200;
Cron
On more than a trivial site, most of Moodle’s work is handled in the background. This is also where Moodle can fail most often. This means you have to set up a mechanism to execute scripts and log the output from those scripts. In the Unix world, this is called cron and in Windows it is Scheduled tasks. For our instance, we have a scheduled task that runs every minute, triggering a batch file that runs the Moodle PHP script admin\cli\cron.php. We create a timestamp and use this to create a new file that we can pipe the output from the cron script into. We also have another scheduled task that cleans up cron output files after five days. We use anther log file that we output the returned status and run time into for each cron run, which is a helpful overview in seeing when cron tasks run long; we truncate the file to 30,000 lines to keep a few days of history.

Moodle takes care of what tasks it will complete during a cron run. It understands overlapping tasks and scheduling itself, so you don’t have to. It maintains locks for overall cron running, ad hoc tasks and individual tasks. What can irregularly happen is that a task can fail and the locks are not cleared. By default, locks are cleared after 24 hours, but this does not always work and a lot can happen in 24 hours. We have made a few changes to get more reliable results. First, some changes to the config.php file to use the DB instead of files for various kinds of locking…
$CFG->preventfilelocking = true;
$CFG->lock_factory = '\\core\\lock\\db_record_lock_factory';
Be sure these lines occur before the require_once() for setup.php.
We have allowed scheduled tasks to run in parallel in Windows. This means that you can have up to three scheduled task runners and three ad hoc task runners running at the same time, controlled by the limits in Moodle in Site admin > Server > Task processing. If there are long-running, multi-minute tasks (like search indexing, forum notifications, etc), other shorter tasks are not affected as much. Also, if one of the task runners locks up completely, others will still be able to run.
We’ve also put DB alerts in place to monitor the locks. When tasks have not run for an hour or when a lock has not been cleared for an hour, it sends out an alert. This doesn’t occur often, but is good to know and check on when it does.
Integrations
SSO (Single Sign-on)
Our default login is through SSO using the SAML2 Single Sign on plugin. When users hit the site they are redirected to sign in through SSO, if they haven’t already. Our SSO sessions are handled by an external provider and works across most of our web-based systems. The only manual authentication to Moodle is for the main admin account which is accessed by an SSO bypass URL.
Google Drive
To access Google services, you need to register for an OAuth2 client ID (guide). We do not use the authentication side of this as we use SSO, but we do used this for Google Drive repository access.
One Drive
Like the Google API, you need to register an OAuth2 client for Microsoft to be able to access One Drive (guide). There is a more extensive plugin set to access more MS API services, like OneNote, but we were not able to get that working.

Google Analytics
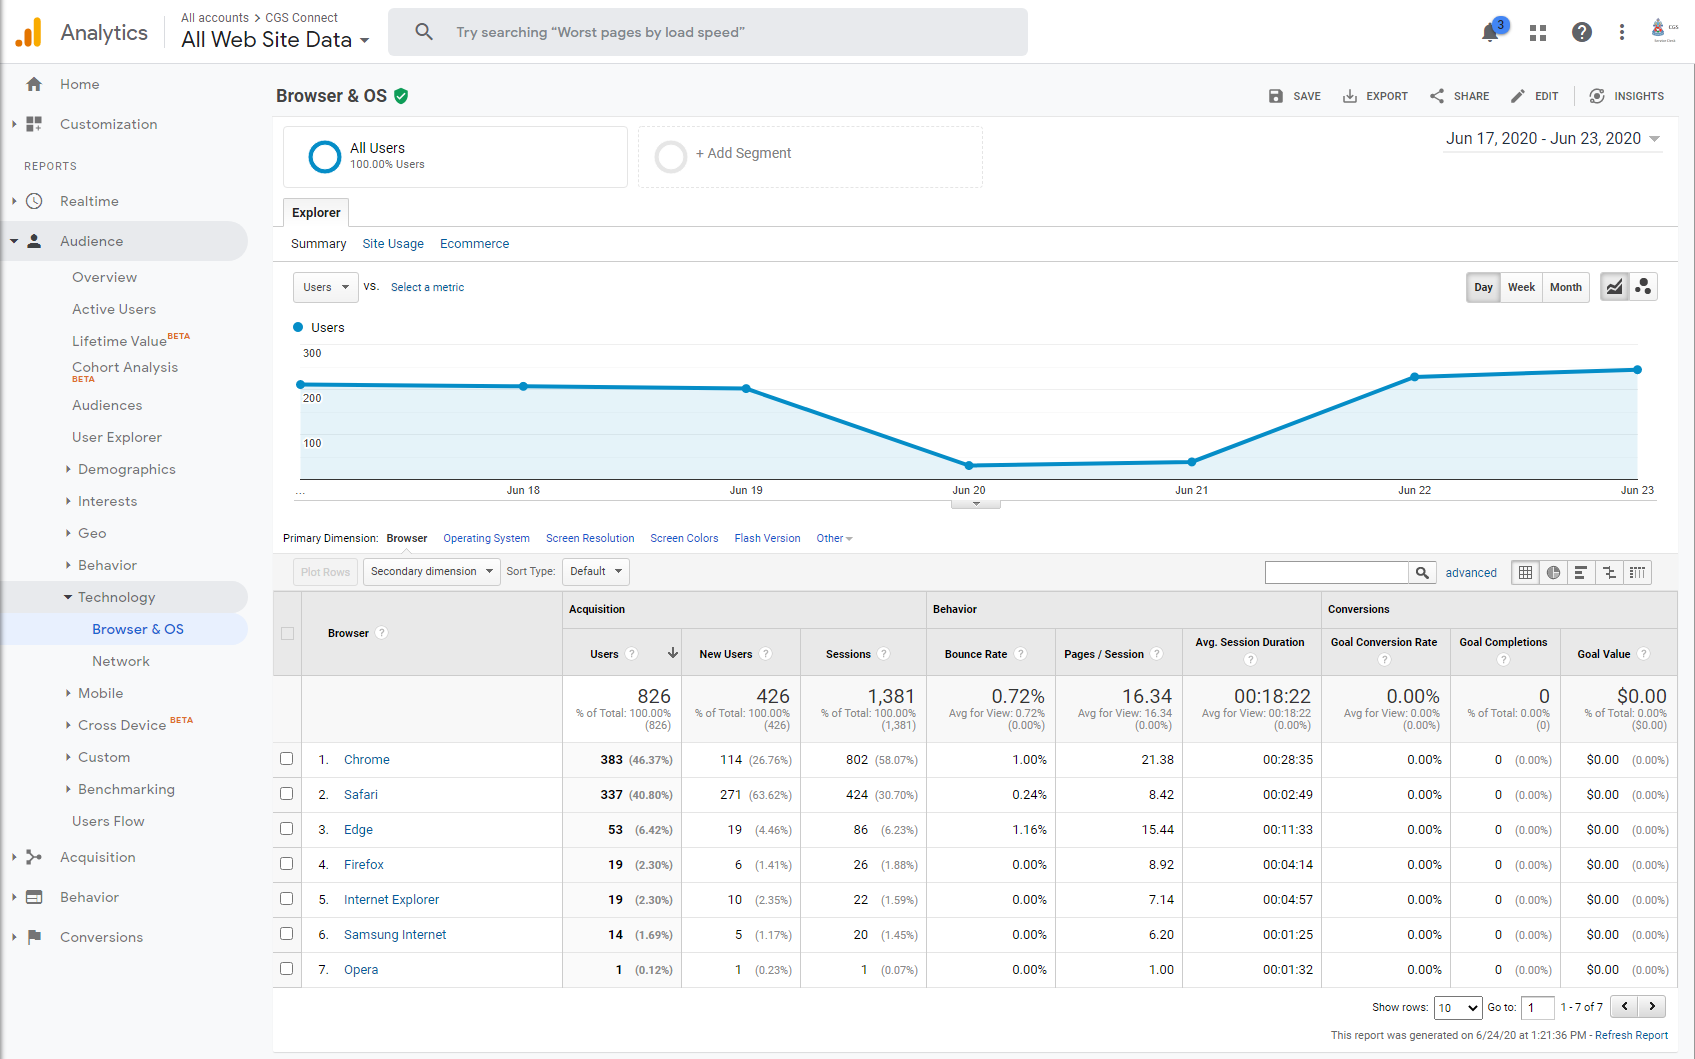
One way to get stats about users passing through your site, including their locations and device details, is with Google Analytics. You have to set up an account on the Google Analytics site and get a tracking ID. I recommend the Local Analytics plugin, which makes setting up the link to Google Analytics easy and provides more meaningful information when you are analysing traffic later.
Solr (Search)
Moodle has some basic search functionality baked in, which is easy to use, but does not index PDFs and other files for search terms. We set up the Solr search engine, which runs in the background and is accessed by Moodle’s cron to index new and modified content hourly. The process of setting this up can be achieved by following Moodle Solr Guide and this relevant Moodle Forum discussion.
The Solr port for Windows uses Java (unfortunately), so you have to install JRE. You can then install Solr 5.5.5 from Solr Downloads page (see also this Solr Guide).
You need to download the PHP extension DLL from this Forum page or PECL page, depending on your version of PHP.
There are some tricks to get Solr to work with Moodle. Under the Solr install folder server\solr\moodle\conf\managed-schema you have to comment out the following lines (using XML comments, like HTML comments).
<field name="_text_" type="text_general" indexed="true" stored="false" multiValued="true"/>
<copyField source="*" dest="_text_"/>
We also had to increase the number of items that could be searched, otherwise admins and users with broad access to lots of content will face errors when searching. In the file server\solr\moodle\conf\solrconfig.xml we changed the maxBooleanClauses value to 524,288 (32,000 wasn’t enough).
<maxBooleanClauses>524288</maxBooleanClauses>
The Solr engine doesn’t run as a service, so in Windows we added a scheduled task to start the program (bin\solr.cmd with arguments start -m 2g) at startup and keep it running (checking hourly). It seems to run happily without our intervention.
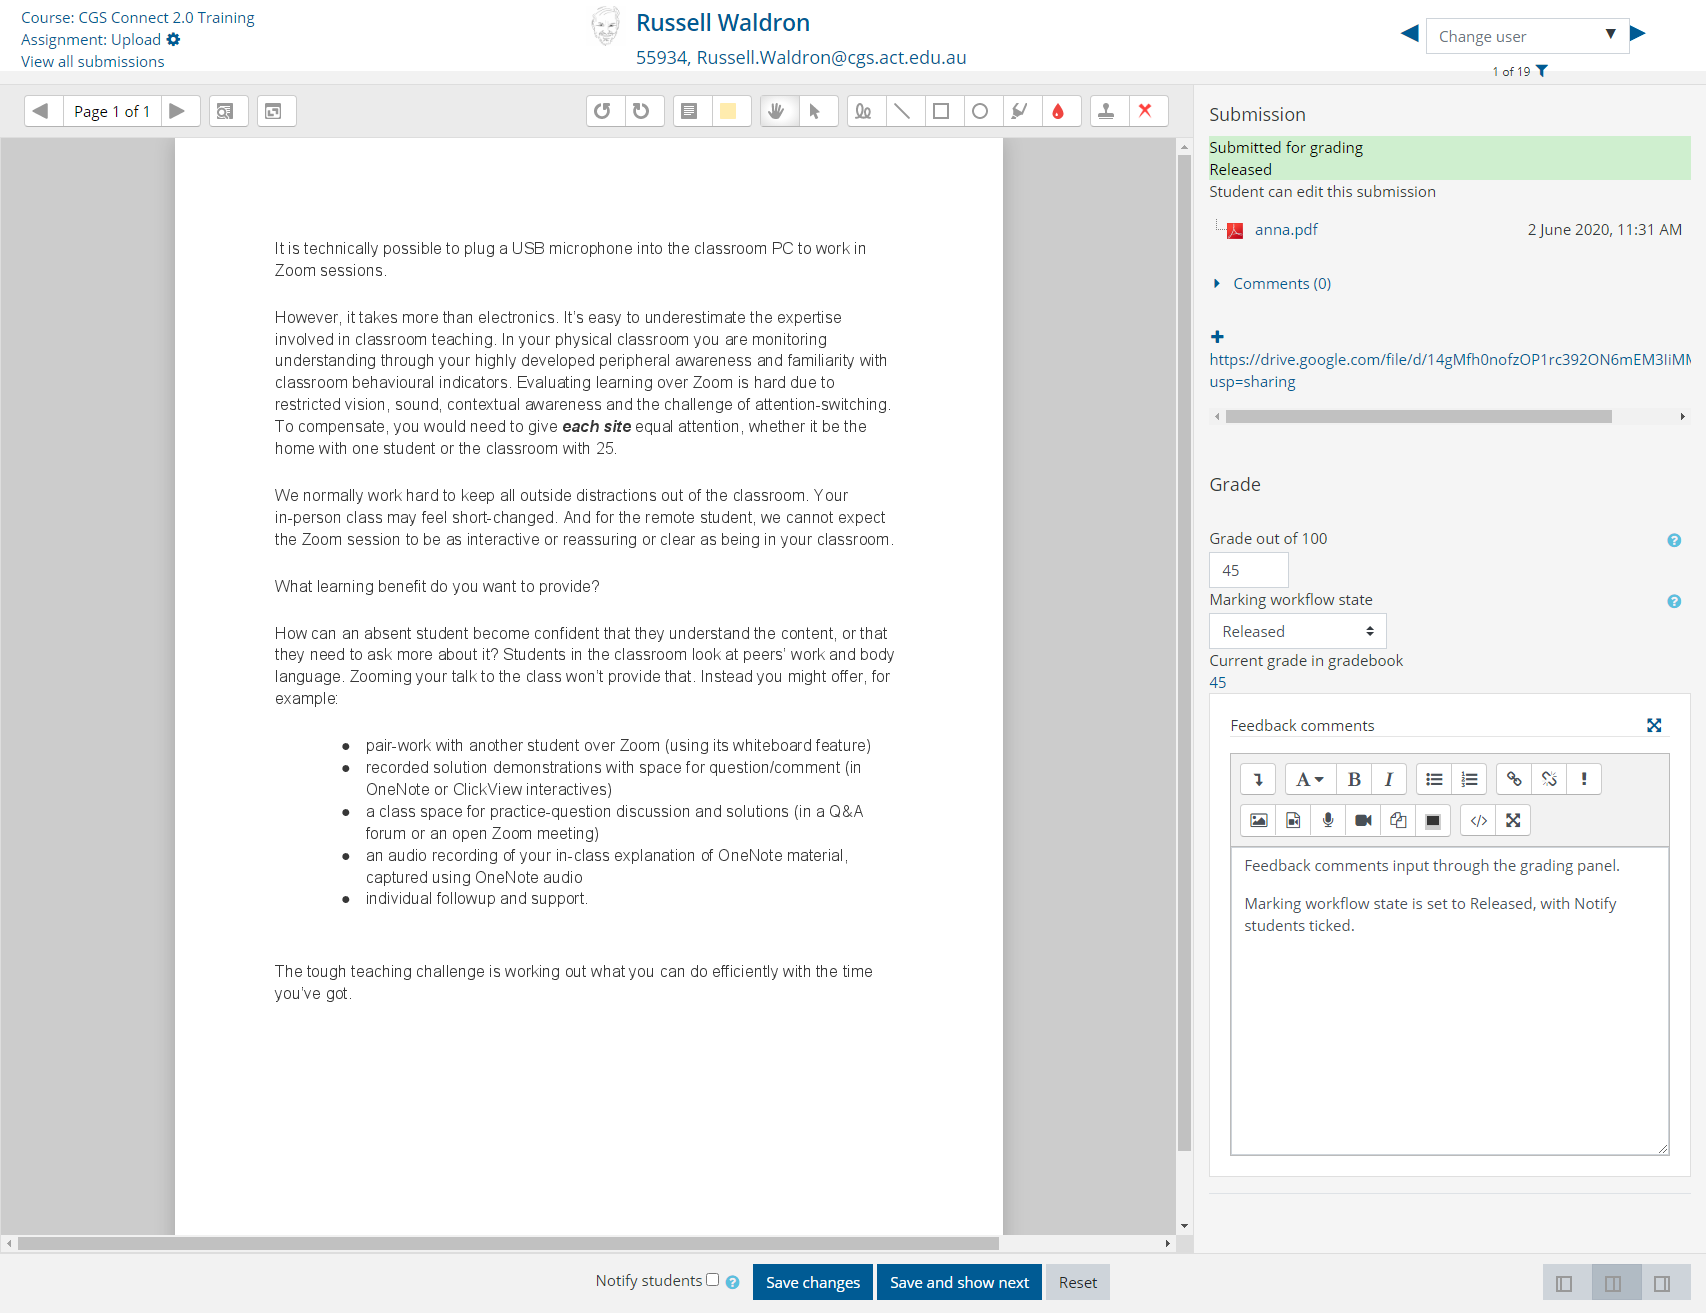
Unoconv (PDF rendering)
One of Moodle’s nicest features is the ability to render documents so teachers can annotate on them during marking. We tried GhostScript, which has worked in the past, but this resulted in errors for us. One alternative is Google’s Document converter, but this is slow when large files have to be sent for rendering and returned. Another alternative is Uniconv, which is part of LibreOffice (guide). You need to download and install LibreOffice. Download the Unoconv source code zip from Github, extract the unoconv script, rename it to unoconv.py and store it in C:\unoconv\. Create a unoconv.bat file in C:\unoconv\. Add paths to Libre Office’s python.exe and the unoconv.bat files in Moodle’s config.php file (see config.dist for examples). In Site admin > Plugins > Document converters > Manage document converters, unhide the Unoconv document converter and promote it to top.
Moodle Setup
Advanced Features, etc
The following table shows where we have deviated from defaults and why.
| Feature | On/Off | Why |
|---|---|---|
| enableblogs | unchecked | Not needed in School at this stage |
| enableplagiarism | checked | Used with TurnItIn |
| enablebadges | unchecked | Possibly useful later, but a big step initially |
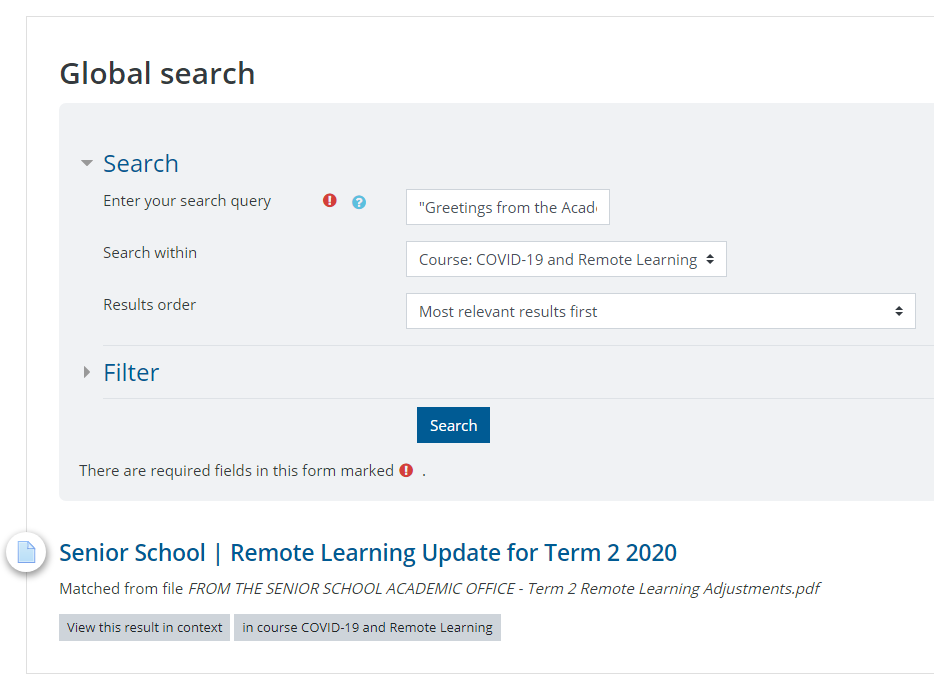
| enableglobalsearch | checked | A requirement identified by stakeholders |
| core_competency | unchecked | Possibly useful later, but a big step initially |
| contextlocking | checked | Allows historical courses to be kept in read-only mode (frozen) |
Security and Privacy
A number of measures can be taken to secure the Moodle setup as advised by the Security overview report (Site admin > Reports), which includes links to guides for each security check.
A security measure you will want to undertake is to fix the paths to system files that can be viewed in Site admin > Server > System paths; this can be done by adding these settings in your config.php file. Fixing these prevents someone who gains admin access on the front end modifying these to gain access to back-end processes.
To secure the site, we’ve reduced the capabilities of the Authenticated User role, which is the base role for most other roles. A good way to secure your permissions is to edit the Authenticated user permissions (Site admin > Users > Permissions > Define roles), looking for the icons under the Risks column, changing anything with an XSS (![]() ) or Configuration (
) or Configuration (![]() ) risk icon to Prevent or Prohibit.
) risk icon to Prevent or Prohibit.
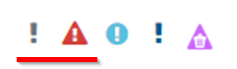
Prevent means it can be overridden by a more specific role, like a Teacher, while Prohibit essentially means only administrators can use that; be liberal with Prevent, but consider using Prohibit carefully as it can break the experience for users unintentionally.
Being outside Europe, we’re not subject to strict rules for privacy. We’ve therefore turned off the tool that allows users to automatically delete their personal information (automaticdeletionrequests) and the display of the data retention summary (showdataretentionsummary).
User Roles
In order to get Moodle to work the way you need it to in your School, you will need to make changes to all roles and set up some new ones.
General Changes
We made a number of changes to the Authenticated user role to control the user experience. This is partly because we have a student information system (SIS) that is the source-of-truth for identity information and because enrolments are defined by timetables.
| Capability | Permission | Why |
|---|---|---|
| Prevent users from viewing courses without participation | moodle/course:view → prevent | Users in the School should only see courses they are enrolled in through the timetable |
| Prevent users from browsing courses unless explicitly given that capability | category:viewcourselist → prevent | Only staff can browse. Parents and students should only see what they’re enrolled in |
| Prevent users from seeing the participants list unless explicitly given that capability | moodle/site:viewparticipants, moodle/course:viewparticipants → prevent | Parents and students should not be able to see other student details |
| Prevent suggesting courses | moodle/course:request → prohibit | Only admins can create courses based on the timetable |
| Prevent sending messages to any user | moodle/site:sendmessage → prohibit | Another channel for messages was not wanted |
| Prevent password changes | moodle/user:changeownpassword → prohibit | Users log in through SSO using their School password |
| Prevent users from editing own profile | moodle/user:editownprofile → prohibit | User info is synced from the SIS |
| Prevent adding blocks on own profile page | moodle/user:manageownblocks → prohibit | The user profile page is used to show parents custom user information |
| Prevent course category changes | moodle/course:changecategory → prohibit | Organisation of courses is set according to School departments |
| Prevent course renaming | moodle/course:changefullname, moodle/course:changeidnumber, moodle/course:changeshortname → prohibit | Course naming follows set patterns and is needed for syncing |
| Prevent direct grade editing | moodle/grade:edit → prohibit | Grades are synced, only allow grading through activities |
| Turn off Private files | moodle/user:manageownfiles, repository/user:view → prohibit | Users have cloud storage accounts |
Changes to other standard roles
| Role | Capability | Permission | Why |
|---|---|---|---|
| Manager | Prevent login as | moodle/user:loginas → prevent | Only admins should be able to do this |
| Manager, Teacher | Allow editing of student submissions | mod/assign:editothersubmission → allow | Teachers do this for students in a school |
| Non-editing teacher | Allow teachers to import from a course they can see (assumes they are a teacher in the destination course) | moodle/backup:backuptargetimport → allow | Allows collaboration |
| Non-editing teacher | Allow non-editing teachers to see hidden course content | moodle/course:viewhiddensections → allow | Teachers can see hidden content in another teacher’s course |
| Student | Prevent students seeing the participants list | moodle/site:viewparticipants, moodle/course:viewparticipants → prevent | Only teachers should see who is enrolled |
Browsers
As a means of simplifying navigation, we limit course enrolments to users involved in courses. Users do not see other courses in their Boost navigation bar. However, there is a desire to allow teachers to be able to browse within their own parts of the School and some staff, such as learning support staff, need to be able to browse to a student’s course in order to support them. We created a “Browser” role that is equivalent to a non-editing teacher but is limited to category levels. We automatically sync teachers as browsers to their parts of the School. This provides access without affecting course enrolments.
Parents
Moodle was first started to support education at tertiary level and, although it is used in other sectors, that origin shows through in how parents are handled in the system. Normally parents can only see their student’s profiles and are not allowed into courses. We don’t want to allow guests freely around the system and we don’t want to enrol parents in courses as that pollutes the participants list and confuses marking lists. We have created Parent role in the normal way, but we allow this to be assigned at a category level. We then sync parents to categories containing courses their children are enrolled in. We control their access to specific courses within these categories by using a customised version of the Mentees block on the site Home and student profile pages, showing the courses their students are enrolled in and allowing direct access. This is not a perfect solution, but it will work until Moodle understands Parents better.

Parents are themselves enrolled in a number of “Brochure” courses depending on what part of the School their children are enrolled. These courses allow posting of general academic and co-curricular information and also act as a means of sending targeted announcements.
User Photos
Getting user photos into the system is relative simple. We have a script that exports staff and student photos from our SIS into a folder, each with filenames using their user ID. Zip all the photos and drop the zip file into the form at Site admin > Users > Upload user pictures. We repeat this annually after photo day.
Plugins
Moodle has thousands of contributed plugins that you can add to your site; this is one if its strengths. Be cautious about adding plugins, however, as developers are volunteers and if they stop developing your favourite plugin, you may be burdened with the responsibility of maintaining that plugin through future Moodle upgrades. Look for plugins created by developers that are active and responding to user questions. I co-wrote a book with Gavin Henrick about choosing Plugins and, although the list of plugins is aging, the first few chapters about evaluating plugins is still relevant.
The following is the list of plugins we use (with configuration changes we made). This does not include plugins we have developed ourselves.
- Accessibility Block
- Atto Fullscreen
- editor_atto | toolbar → other = html, fullscreen
- Checklist advanced grading
- Clickview (editor plugins and activity module)
- editor_atto | toolbar + clickview (Add Clickview button to Atto editor toolbar in files section)
- replaced both icons in /lib/editor/atto/plugins/clickview/pix with B&W version

- Group self select
- Media Gallery Set
- MailTest (admin tool)
- Moodle Benchmark (admin tool)
- Portfolio (GI Portfolio tool)
- Sharing Cart
- block_sharing_cart | userdata_copyable_modtypes | all→ checked
- block_sharing_cart | gapselect | all → unchecked
- SolutionSheet (Assign feedback)
- OUWiki (Used in place of the default wiki activity)
- Tiles course format (our default course format)
- format_tiles | followthemecolour → checked
- format_tiles | phototilesaltstyle → checked
- format_tiles | showprogresssphototiles → unchecked
- format_tiles | assumedatastoreconsent → checked
- format_tiles | showoverallprogress → unchecked
- format_tiles | phototiletitletransarency → 30%
- format_tiles | customcss →
div#abovetiles { display: block; float: right; width: auto !important; }
ul.section.img-text.nosubtiles { margin: 0; padding: 0; }
.format-tiles .modal-backdrop.fade.in { display: none !important; }
.format-tiles .embed_cm_modal a {color: #005b94;}
We have turned off the following standard activities.
- Chat
- IMS Content Package
- External Tool
- SCORM Package
- Survey
- Wiki (using OU Wiki instead)
The following blocks are disabled.
- Blog Menu
- Blog Tags
- Community Finder
- Courses
- Flickr
- Global search (in theme at top of page)
- Latest Announcements (we use our own)
- Latest Badges
- Login
- Navigation
- Private files
- Recent Blog Entries
For Plagiarism detection, we use TurnItIn. There are alternatives, but that was a pre-existing system used by the School, so it was easy to transition that over. TurnItIn controls distribution of their plugin in a deliberately confusing way. You can try this guide and seek further support from TurnItIn if you want to go that way.
In terms of Text editors, we have disabled the TinyMCE editor and rely on the more accessibility-friendly Atto editor. For the RecordRTC plugin, we’ve increased the time limit to 300sec (10min). For the Table plugin, we’ve allowed border styling.
Our Front Page
The default landing page for Moodle is the Dashboard page. This makes sense when students are the main audience without parents, but in a School, the landing page is used by a wider audience. In our School, the landing page also acts as a portal to other systems and for communications, so we needed it to be consistent. For this reason, we set the Default home page setting to be the Site home and we’ve actually hidden the Dashboard using a CSS tweak in our theme. It is also just simpler to have one landing page.
Talking about themes, we use a child theme of the default Boost theme (guide). This means we benefit from improvements to Boost while allowing us to make customisations as needed. As well as customising colours, we are able to add additional elements, such as block regions, and hide elements that are difficult to disable through admin settings (like messaging controls). The result is a very clean interface.
Course creation and organisation
Our organisation of categories and courses was set up to reflect the organisation of the School itself, giving a natural way of browsing to courses (most users only see courses they are directly enrolled in).
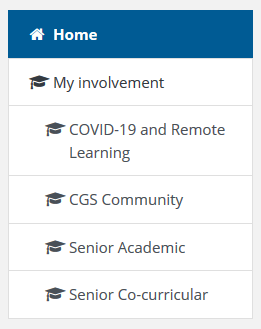
Our School caters for students from early learning to year 12. The School is divided into two main parts: Primary and Senior (High School). Within each, there are Academic and Co-curricular courses. The Senior School uses Houses to organise students for pastoral care. There is also an overarching Community category and a category for Staff. The categories are therefore organised as follows, each with courses inside.
- Community
- Primary School
- Primary Academic
- Primary Co-curricular
- Senior School
- Senior Academic
- (Department eg Mathematics, Science, etc)
- …
- Senior Co-Curricular
- Activities
- Arts
- Outdoor Ed
- Sports
- Trips
- Senior Houses
- Senior Academic
- Staff
We also have year categories (2019, 2020, …) that allow us to archive courses when they end. The structure of courses within these year categories matches the categories listed above, mostly for administrative convenience as user’s can’t browse to these courses and can only get to them if they are enrolled.
We create new courses each teaching period. For some courses this is six months, for most it is a year, and for some year 11 and 12 courses it is two years. In order to uniquely identify each course, a naming convention is used.
| Fullname template | <Subject> | <Year/Award> | [<Level>] | <End Year> | [<Semester>] | Full example |
|---|---|---|---|---|---|---|
| Fullname examples | English | Year 9 | 2019 | English Year 9 2019 | ||
| English | IB | HL | 2020 | English IB HL 2020 | ||
| English | HSC | Extension 1 | 2021 | English HSC Extension 1 2021 | ||
| Geography | Year 10 | 2020 | Sem 1 | Geography Year 10 2020 Sem 1 | ||
| Shortname template | <Subject abbrev.> | <Year number/Award> | [<Level abbrev.>] | <End Year> | [<Semester number>] | |
| Shortname examples | Maths | 8 | 2019 | Maths 8 2019 | ||
| Ancient Hist | HSC | Ext1 | 2020 | Ancient Hist Ext1 2020 | ||
| Geography | 10 | 2020 | 1 | Geography 10 2020 1 |
Data Syncing
To be more than a trivial independent system, Moodle needs to be integrated with systems that can provide user information. We rely on table views as the interface for communicating this information. We populate these views using scripts on our SIS information. Moodle provides some syncing tools out-of-the-box and some we have created ourselves.
- External Database Authentication (Site Admin > Plugins > Authentication > Manage authentication)
- We sync most user fields this way and have added campus and year values for students as custom profile fields
- External Database Enrolments (Site Admin > Plugins > Enrolments > Manage enrol plugins)
- We sync student, teacher and parent enrolments in actual courses. For students and teachers, this is based on the timetable. For all users, enrolment in brochure courses is done depending on the part of the School relevant students are enrolled or staff are employed.
- We turned off automatic course creation to ensure control over new courses, just in case.
- Group Syncing (custom)
- Because of our course organisation, students enrolled in courses may be in different classes with different teachers. To allow teachers to distinguish their own class for assessment and communication, groups are automatically set up for each class. To avoid interfering with manually created groups, automatically created ones are associated with a specific grouping.
- Mentors (custom)
- The parent-child relationship uses the generic mentor association in Moodle. We have created a plugin that populates these relationships automatically.
- Category and System roles (custom)
- To assign parent and browser roles to categories and system levels, we have set up a sync that populates these. This allows parents to see their childrens’ courses, teachers to browse courses within their department, learning support staff to browse into student’s courses and School leaders to be given Manager roles depending on their job position.
We are also working on grade syncing between Moodle’s gradebook and our SIS to streamline the flow of grade information.
Lessons Learned
Keep things together on your network
When we started setting up our VMs, we had them in different parts of our network. Our webserver VM was in the DMZ, but the database server was inside our network. Traffic between the VMs had to traverse our firewall, which created sync issues and a lot of errors. Bringing them together on the network solved these problems.
Don’t move your server
As we migrated systems from our old LMS (Blackboard) to Moodle, the old system was still in use. It was our intention to set up our new system and then simply move it so to the same URL as the old system, so any users would simply arrive at the new system. The new system was called next.cgs.act.edu.au, but when we needed to shift this to connect.cgs.act.edu.au. This caused some big problems, both within the system and with our DNS registration, leading to an unwanted outage, just when we wanted people to start using the new system. A better approach would have been to set up the system on a new URL and redirect traffic from the old.
Migration takes a lot of time
Moodle does have some tools that let you import content from other systems. We thought that since so many people had shifted from Bb to Moodle, the process would surely be simple. Our initial experiments with common cartridge showed that what Bb delivered was a large pile of mess. Cleaning this up took more time than manually importing content and this manual touch led to better courses in the end. Translating Bb’s many-layered courses into Moodle’s flat course structure was also tricky.
Our School had determined that the transition between systems should be done quickly, without bothering teachers and with all historical content migrated for future use. With the help of a few good recruited workers who were familiar with Moodle, we managed to deliver a migrated set of courses, however it was late, which negatively affected the change experience for many users.
Be sure to carefully measure how much content you need to migrate, give yourself plenty of time to migrate content and be transparent about migration progress with users.
Loved rreading this thanks