Phishing attacks are a risk to our School and schools like it. They are difficult to mitigate using automated means, so user training is needed.
There are two main types of phishing attacks:
- an email that leads a user to a page where they provide credentials or other information or
- an email that attempts to establish a trusted conversation with a user in order to ask them for information or to purchase items that can be transferred to cash (spearphishing).
While financial loss needs to be avoided, the extraction of user credentials has the potential to be most damaging as this can lead to loss of secure information and ultimately data breaches.
At Canberra Grammar School, we’d been wanting to run phishing training for a number of years. We had seen quotes for external vendors to support such training, but to save $12,000 to $15,000 we were motivated to try this ourselves. In this post I will outline how we went about running phishing training at CGS and the outcomes we experienced.
Messaging Around Phishing Training
In order to train users about phishing, you have to think like a phishing attacker. However, it’s important not to take that too far and think of the training as tricking users. Ideally users should become aware of phishing, know how to identify phishing emails and know how to respond when they receive such emails. This all has to be done while maintaining the good relationship between users and IT staff.
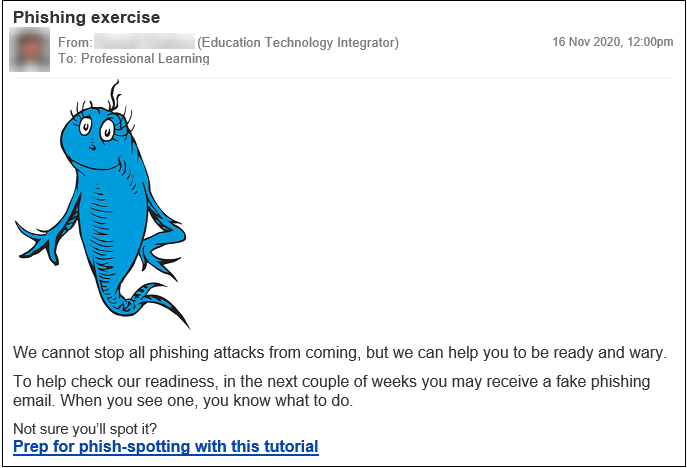
Before embarking on this training we created a number of educational and informative communications.
- A guide within our Knowledge Base describing phishing emails and how to act
- An email to various School leaders informing them about the program of training and letting them know it was OK to discuss it
- A series of educational messages sent to staff through our daily announcements
- A quiz in our LMS that offered optional training to those wanting it before our fake phishing exercise and mandatory training for those who responded badly to the exercise
Within our School, staff are encouraged to forward phishing emails to our Service Desk who assist with identifying emails as phishing attacks and blocking senders as well as identifying other recipients and warning them.
Setting Up a Phishing Server
We started creating our own solution using a basic web server and email server, but we then came across a system called GoPhish, which is an open source system for running phishing training.
To run GoPhish, you need a server that is web-accessible. We made sure the server was accessible outside the School as we imagined some staff would receive and respond to fake phishing emails from home and this needed to work as well as it did within the School. This could be a VM hosted locally or one from an external hosting provider.
We also took the step of purchasing a domain name close to our School’s own domain name (registrar link). We had seen such a domain used in a very sophisticated phishing attack on School community members and we wanted to use a similar domain for some of our fake phishing emails and landing pages, targeted to staff with riskier roles.
GoPhish is simple to install and get running. Download the zip file, unzip it and run the executable. We used a self-hosted Windows VM and when GoPhish first ran, a firewall warning popped up, asking to allow the software through.

When the server first runs, it generates a password that is displayed on the command prompt window. I grabbed a copy of that. The IP and port of the server’s web interface is also given, which I copied into your browser’s URL bar. My browser warned me the site is insecure; clicking Advanced and Proceed and I could see the admin interface. I used the default username “admin” and the generated password to log in, then set a new password when prompted.
The VM and the server needed to keep running while configuring the system, sending phishing emails and afterwards to track and redirect users.
Campaigns
On the left-hand menu there are items for setting up components of a campaign. The nice part about setting these up separately is that this allows you to mix-and-match different combinations of components when you put together a campaign.
I don’t think it would be wise to share our templates here, but if you are from a school, feel free to call or email me and I will share mine with you.
Sending Profiles
Each campaign needs a sender.
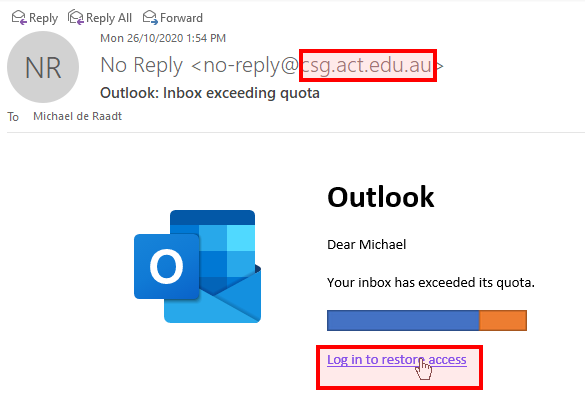
- For credential campaigns that lead a user to a page, replying is not important, so we used a sender that looked real according to where the email was supposed to be coming from (eg no-reply@ato.gov.au).
- For spearphishing campaigns, the sender profile should represent a person of authority in your organisation, leading replies to a fake email account outside your organisation that looks like it could be that person’s personal email address. We set up a Gmail account for this. For added realism, we used the real email address of the impersonated sender in the From field, but add a Custom Header field with the name Reply-To directing replies to the fake email account. (We only used this level of sophistication on our most at-risk staff. Normally such an attack shouldn’t be possible as the School blocks domain emails coming from non-domain accounts, but they may experience this in personal emails.)
Email Templates
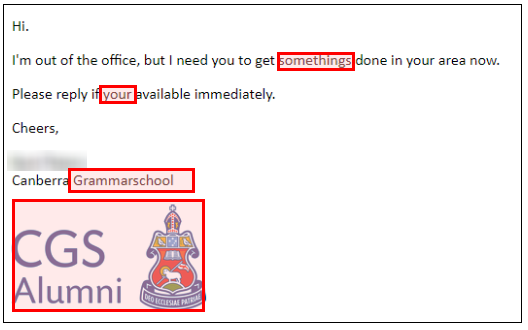
We set up a number of email templates representing credible communications from authorities who might contact a person out of the blue. The key message is a request for urgent action. We added content in the template editor’s HTML tab (you can also click the Source button to toggle WYSIWYG mode). For images, we embedded these as base64 encoded content so they are sent within the email, rather than links or attachments (see tools below). The email template can embed recipient names if you want it to be more sophisticated; these names are uploaded with email addresses. We ticked the box to add a tracking image to each email, which allowed us to know if a user has viewed a message (assuming they downloaded the linked tracking image, which is not entirely reliable).
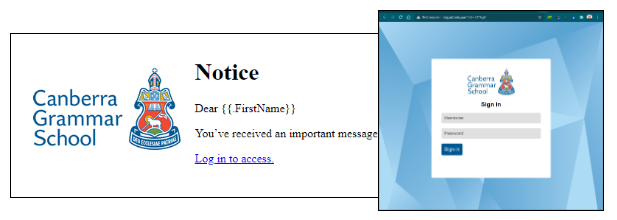
We created templates that suggested contact from the Tax Office, from the School asking for urgent login and another suggesting the user’s inbox was full, needing action.
For spearphishing, you are sending emails to tempt recipients into replying. We used a sender profile for a person who could be identified as an authority from the School’s website. Our email template suggested urgency with some unstated action needed. The email included a signature, including an embedded base64 image, but it was deliberately different to the School’s defined email signature format. We spoke to the person we were impersonating to get their support and cooperation and people did contact that person directly.
Landing Pages
For capturing credentials, users will be led from a link in an email to a landing page. Landing pages should include inputs for users to put in their credentials. To create a fake landing page we went to the real page, copied its HTML, brought linked CSS into the document and converted linked images into embedded base64 images so the page is entirely self contained. GoPhish can help you create such landing pages if you provide it the URL of a real landing page, but we didn’t try this. Some skill with HTML will help you make it work. Don’t worry about where the form is set to send it’s information (the <form> action attribute), the phishing system overrides this to bring the traffic back into itself before redirecting users. We ticked the box to capture submitted data, but don’t tick the “Capture Passwords” checkbox.

Redirection
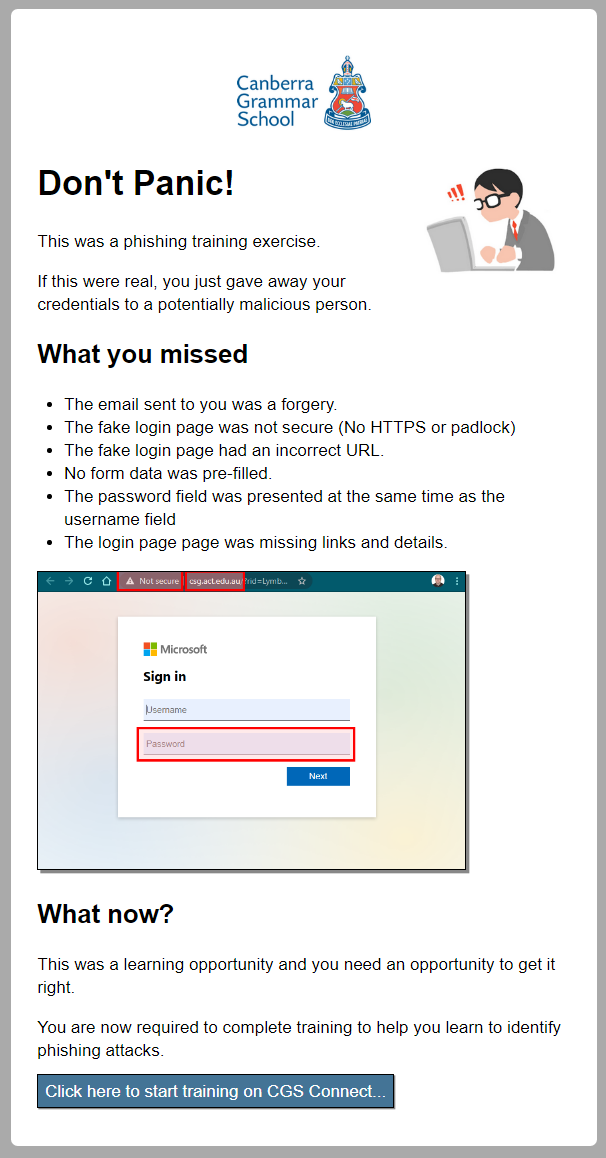
In a phishing attack that leads a user to a page to provide their credentials, there is an option to redirect the user to a page afterwards. Rather than this being within the phishing site, which should be suspect to users, we redirected users to a page hosted on the server of our School LMS, so the domain would be familiar and acceptable security was in place. The page could be accessed without authentication so as not to disrupt the effect of the exercise. The page could be passed URL parameters so that information about the specific attack could be recalled to illustrate what the user missed in the attack. At the bottom of the page, users were directed to the phishing training quiz.
Uploading Users
Groups need to be created in a spreadsheet. We used full-time staff only and divided them up into sensitive and non-sensitive groups according to financial capabilities and levels of access to sensitive information. For each group we created a CSV file with the following columns, including a header row. All fields except Email can be blank, but you can draw on these other fields in templates, if you wish.
First Name,Last Name,Email,Position
During our initial setup, we had groups that included EdTech department staff for testing.
Launching a Campaign
We started by warning our Service Desk we were are about to start a campaign and how to respond to users reporting phishing emails. We provided text to make responding to these emails easy and consistent.
For our spearphishing campaign, we warned the person we were impersonating that we were about to start. We discussed how to respond to queries that came to them.
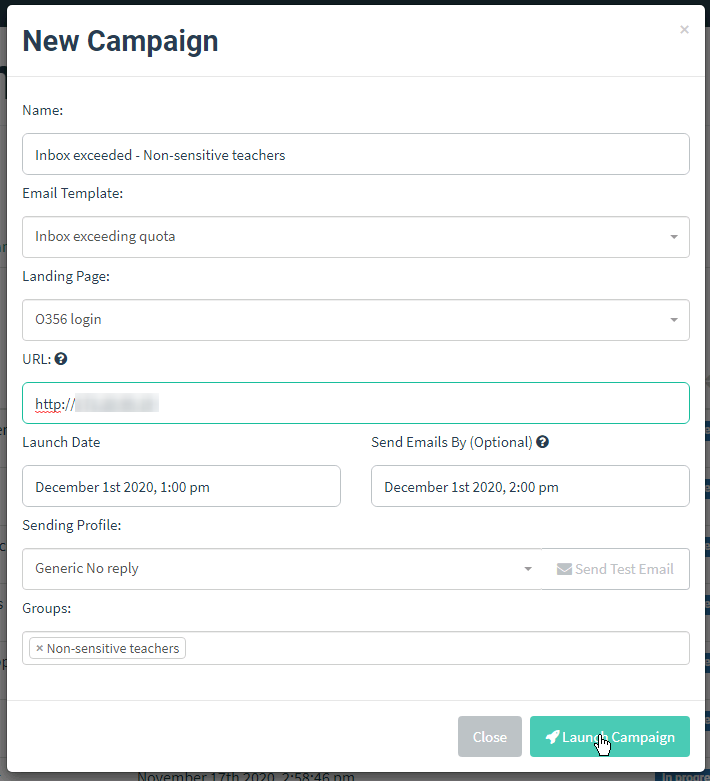
We created a new campaign from the Campaigns page.
- We picked an appropriate combination of:
- email template + sender profile,
- landing page (irrelevant if spearphishing) and
- user group.
- For the URL, we mixed up the address similar to the School’s actual domain (trickier) with the IP address of the phishing server (less tricky).
- We set an end time about an hour later using the “Send Emails By (Optional)” setting and the system spaced out sending the emails.
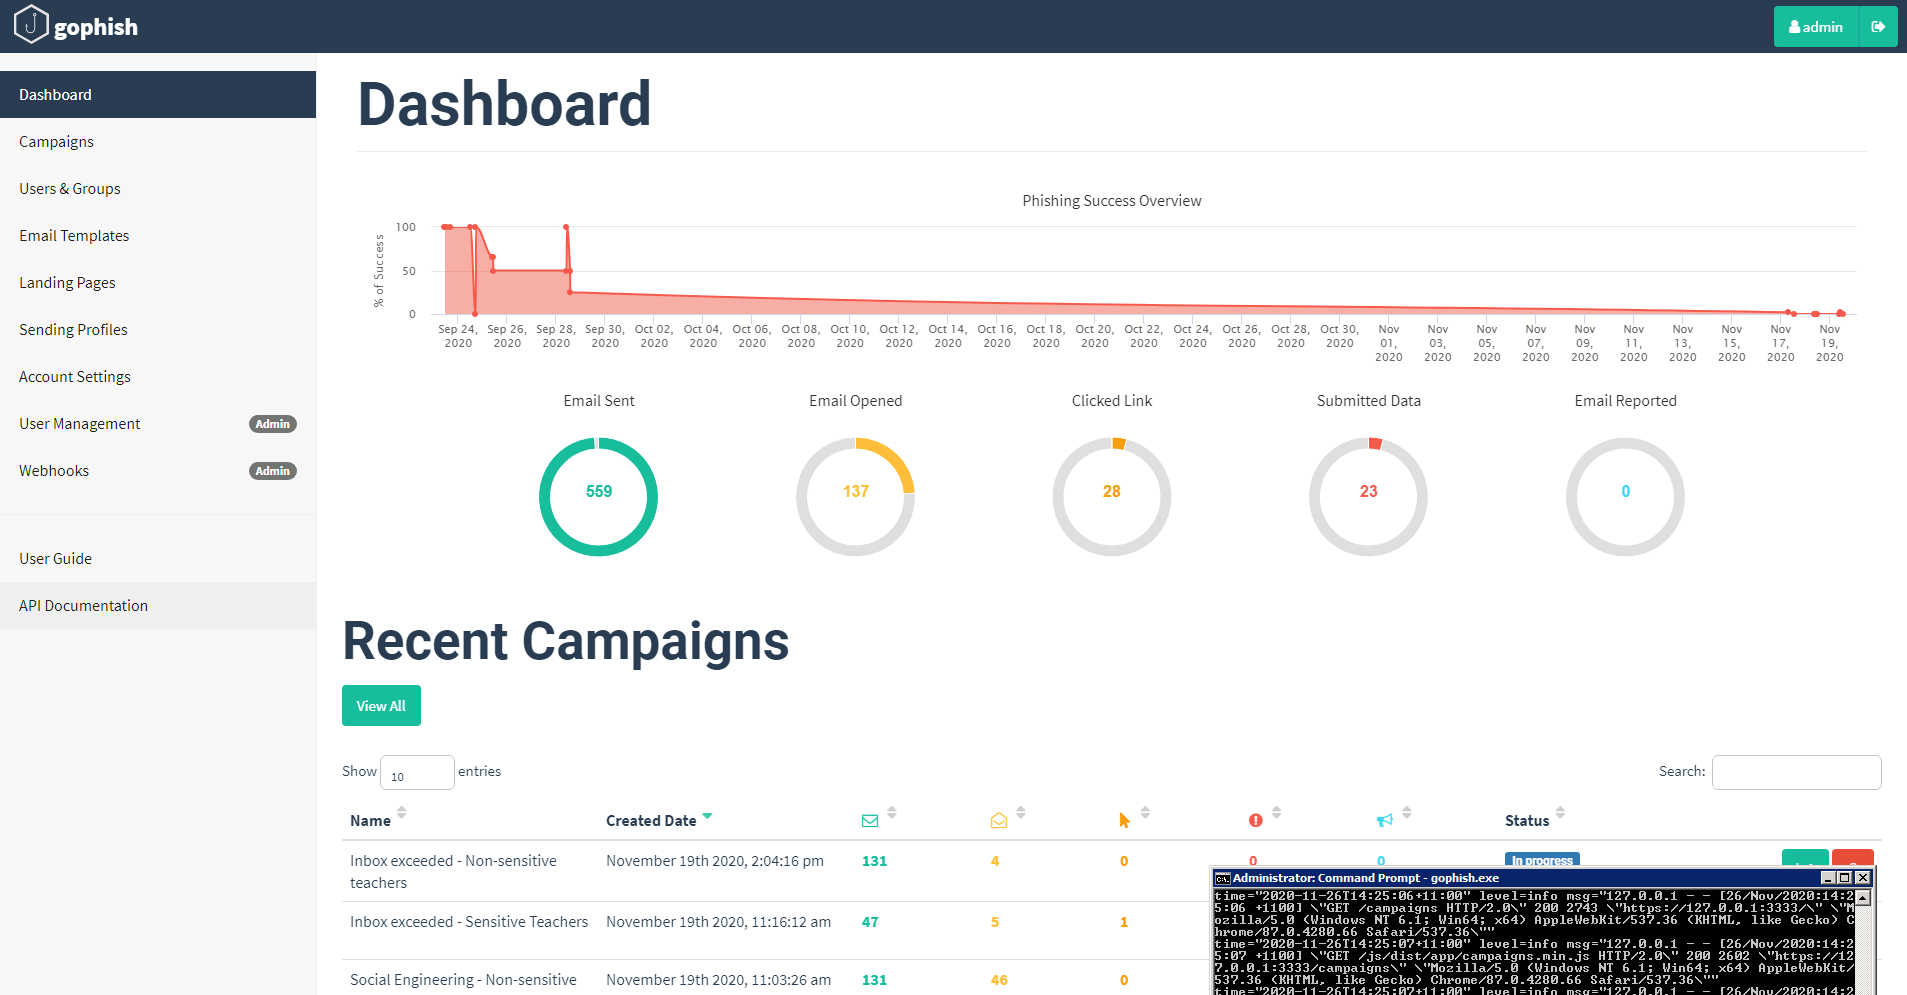
Once launched, we kept an eye on various campaigns through the Dashboard page. Campaigns were conducted with groups over a period of three days using different email+landing page combinations.
Replies to the spearphishing emails went to a fake email account. To each reply we informed the person replying that they had been sent a fake phishing email, what they should have done and that they should then undertake training. Again, a pre-determined text response was used.
See Also
Image conversion tools…
Docs…
Our Experience
On the whole, the experience of running phishing training was generally positive. Most staff expressed a keenness to be tested when the exercise was discussed publicly. Only a couple of staff said they felt uncomfortable after failing the exercise. Responses from staff allowed us to improve our advice during training and for a future repetition.
It’s hard to know exactly how many emails were received by users as some would have been filtered by users’ email clients. It’s also hard to know how many people looked at the emails as the tracking images would have been hidden by most users email clients, unless they chose to reveal them. We did get some numbers, which rounded out as follows.
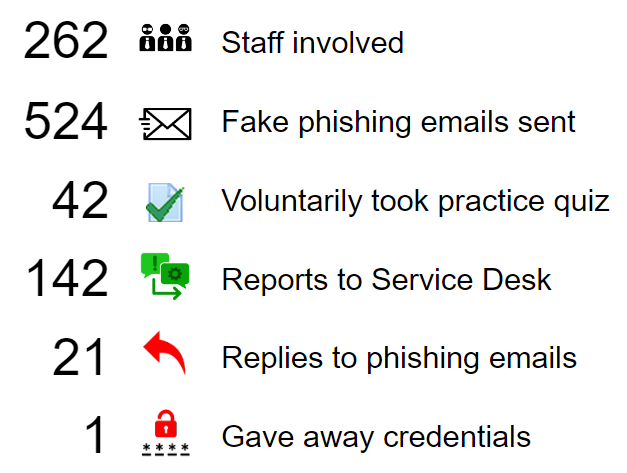
While not all staff responded in an ideal fashion, awareness was raised and people who failed the exercise were directed to remedial training. Ultimately a positive education exercise was achieved.
The testing also shows our email system responds appropriately to most phishing emails and can be trained when users identify emails as Junk. This was also good training for Service Desk staff.
The phishing system can be reused in future if this exercise needs to be repeated.
Awesome Explanation and Great work., Following tools will also help you for phishing exercise
Setoolkit, Weeman and socialfish